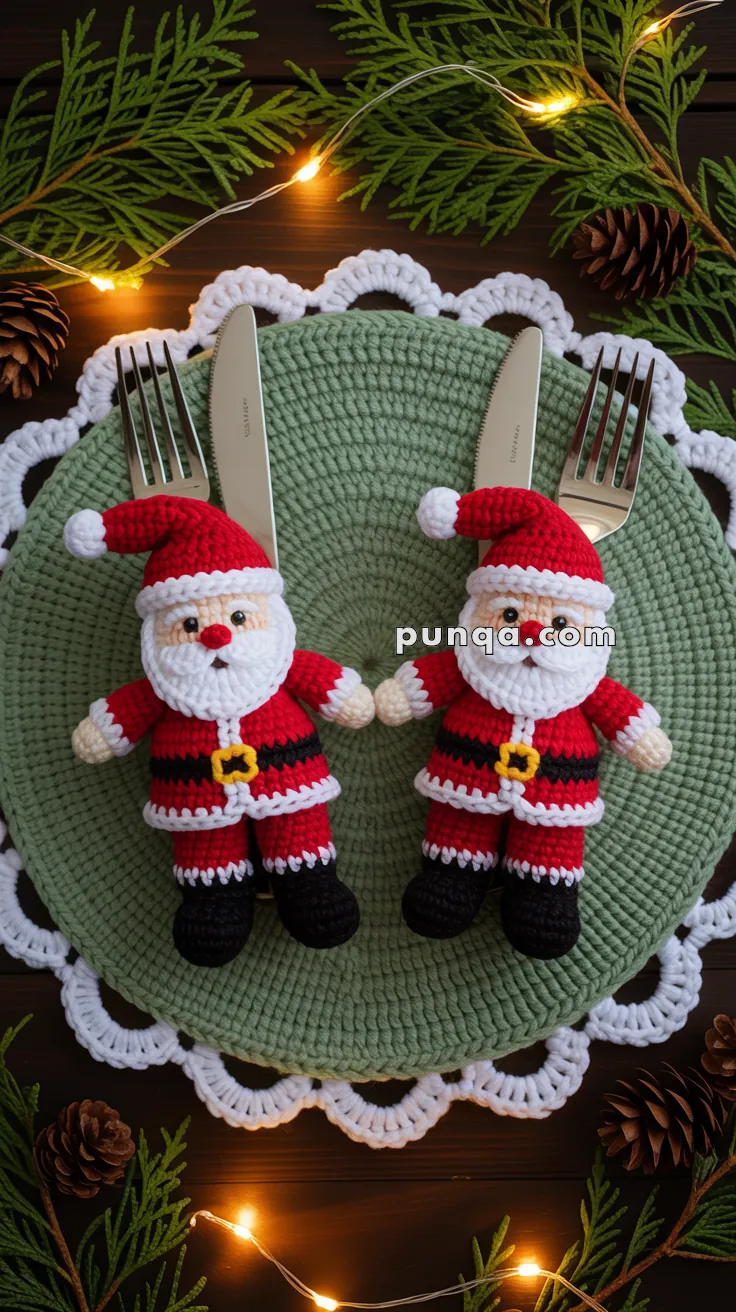
Add a playful touch of holiday magic to your dining room with the Amigurumi Santa Cutlery Holder, a crochet project that’s as festive as it is functional! 🎅🧶 These adorable little Santas are designed to hold a fork and knife neatly behind their arms, making them the perfect companions for your Christmas table setting. With soft floppy legs and a flat base, they sit comfortably in place while bringing instant cheer to every meal.
Complete with all the classic Santa details—a bright red suit, fluffy beard, tiny belt buckle, and a cozy pom-pom hat—these cutlery holders are sure to delight family and guests alike. Whether you make a full set for a holiday feast or just a few to add a whimsical touch, the Amigurumi Santa Cutlery Holder is a joyful way to crochet celebration, coziness, and a sprinkle of handmade magic—one loop at a time! 🧵✨🎄
🎅 Amigurumi Santa Cutlery Holder Crochet Pattern
Create the sweetest Christmas table setting with these adorable Santa cutlery holders! Each Santa features a flat, oval-style body, soft floppy legs, a curved hat with a pom-pom, a rounded beard, and tiny arms leaving a space behind them to hold a fork and knife. Perfect for decorating each plate and adding cozy handmade charm to your holiday gatherings.
✨ Skill Level
Beginner to Intermediate – basic shaping, color changes, and simple assembly.
📏 Finished Size
Approx. 16–18 cm tall using DK yarn and a 2.5–3.0 mm hook.
🧶 Materials
- DK yarn:
• Red (suit & hat)
• White (trim, beard, cuffs, hat brim)
• Beige (skin)
• Black (belt & boots)
• Yellow (belt buckle) - 2.5–3.0 mm crochet hook
- 6–8 mm safety eyes or black embroidery thread
- Fiberfill (minimal stuffing—body must stay flat)
- Yarn needle & scissors
- Optional: blush for cheeks
🧵 Abbreviations (US)
MR – magic ring
sc – single crochet
inc – increase
dec – decrease
sl st – slip stitch
ch – chain
FO – fasten off
😊 Head (Beige)
The Santas in the photo have round, slightly flat heads.
Light stuffing only.
- MR, 6 sc
- inc x6 → 12
- (1 sc, inc) x6 → 18
- (2 sc, inc) x6 → 24
5–9) sc around (24) - (2 sc, dec) x6 → 18
- sc around (18)
- (1 sc, dec) x6 → 12
Lightly stuff. - dec x6 → 6, FO.
Insert safety eyes between rounds 6–7, spaced 5 sts apart.
🧔 Beard & Mustache (White)
The beard in the photo is wide and rounded with strong horizontal texture.
Beard
Ch 13
Row 1: sc in 2nd ch and across (12)
Row 2: ch 1, sc across (12)
Row 3: ch 1, sc across (12)
Row 4: surface-sl-st along the bottom edge for texture
FO and shape into a gentle curved plate. Sew under eyes.
Mustache
Ch 7
Row 1: sc in each (6), FO.
Pinch the center and sew on top of beard.
👃 Nose (Red)
MR, 6 sc, FO.
Sew centered just above the mustache.
🎅 Hat (Red + White)
The hats in the photo are long, slightly curved, with a thick white brim.
Using red:
- MR, 4 sc
- (1 sc, inc) x2 → 6
- (2 sc, inc) x2 → 8
- (3 sc, inc) x2 → 10
- (4 sc, inc) x2 → 12
- (5 sc, inc) x2 → 14
- (6 sc, inc) x2 → 16
- (7 sc, inc) x2 → 18
- (8 sc, inc) x2 → 20
- (9 sc, inc) x2 → 22
- (10 sc, inc) x2 → 24
12–18) sc around (24)
Switch to white:
19) sc around
20) sl st around for fluffy brim, FO.
Pom-pom
MR, 6 sc or attach a tiny white pom-pom.
Sew to tip and lightly bend hat over to one side.
🧥 Body (Red)
The body in the photo is wide, flat, and oval-shaped. Minimal stuffing.
- MR, 6 sc
- inc x6 → 12
- (1 sc, inc) x6 → 18
- (2 sc, inc) x6 → 24
- (3 sc, inc) x6 → 30
6–13) sc around (30)
Switch to white:
14) sc around (30) for bottom coat trim
FO.
Stuff bottom 1/3 only to keep body flat like the photo.
🖐 Arms (Make 2 – Beige → Red → White)
In the photo, the arms are straight, slightly short, and sit outward to leave space for cutlery. Not stuffed.
Hands (Beige):
- MR, 6 sc
2–3) sc around (6)
Switch to red:
4–7) sc around (6)
Switch to white:
8) sl st around for cuff
FO.
Do not stuff.
Sew arms angled outward so fork & knife slide behind them.
👖 Legs (Make 2 – Red → White → Black)
Photo shows short red pants, thin white stripe, and chunky soft black boots with flat bases.
Start with red:
- MR, 6 sc
- inc x6 → 12
3–5) sc around (12)
Switch to white:
6) sl st around (12)
Switch to black:
7–12) sc around (12)
13) (2 sc, dec) x3 → 9
14) sc around (9)
FO.
Lightly stuff the boots only.
Sew legs to very bottom edge of body so they hang freely.
🔔 Belt (Black)
Ch 26
Sl st across, FO.
Wrap around waist and stitch.
🟡 Belt Buckle (Yellow)
Ch 6, join into loop
Sl st around
Sew to center front, leaving black belt showing clearly through the middle—just like in the photo.
🧵 Assembly
- Sew head onto flat top of body.
- Attach beard, mustache, nose.
- Sew hat slightly forward so the brim touches top of forehead.
- Add blush to cheeks.
- Sew arms so a horizontal gap remains behind them for cutlery.
- Sew legs to bottom, leaving them floppy.
- Slide fork & knife behind arms on each Santa.
🎄 Outro
These charming Santas bring warmth and whimsy to every holiday table. Their soft shape, cute faces, and cozy textures make them unforgettable gifts and décor pieces. Mix and match them across your Christmas table for a festive, joyful setup everyone will love! 🎅✨


super merci!!!