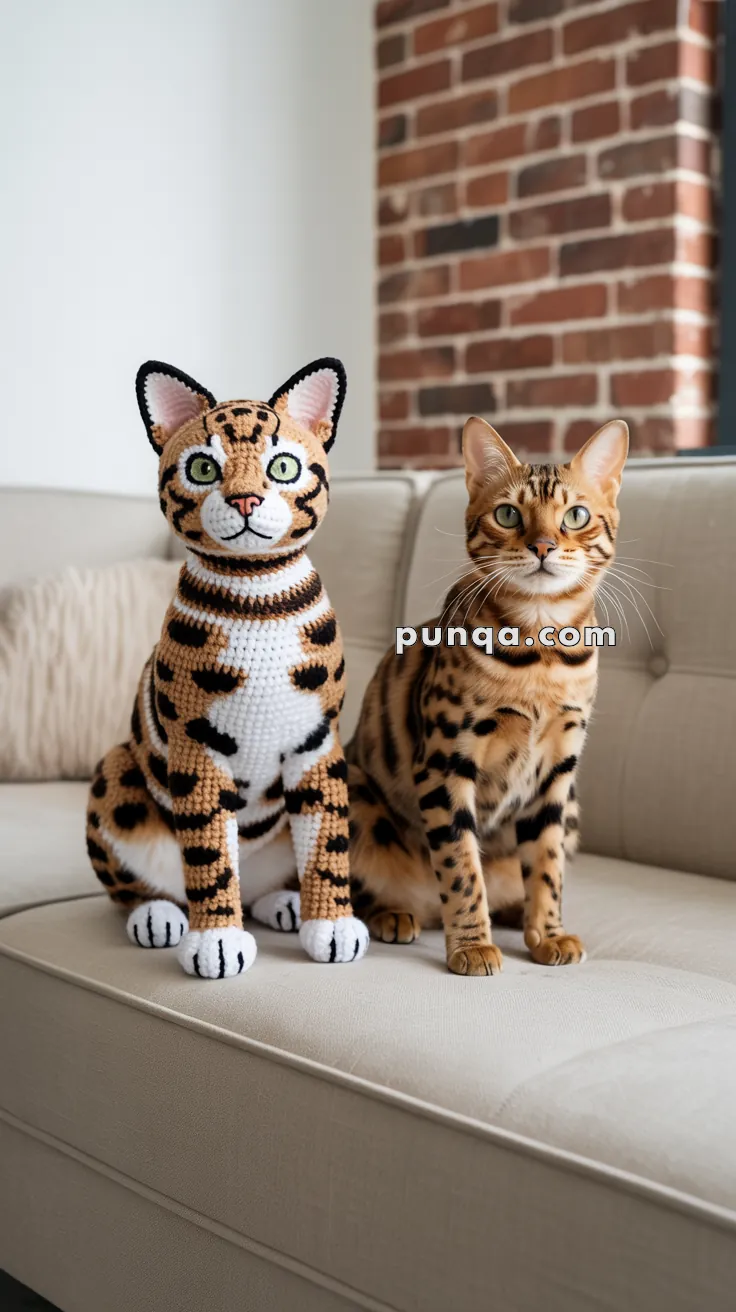
Bring a touch of wild elegance to your crochet collection with the Amigurumi Bengal Cat, a striking project that captures the beauty and personality of this exotic feline! 🐆🧶 With its sleek body, expressive eyes, and signature spotted coat, this handmade kitty is full of charm and character. Whether you’re crafting for a cat lover, decorating a cozy corner, or adding to your amigurumi menagerie, the Bengal cat is sure to stand out with its bold markings and playful pose.
Perfect for crocheters who enjoy detailed shaping and lifelike features, this pattern invites you to explore color changes, soft textures, and a dash of feline flair. Customize your Bengal with different spot patterns, add a little collar, or pose it next to other crochet pets for a full handmade zoo. The Amigurumi Bengal Cat is a fun and rewarding way to stitch up personality, elegance, and a sprinkle of jungle-inspired joy—one loop at a time! 🧵🐾
🐆 Amigurumi Bengal Cat Crochet Pattern
Bring the bold beauty of the Bengal cat to life with this detailed amigurumi pattern. With its tall ears, expressive green eyes, elegant posture, ringed neck, striking rosettes, and clean white paws, this handmade feline makes an unforgettable display piece for any cat lover. The structured body and intricate colorwork create a stunning crocheted companion with realistic charm.
✨ Skill Level
Advanced
Includes integrated shaping, seated body construction, surface embroidery, and precise assembly.
📏 Finished Size
Approx. 30–32 cm (12–12.5 in) tall
(using worsted-weight yarn and a 3.5 mm hook)
🧶 Materials
Yarn (Worsted Weight)
- Tan / light brown – main body
- White – chest, belly, paws, muzzle
- Black – outlines, rosettes, stripes
- Dark brown – rosette centers
- Pink – nose and inner ears
Tools & Supplies
- 3.5 mm crochet hook
- 14–16 mm green safety eyes
- Polyester fiberfill
- Tapestry needle
- Stitch markers
- Scissors
Work in continuous rounds unless otherwise stated.
🧵 Abbreviations (US Terms)
MR – Magic Ring
sc – Single Crochet
inc – Increase (2 sc in same stitch)
dec – Invisible Decrease (sc2tog)
sl st – Slip Stitch
st(s) – Stitch(es)
FO – Fasten Off
🐱 Head (Tan)
R1: MR, 6 sc (6)
R2: inc ×6 (12)
R3: (sc, inc) ×6 (18)
R4: (2 sc, inc) ×6 (24)
R5: (3 sc, inc) ×6 (30)
R6: (4 sc, inc) ×6 (36)
R7: (5 sc, inc) ×6 (42)
R8–11: sc around (42)
R12: (6 sc, inc) ×6 (48)
R13–14: sc around (48)
R15: (6 sc, dec) ×6 (42)
R16: sc around (42)
R17: (5 sc, dec) ×6 (36)
R18: (4 sc, dec) ×6 (30)
R19: (3 sc, dec) ×6 (24)
Insert eyes between R12–R13, spaced 14–15 sts apart.
R20: (2 sc, dec) ×6 (18)
R21: (sc, dec) ×6 (12)
Stuff firmly, shaping a slightly oval head.
R22: dec ×6 (6)
FO and close.
🐾 Muzzle (White)
R1: MR, 6 sc (6)
R2: inc ×6 (12)
R3: (sc, inc) ×6 (18)
R4: (2 sc, inc) ×6 (24)
R5–6: sc around (24)
Stuff lightly and sew low and centered on the face.
Embroider a pink triangle nose and black mouth.
Add 3–4 whisker dots per side.
👁 Eye Details
- Outline eyes with black surface stitching
- Add short tan upper and lower eyelids using small chains
- Angle outer corners slightly downward for a feline expression
🐾 Ears (Make 2)
Outer Ear (Tan)
R1: MR, 4 sc (4)
R2: (sc, inc) ×2 (6)
R3: (2 sc, inc) ×2 (8)
R4: (3 sc, inc) ×2 (10)
R5: (4 sc, inc) ×2 (12)
R6–8: sc around (12)
FO.
Inner Ear (Pink)
Work R1–R4 of outer ear.
FO and sew inside.
Outline ear edges with black surface stitch.
Attach ears tall and slightly angled outward.
🐆 Neck (Compact, Ringed)
Pick up 28 sts evenly around head opening.
R1–2: sc around (28) tan
R3: sc around (28) black
R4–5: sc around (28) tan
R6: sc around (28) black
R7: sc around (28) tan
R8: (2 sc, dec) ×7 (21)
R9: sc around (21)
Lightly stuff and FO.
🐈 Body with Integrated Haunches (Seated)
Begin in white.
R1: MR, 6 sc (6)
R2: inc ×6 (12)
R3: (sc, inc) ×6 (18)
R4: (2 sc, inc) ×6 (24)
R5: (3 sc, inc) ×6 (30)
R6: (4 sc, inc) ×6 (36)
R7: (5 sc, inc) ×6 (42)
R8–9: sc around (42)
Maintain an 8-stitch white belly panel, centered.
R10–14:
34 tan, 8 white (42)
Hip & Haunch Shaping (Integrated)
R15: (6 sc, inc) ×6 (48)
R16–18: sc around (48)
R19: (7 sc, inc) ×6 (54)
R20–21: sc around (54)
This creates the rounded haunch mass.
Seat Closure
R22: (7 sc, dec) ×6 (48)
R23: sc around (48)
R24: (6 sc, dec) ×6 (42)
R25: (5 sc, dec) ×6 (36)
R26: (4 sc, dec) ×6 (30)
Stuff firmly, concentrating stuffing into the haunches.
R27: (3 sc, dec) ×6 (24)
R28: (2 sc, dec) ×6 (18)
R29: (sc, dec) ×6 (12)
R30: dec ×6 (6)
FO and close.
The base should be rounded, flat, and stable.
🦶 Front Legs (Slim) – Make 2
Paw (White)
R1: MR, 6 sc (6)
R2: inc ×6 (12)
R3: (sc, inc) ×6 (18)
R4: sc around (18)
R5: (sc, dec) ×6 (12)
Leg (Tan)
R6: (sc, inc) ×6 (18)
R7: (sc, dec) ×3 (15)
R8–14: sc around (15)
Stuff firmly.
FO.
Embroider 3 black toe lines.
Attach close together under the chest, paws flat.
🦵 Back Legs (Lower Section Only) – Make 2
These attach directly under the integrated haunch mass.
R1: MR, 6 sc (6)
R2: inc ×6 (12)
R3: sc around (12)
R4: (sc, dec) ×4 (8)
Change to white.
R5: sc around (8)
R6: (2 sc, dec) ×2 (6)
Stuff lightly.
FO.
Attach directly under the haunch curve so knees sit high and paws tuck forward.
Embroider 3 black toe lines.
🌀 Tail
R1: MR, 6 sc (6)
R2: inc ×6 (12)
R3–4: sc around (12) tan
R5: sc around (12) black
Repeat:
2 rounds tan
1 round black
Finish with 3 rounds black.
Stuff lightly and attach high on the back with a gentle curve.
🎨 Rosette Markings
Centers: dark brown
Outlines: black surface stitch
Placement
- Head: forehead stripe, cheek spots
- Neck: small dots beneath rings
- Torso sides: staggered rosettes (small → medium → large toward haunches)
- Back: irregular rosettes and dots
- Haunches: medium rosettes
- Tail base: a few rosettes before banding
🧩 Assembly
- Sew neck to body securely
- Attach head with a slight forward tilt
- Attach front legs under chest
- Attach back paws tucked under haunches
- Shape posture gently by hand
✨ Finishing Touches
- Add soft blush to cheeks and ears
- Adjust rosette placement for balance
- Ensure paws rest evenly
💚 Your Finished Bengal Cat
Your crocheted Bengal cat now sits proudly with true feline anatomy, wide rounded haunches, slim elegant limbs, expressive features, and realistic markings. This photo-accurate amigurumi captures the breed’s wild beauty and calm confidence, making it a striking centerpiece for any handmade collection.
Happy crocheting 🐆✨