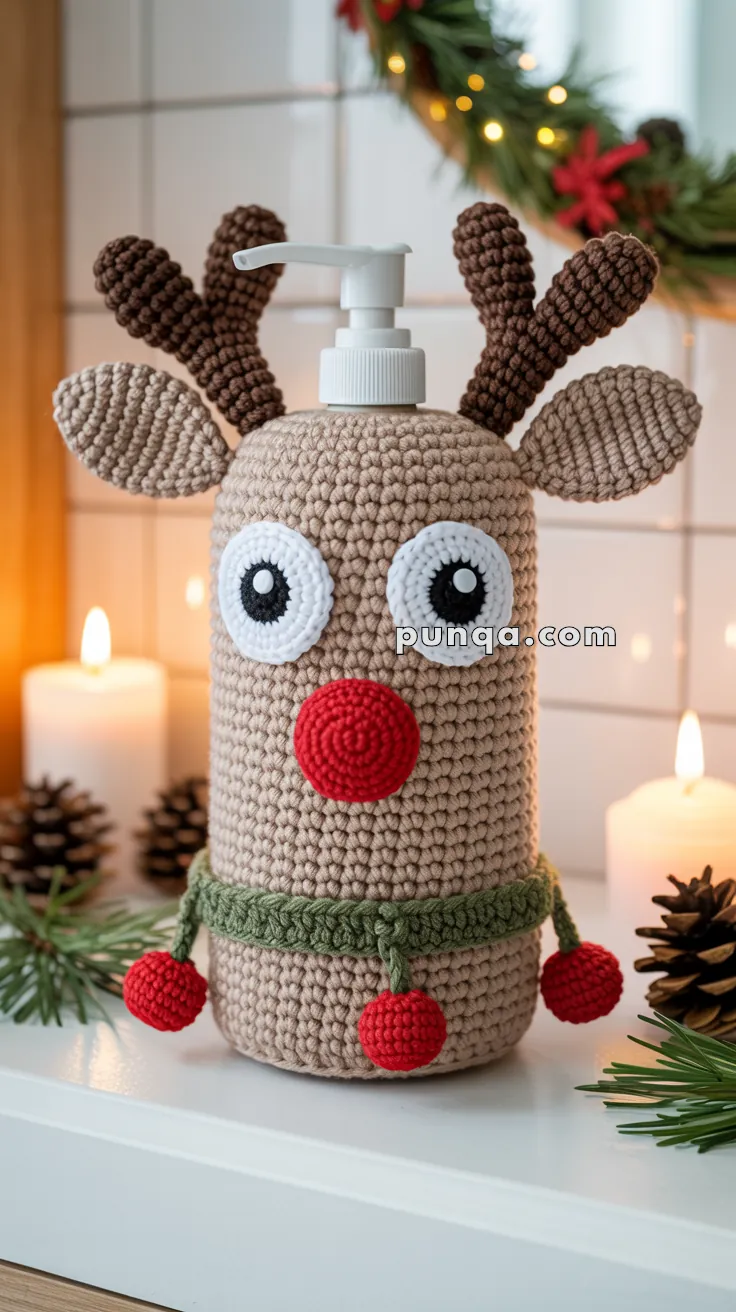
Add a dash of holiday cheer to your sink with the Reindeer Soap Dispenser Cover, a festive crochet project that turns your everyday soap bottle into a merry little Rudolph! 🧼🦌 With big eyes, a bright red nose, playful antlers, and a holly-style collar, this charming cover brings seasonal magic to your kitchen or bathroom. It’s a quick and whimsical way to make handwashing feel like part of the holiday fun.
Perfect for crocheters who love joyful details and functional décor, this pattern invites you to explore bold shapes, cozy textures, and a sprinkle of Christmas spirit. Whether you’re crafting it for your own home, gifting it to a holiday-loving friend, or adding a handmade touch to your winter market table, the Reindeer Soap Dispenser Cover is a delightful way to stitch up festive flair—one loop at a time! 🧵🎄
🦌 Crochet Reindeer Soap Dispenser Cover Pattern
Make your soap dispenser festive with this adorable reindeer cover! Featuring big white eyes, a bold red nose, floppy ears, upright antlers, and a green collar with red baubles, this design transforms an everyday item into Christmas cheer.
🧵 Skill Level
Intermediate – You should be comfortable with basic stitches, crocheting in the round, sewing parts together, and optionally inserting wire into pieces (for the antlers).
📏 Finished Size
- Height: ~7.5 in (19 cm) tall (without pump)
- Width: Fits a standard cylindrical soap dispenser (approx. 6–7 in circumference).
- Antlers add ~2 in (5 cm) extra height.
👉 The size can be easily adjusted by adding or reducing rounds in the body section to match your dispenser’s height.
✨ Materials
- Worsted weight yarn in:
- Beige/Tan (body, ears)
- Brown (antlers)
- White (eyes)
- Black (eye pupils, optional smile)
- Red (nose, baubles)
- Green (collar)
- 3.5–4 mm crochet hook
- Yarn needle
- Scissors
- Stitch marker
- Fiberfill stuffing (nose & baubles)
- Pipe cleaners or 1 mm floral wire (for antlers)
- Soap dispenser
🧶 Abbreviations (US Terms)
- MR = magic ring
- sc = single crochet
- inc = increase (2 sc in one stitch)
- dec = decrease (sc2tog)
- sl st = slip stitch
- ch = chain
- FO = fasten off
🟤 Body (Beige/Tan)
- MR, 6 sc (6)
- inc x6 (12)
- (1 sc, inc) x6 (18)
- (2 sc, inc) x6 (24)
- (3 sc, inc) x6 (30)
- (4 sc, inc) x6 (36)
- (5 sc, inc) x6 (42)
8–40. sc in each st (42) — adjust height to fit your soap dispenser.
FO and weave in ends.
⚪ Eyes (make 2, White)
- Round 1: MR, 6 sc (6)
- Round 2: inc x6 (12)
- Round 3: (1 sc, inc) x6 (18)
FO, leave long tail.
Pupils (make 2, Black)
- MR, 8 sc (8)
FO, leave tail.
🔴 Nose (Red)
- MR, 6 sc (6)
- inc x6 (12)
- (1 sc, inc) x6 (18)
4–5. sc around (18) - (1 sc, dec) x6 (12)
- dec x6 (6)
Stuff, FO, leave tail.
🦌 Antlers (make 2, Brown)
Main Stem
- MR, 6 sc (6)
2–14. sc around (6)
Branches (make 2 per antler)
- MR, 6 sc (6)
2–6. sc around (6)
Assembly
- Insert pipe cleaner or floral wire inside the main stem and each branch.
- Twist branch wires around main stem wire to secure.
- Crochet over the wire as you assemble, or sew branches onto the stem afterward.
- Lightly stuff if needed.
👉 This wire support keeps antlers upright and stable, just like in the photo.
👂 Ears (make 2, Beige/Tan)
- MR, 6 sc (6)
- inc x6 (12)
3–6. sc around (12)
Flatten, FO with tail.
🎀 Collar (Green)
- Ch 50, join into a ring.
- Round 1: sc around.
- Round 2: sl st in each st for edging.
FO, leave tail.
🔴 Baubles (make 3, Red)
- MR, 6 sc (6)
- inc x6 (12)
- (1 sc, inc) x6 (18)
- sc around (18)
- (1 sc, dec) x6 (12)
- dec x6 (6)
Stuff firmly, FO.
Sew onto collar.
🧵 Assembly
- Sew eyes to the body (about ⅓ down from top).
- Attach black pupils to the center of the eyes.
- Sew nose directly below eyes.
- Sew antlers on top of head, about 5–6 sts apart, using the wire to pose them upright.
- Attach ears slightly below antlers, angled outward.
- Wrap collar around base and sew.
- Attach red baubles evenly spaced on the collar.
🎄 Final Touch
Slip your reindeer cover onto the dispenser and adjust the antlers so they stand tall. The wide eyes, bright red nose, and festive collar make this little reindeer the perfect handmade accent for the holidays. A delightful detail that brings Rudolph’s charm right into your kitchen or bathroom!