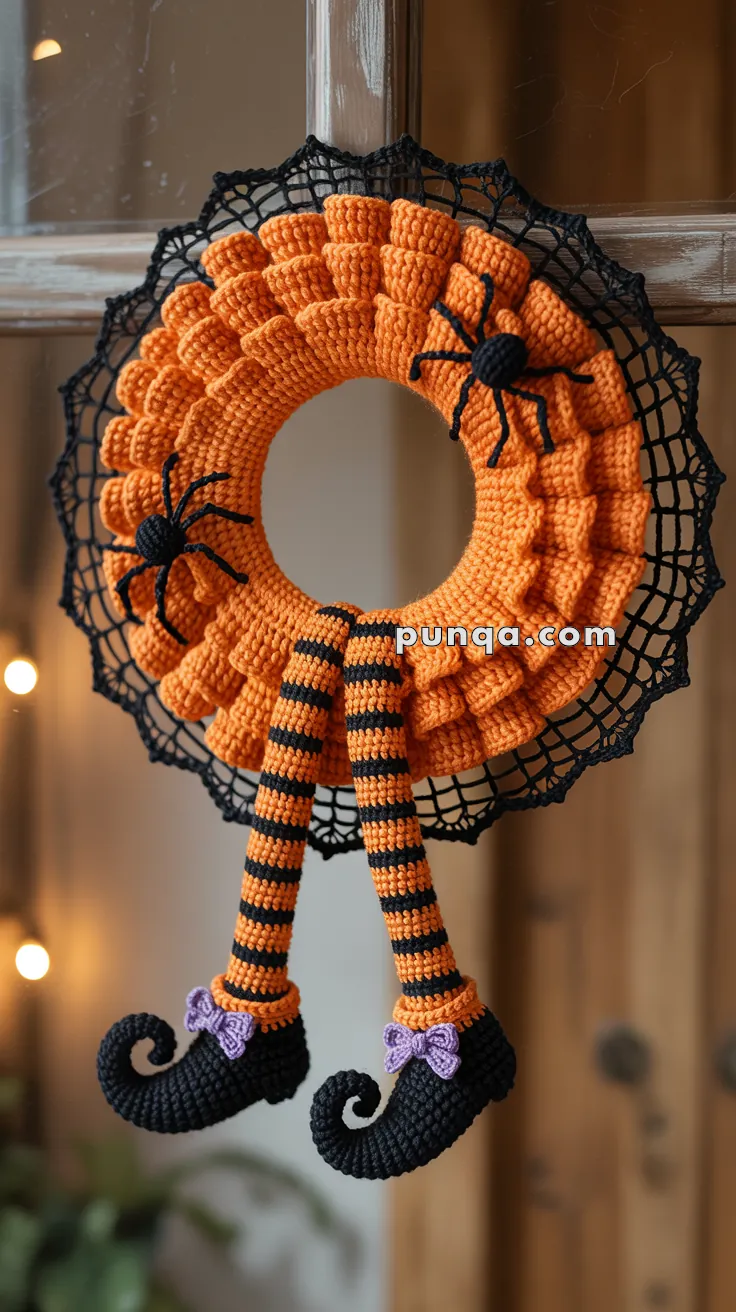
Add a wickedly whimsical touch to your Halloween décor with the Witch Legs & Spider Webs Wreath, a spooktacular crochet project that’s bursting with personality! 🧙♀️🧶 Featuring bold pumpkin-orange ruffles, a delicate black lace web border, and dangling witch legs with curled shoes, this wreath is a playful mix of creepy and cute. Whether it’s hanging on your front door or brightening up a party space, it’s sure to enchant trick-or-treaters and guests alike.
Perfect for crocheters who love dramatic textures and festive flair, this pattern invites you to get creative with color, embellishments, and spooky accents like creepy spiders and glittery yarn. Make it as a standalone statement piece or pair it with matching Halloween crafts for a full haunted-home vibe. The Witch Legs & Spider Webs Wreath is a thrilling way to stitch up seasonal charm, one loop at a time! 🎃🧵
🧙♀️ Halloween Witch Legs & Spider Webs Wreath Crochet Pattern
Turn your front door into a spooky showstopper with this handmade Halloween Witch Wreath! Featuring plump pumpkin-orange ruffles, a black lace spiderweb border, dangling striped witch legs with curled shoes, and creepy little spiders, this festive project is sure to enchant (and spook!) your October visitors.
✨ Skill Level
Intermediate – uses textured stitches (FPdc), color changes, 3D shaping, and lacework.
📏 Finished Size
- Wreath base: 30 cm (12 in) foam ring
- Lace border adds: 5–6 cm (2–2.5 in) around
- Legs: 20–22 cm (8–9 in) long each
- Shoes: 6–7 cm (2.5–3 in) each
- Total hanging length: ~50 cm (20 in)
🧶 Materials
Yarn
- Worsted weight yarn (category 4):
- Orange: 200–250 g (wreath cover + ruffles)
- Black: 100–150 g (lace, shoes, spiders, stripes)
- Purple: 10 g (bows)
Tools & Notions
- 4 mm (G/6) crochet hook
- 30 cm (12 in) foam wreath form
- Polyfill stuffing (small amount for legs, shoes, spiders)
- 2 pipe cleaners (optional, for posable legs)
- Yarn needle
- Scissors
- Stitch markers
- Hot glue gun (optional, for reinforcement)
Gauge
18 sc × 20 rows = 10 cm (4 in) in single crochet
Gauge is not critical but will affect yarn amounts and final size.
🔤 Abbreviations (US Terms)
MR = Magic Ring ch = chain sc = single crochet hdc = half double crochet dc = double crochet FPdc = front post double crochet inc = increase (2 sc in same stitch) dec = decrease (sc2tog) sl st = slip stitch st(s) = stitch(es) rep = repeat FO = fasten off BLO = back loop only
🎃 PART 1: Wreath Base with Pumpkin Ruffles
Instructions
With orange yarn:
Foundation: Ch 24
Row 1: Sc in 2nd ch from hook and in each ch across (23 sc). Ch 1, turn.
Row 2: Sc in each st across (23 sc). Ch 1, turn.
Row 3: Sc in each st across (23 sc). Ch 1, turn.
Row 4 (Ruffle Row): FPdc around the post of each sc from Row 2 (working over Row 3). Ch 1, turn. (This creates the raised “pumpkin rib” texture.)
Row 5: Sc in each st across (23 sc). Ch 1, turn.
Repeat Rows 2-5 until your piece measures 95–100 cm (37–39 in) long. This should be approximately 75–80 rows total.
Final Row: Sc across. FO, leaving a 50 cm (20 in) tail for sewing.
Assembly
- Wrap the orange rectangle around the foam wreath form, with the textured side facing out.
- Align the short edges at the back of the wreath.
- Using the long tail and yarn needle, whipstitch the edges together, pulling snugly.
- Weave in the starting tail.
🕸️ PART 2: Black Lace Spiderweb Border
With black yarn:
Round 1 (Foundation)
Join black yarn to any stitch on the back inner edge of the wrapped wreath.
Ch 1, work sc evenly around the inner circumference. You should have approximately 90–100 sc. Join with sl st to first sc. (Exact number isn’t critical, but should be divisible by 5.)
Adjust if needed: If your count isn’t divisible by 5, add or skip 1–2 sc. Mark your final count.
Round 2 (First Web Layer)
Ch 1, sc in same st, ch 5, skip 4 sc, sc in next sc, rep from * around. You should have 18–20 ch-5 spaces. Join with sl st to first sc.
Round 3 (Shell Points)
Sl st into first ch-5 space, ch 1, (sc, hdc, 3 dc, hdc, sc) in ch-5 space, rep from * around. Join with sl st to first sc. (Creates scalloped shells.)
Round 4 (Extended Web)
Sl st to center dc of first shell, ch 7, sl st to center dc of next shell, rep from * around. Join with sl st to base of first ch-7.
Round 5 (Final Points)
Sl st into first ch-7 space, ch 1, (sc, hdc, 5 dc, hdc, sc) in ch-7 space, rep from * around. Join with sl st to first sc. FO and weave in ends.
Shaping Tip: Lightly steam-block or pin the lace points outward to maintain their spiderweb shape.
🦵 PART 3: Witch Legs (Make 2)
With orange yarn:
Leg Tube
Round 1: MR, 6 sc into ring. Join with sl st. (6 sc)
Round 2: Ch 1, inc in each st around. Join. (12 sc)
Rounds 3–6: Ch 1, sc in each st around. Join. (12 sc)
Change to black yarn:
Rounds 7–9: Ch 1, sc in each st around. Join. (12 sc)
Change to orange yarn:
Rounds 10–12: Ch 1, sc in each st around. Join. (12 sc)
Continue alternating colors (3 rounds black / 3 rounds orange) until leg measures 20–22 cm (8–9 in) or approximately 32–36 rounds total.
Last Round: With black, sc around. FO, leaving a 40 cm (16 in) tail for attaching.
Stuffing & Shaping
Option 1 (Dangly): Stuff only the top 1/3 of the leg lightly. Leave the lower portion unstuffed so legs hang naturally.
Option 2 (Posable): Insert a pipe cleaner through the center before stuffing. Trim to size. This allows you to bend the legs.
🥿 PART 4: Witch Shoes with Curled Toes (Make 2)
With black yarn:
Sole
Foundation: Ch 16
Round 1: Starting in 2nd ch from hook: sc in next 14 ch, 3 sc in last ch (toe area); continue working on opposite side of foundation chain: sc in next 14 ch, 2 sc in last ch. Join with sl st to first sc. (33 sc)
Place marker in center sc of the 3-sc group (toe tip).
Sides
Rounds 2–4: Ch 1, sc in each st around. Join. (33 sc)
Toe Shaping
Round 5: Ch 1, sc in next 13 sts, dec 3 times (across toe), sc in next 14 sts. Join. (30 sc)
Round 6: Ch 1, sc in next 12 sts, dec twice, sc in next 14 sts. Join. (28 sc)
Round 7: Ch 1, sc in each st around. Join. (28 sc)
Heel Shaping
Round 8: Ch 1, sc in next 14 sts, dec twice, sc in next 10 sts. Join. (26 sc)
Round 9: Ch 1, sc in each st around. Join. (26 sc)
FO, leaving a 30 cm (12 in) tail for sewing.
Creating the Curled Toe
- Stuff shoe lightly, focusing on the heel and middle.
- Leave toe area less stuffed and flexible.
- Using your fingers, fold the toe tip upward and inward to create a curl.
- Using black yarn and needle, tack the toe in place by sewing through the underside and securing to the shoe front. Take 3–4 small stitches to hold the curl.
- Shape into an exaggerated witch-shoe curve.
Attach Leg to Shoe
- Insert the bottom of the leg into the top opening of the shoe.
- Using the long tail from the leg, sew around the opening with whipstitch, joining leg to shoe securely.
- Optional: Add a dot of hot glue inside for extra stability.
🎀 PART 5: Purple Bows (Make 2)
With purple yarn:
Foundation: Ch 12
Row 1: Hdc in 3rd ch from hook and in each ch across (10 hdc). FO, leaving a 25 cm (10 in) tail.
Shaping the Bow
- Fold the strip in half to find the center.
- Pinch the center together.
- Wrap the yarn tail tightly around the center 3–4 times to create the bow shape.
- Secure with a knot on the back.
- Trim excess, leaving a 10 cm (4 in) tail for sewing.
Attach Bows
Sew one bow to the outside of each shoe, positioned just above where the leg enters the shoe.
🕷️ PART 6: 3D Spiders (Make 2–3)
With black yarn:
Spider Head
Round 1: MR, 6 sc into ring. Do not join; work in spiral. (6 sc)
Round 2: Inc in each st around. (12 sc)
Rounds 3–4: Sc in each st around. (12 sc)
Round 5: Dec around. (6 sc)
Stuff head firmly. FO, leaving a 15 cm (6 in) tail.
Spider Body
Round 1: MR, 6 sc into ring. Do not join; work in spiral. (6 sc)
Round 2: Inc in each st around. (12 sc)
Rounds 3–4: Sc in each st around. (12 sc)
Round 5: Dec around. (6 sc)
Stuff body firmly. FO, leaving a 20 cm (8 in) tail.
Assemble Spider Body
Using the tail from the head, sew the head to the front of the body, creating a figure-8 spider shape.
Spider Legs (Make 8 per spider)
With black yarn:
Ch 6, sl st in 2nd ch from hook and in each ch back to the body. FO, leaving a 10 cm (4 in) tail.
Attach Legs
Sew 4 legs evenly spaced on each side of the spider body, angling them outward and slightly forward. Secure each leg with 2–3 stitches at the base.
🪡 PART 7: Final Assembly
Step 1: Prepare Wreath
Lay the wrapped wreath flat on your work surface with the lace border facing up.
Step 2: Attach Witch Legs
- Position both legs at the bottom center of the wreath, with shoes pointing forward.
- Using the long tails from the legs, sew through the orange cover and around the foam form multiple times for security.
- Space legs about 8–10 cm (3–4 in) apart.
- Make sure stitching goes through to the back for stability.
Step 3: Position Spiders
- Place 2–3 spiders crawling across the orange ruffled section.
- Spread them around the wreath for visual balance (top, sides, etc.).
- Sew each spider securely to the orange cover, stitching through the belly.
Step 4: Shape the Shoes
Adjust the curled toes so they point outward dramatically. Position bows to face forward. Bend legs if using pipe cleaners.
Step 5: Add Hanging Loop
Cut a 30 cm (12 in) length of black yarn. Thread through the back top of the wreath, creating a loop. Tie securely and trim ends.
🌟 Finishing Touches
✅ Steam or block the lace border lightly to help points hold their shape
✅ Adjust leg positions so they dangle naturally and shoes point out
✅ Secure any loose spider legs with small stitches
✅ Weave in all remaining yarn ends
✅ Optional: Hot glue any areas that need reinforcement (leg attachments, shoe curls)
🎉 Your Wreath is Complete!
You now have:
✔ A plump orange pumpkin-textured wreath base
✔ An intricate black spiderweb lace border
✔ Two dangling striped witch legs with curled shoes
✔ Adorable purple bows on the shoes
✔ Creepy 3D spiders crawling across the wreath
Hang on your front door, over a mantel, or anywhere you want to add Halloween charm!
💡 Tips & Variations
- Color Swap: Use lime green instead of orange for a more witchy vibe
- Extra Spooky: Add small black pom-poms as spider eyes
- Size Up: Use a larger wreath form (40 cm) and adjust the base rectangle length accordingly
- Add Sparkle: Weave thin black ribbon with silver thread through the lace border
Happy Haunting! 👻