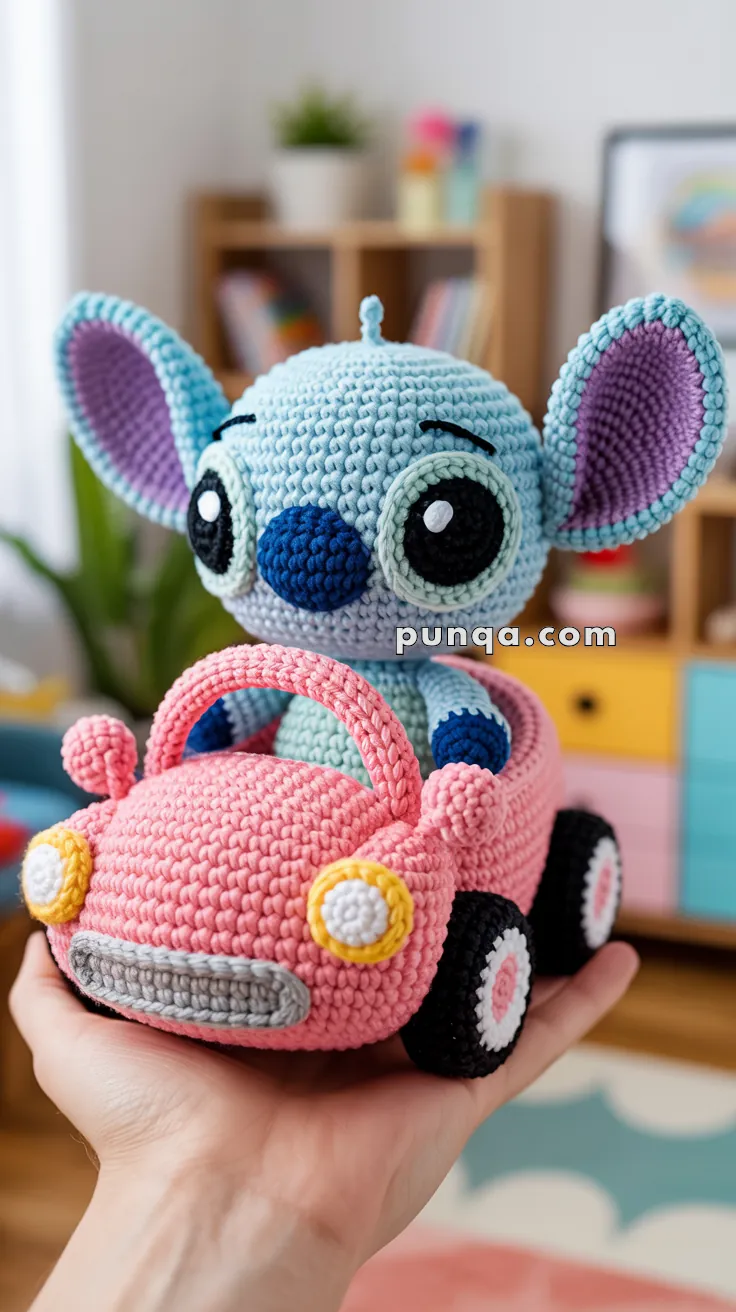
Buckle up for a joyride of cuteness with the Amigurumi Stitch in Pink Car, a whimsical crochet project that’s bursting with personality and playful charm! 💖🚗 Featuring the lovable blue alien Stitch behind the wheel of a retro-style pink car, this design is a delightful mash-up of character and creativity. With expressive eyes, oversized ears, and a car full of adorable details—like tiny wheels, headlights, and a windshield—this project is sure to steal hearts and spark smiles.
Perfect for fans of animated mischief and imaginative crafting, this pattern offers a fun challenge for those who love sculpting characters and accessories in yarn. You can customize the car’s color, add embroidered accents, or even pair Stitch with a matching travel buddy for extra flair. Whether you’re gifting a handmade surprise or adding to your amigurumi collection, the Stitch in Pink Car is a joyful way to stitch up adventure—one playful loop at a time! 🧶🌟
🚗💙 Amigurumi Stitch in Pink Convertible Crochet Pattern
Create the ultimate kawaii ride with this adorable Stitch cruising in his bright pink convertible! With oversized wheels, round headlights, curved hood, arched windshield frame, open seat, tiny side mirrors, and Stitch sitting happily inside, this project is a joy to crochet and makes a stunning display piece for Disney lovers and amigurumi collectors alike. 💕
✨ Skill Level
Intermediate – includes shaping, color changes, and multi-part assembly.
📏 Finished Size
Approx. 20–22 cm (8–9 inches) tall including car
Using DK / worsted yarn and 2.5–3.0 mm hook
🧶 Materials
Yarn (DK / Worsted Weight)
- Light Blue – head, body, ears, arms, legs
- Dark Blue – nose, hands, feet, body spots
- Purple – inner ears
- Pink – car body, hood, mirrors, windshield bars
- Black – wheels, pupils, eyebrows
- White – eye highlights, wheel centers
- Yellow – headlight rims
- Grey – grill
Tools
- 2.5–3.0 mm crochet hook
- Fiberfill stuffing
- Tapestry needle
- Stitch markers
- Scissors
- Black embroidery thread
🧵 Abbreviations (US Terms)
MR – Magic Ring
sc – Single crochet
inc – Increase
dec – Decrease
sl st – Slip stitch
ch – Chain
hdc – Half double crochet
BLO – Back loop only
FO – Fasten off
🔵 Stitch Character
🧠 Head (Light Blue)
R1: MR 6
R2: inc ×6 → 12
R3: (1 sc, inc) ×6 → 18
R4: (2 sc, inc) ×6 → 24
R5: (3 sc, inc) ×6 → 30
R6: (4 sc, inc) ×6 → 36
R7: (5 sc, inc) ×6 → 42
R8: (6 sc, inc) ×6 → 48
R9: (7 sc, inc) ×6 → 54
R10–18: sc around (54)
Insert safety eyes between R12–13, about 8 sts apart.
R19: (7 sc, dec) ×6 → 48
R20: (6 sc, dec) ×6 → 42
R21: (5 sc, dec) ×6 → 36
Stuff firmly
R22: (4 sc, dec) ×6 → 30
R23: (3 sc, dec) ×6 → 24
R24: (2 sc, dec) ×6 → 18
R25: (1 sc, dec) ×6 → 12
R26: dec ×6 → 6
FO and close.
Antenna
Attach yarn at top of head.
Ch 5, sl st in 2nd ch and next 3 ch, sl st to head. FO.
👃 Nose (Dark Blue)
Ch 6
R1: sc in 2nd ch, sc 3, 3 sc in last ch, sc 3, inc → 12
R2: inc, sc 3, inc ×3, sc 3, inc ×2 → 18
R3: sc, inc, sc 3, (sc, inc) ×3, sc 3, (sc, inc) ×2 → 24
R4–5: sc around (24)
Lightly stuff and sew to face.
👀 Eyes (Make 2)
Pupil (Black)
R1: MR 6
R2: inc ×6 → 12
R3: (1 sc, inc) ×6 → 18
Blue Ring
Join light blue
R1: inc in each st → 36
Highlight
MR 4 white. Sew onto pupil.
👂 Ears (Make 2)
Outer Ear (Light Blue)
R1: MR 6
R2: inc ×6 → 12
R3: (1 sc, inc) ×6 → 18
R4: (2 sc, inc) ×6 → 24
R5: (3 sc, inc) ×6 → 30
R6: (4 sc, inc) ×6 → 36
R7–14: sc around (36)
Inner Ear (Purple)
R1: MR 6
R2: inc ×6 → 12
R3: (1 sc, inc) ×6 → 18
R4: (2 sc, inc) ×6 → 24
R5–6: sc around (24)
Sew inner ear onto outer ear.
👕 Body (Light Blue)
R1: MR 6
R2: inc ×6 → 12
R3: (1 sc, inc) ×6 → 18
R4: (2 sc, inc) ×6 → 24
R5: (3 sc, inc) ×6 → 30
R6–10: sc around (30)
R11: (3 sc, dec) ×6 → 24
R12: sc around (24)
Stuff
R13: (2 sc, dec) ×6 → 18
R14: (1 sc, dec) ×6 → 12
R15: dec ×6 → 6
FO.
💪 Arms (Make 2)
Hands (Dark Blue)
R1: MR 6
R2: inc ×6 → 12
R3–5: sc around (12)
Switch to light blue
R6–12: sc around (12)
Flatten and close. Leave tail.
🦵 Legs (Make 2)
Feet (Dark Blue)
R1: MR 6
R2: inc ×6 → 12
R3: (1 sc, inc) ×6 → 18
R4–6: sc around (18)
Switch to light blue
R7: (1 sc, dec) ×6 → 12
R8–14: sc around (12)
Flatten and close.
🔵 Body Spots (Make 4)
R1: MR 6
R2: inc ×6 → 12
Sew 2 on chest, 2 on sides.
🚗 Pink Convertible Car
🩷 Car Base
R1: MR 6
R2: inc ×6 → 12
R3: (1 sc, inc) ×6 → 18
R4: (2 sc, inc) ×6 → 24
R5: (3 sc, inc) ×6 → 30
R6: (4 sc, inc) ×6 → 36
R7: (5 sc, inc) ×6 → 42
R8: (6 sc, inc) ×6 → 48
R9: (7 sc, inc) ×6 → 54
R10: (8 sc, inc) ×6 → 60
R11–18: sc around (60)
Stuff
R19: (8 sc, dec) ×6 → 54
R20: sc around (54)
FO.
🩷 Seat Rim
Attach yarn to top opening
R1: BLO sc around (54)
R2–6: sc around (54)
🩷 Hood
R1: MR 6
R2: inc ×6 → 12
R3: (1 sc, inc) ×6 → 18
R4: (2 sc, inc) ×6 → 24
R5: (3 sc, inc) ×6 → 30
R6: (4 sc, inc) ×6 → 36
R7–10: sc around (36)
Stuff lightly and sew to front.
🩶 Grill
Ch 14
Row 1: hdc in 3rd ch, hdc across (12)
Row 2–3: ch 2, turn, hdc across
Sew to hood.
🟡 Headlights (Make 2)
White
R1: MR 6
R2: inc ×6 → 12
Yellow
R3: (1 sc, inc) ×6 → 18
Sew flat.
🛞 Wheels (Make 4)
Black
R1: MR 6
R2: inc ×6 → 12
R3: (1 sc, inc) ×6 → 18
R4: sc around (18)
White
R5: BLO sc around (18)
Sew to sides.
🩷 Windshield Bars (Make 2)
Ch 30
Row 1: sc in 2nd ch, sc 28
Row 2–4: ch 1, turn, sc across
Curve into arch and sew.
🪞 Side Mirrors (Make 2)
Mirror Head
R1: MR 6
R2: inc ×6 → 12
R3: sc around (12)
Mirror Stalk
Ch 8, sl st back
Attach to hood sides.
🩷 Rear Bump
R1: MR 6
R2: inc ×6 → 12
R3: sc around (12)
R4: (1 sc, dec) ×4 → 8
Stuff lightly and sew to back.
🧩 Assembly
- Attach hood
- Sew grill and headlights
- Add seat rim
- Attach wheels
- Sew windshield bars
- Add side mirrors
- Sew rear bump
- Attach Stitch body inside seat
- Attach legs forward
- Attach arms to frame
- Sew head to body
- Add ears, eyes, nose, eyebrows, smile
🌟 Finished Look
Your Stitch now sits happily inside his bright pink convertible — complete with round headlights, curved hood, chunky wheels, open seat, arched windshield bars, and tiny side mirrors just like the original design.
A joyful display piece and a perfect gift for Disney fans, kids’ rooms, or collectors. 🚗💙✨
Happy crocheting and enjoy every stitch! 🧶💕


Love the little crochet items, great for small a friend or family