Bundle up your little one’s toes in frosty cuteness with the Snowman Baby Booties, a heartwarming crochet project that’s perfect for wintertime snuggles! ⛄🧶 With their cheerful snowman faces, cozy cuffs, and playful details like carrot noses and button eyes, these booties are a festive way to keep tiny feet warm while spreading holiday cheer. Whether it’s baby’s first Christmas or just a chilly day that needs a smile, these booties are sure to melt hearts.
This pattern is a joyful treat for crocheters who love seasonal flair and adorable accessories. You can customize your snowmen with colorful hats, rosy cheeks, or even a sprinkle of sparkle for extra charm. Whether you’re crafting a keepsake, gifting a handmade hug, or adding a whimsical touch to winter outfits, the Snowman Baby Booties are a delightful way to stitch up warmth—one frosty loop at a time! ❄️🧵
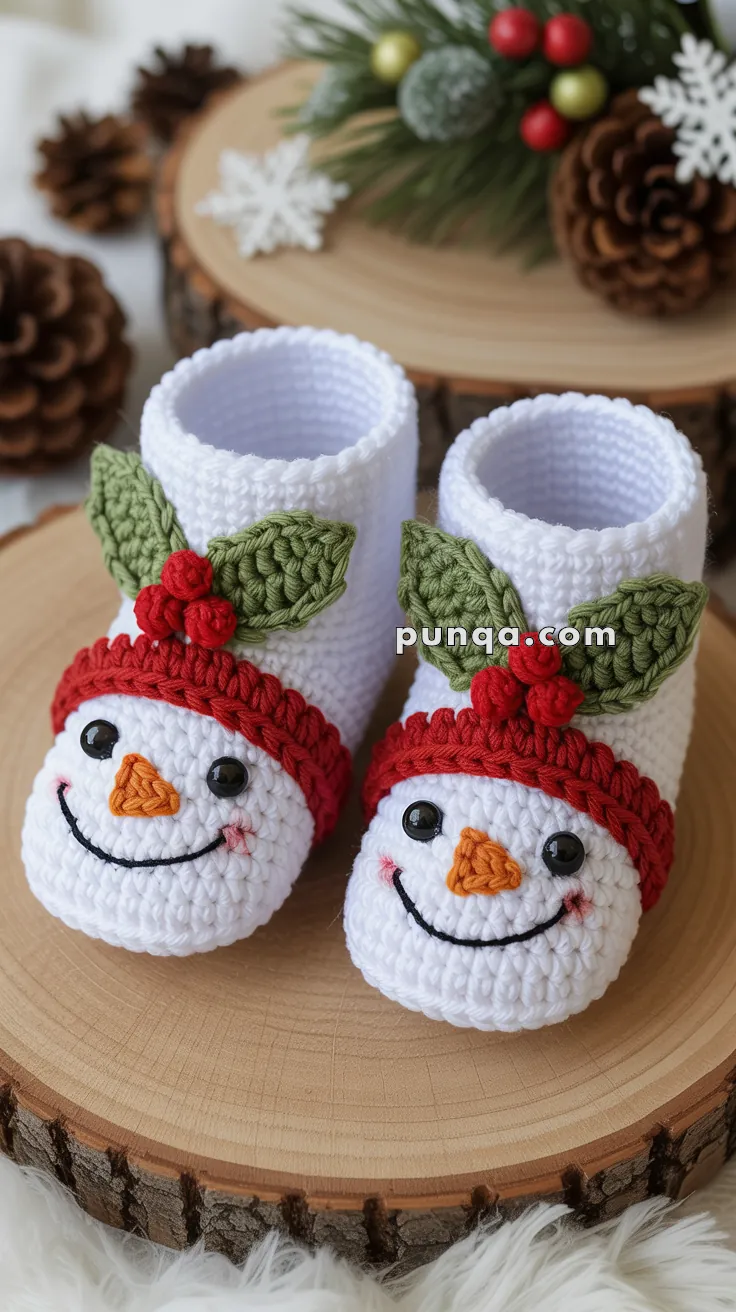
⛄ Snowman Baby Booties Crochet Pattern
Create these adorable snowman booties exactly as shown in the photo, with properly constructed soles, chunky textured headband, and perfectly shaped holly leaves!
✨ Skill Level
Intermediate – Requires working in the round, increases/decreases, textured stitches, and embroidery.
📏 Finished Size
3–6 months (10 cm / 4″ sole length) Size adjustments included at end of pattern.
🧶 Materials
Yarn (Worsted Weight / Aran)
- White – main body (approx. 50g)
- Red – headband (approx. 10g)
- Green – holly leaves (small amount)
- Orange – carrot nose (small amount)
- Black – smile embroidery (small amount)
- Pink – cheek blush (small amount)
Other Supplies:
- Crochet hook: 3.5 mm (US E/4)
- Safety eyes: 6–8 mm black (2 per bootie)
- Yarn needle
- Stitch marker
- Scissors
- Small amount of stuffing (for berries)
- Pins (for positioning holly before sewing)
🔤 Abbreviations (US Terms)
- MR – Magic Ring
- sc – Single Crochet
- hdc – Half Double Crochet
- dc – Double Crochet
- inc – Increase (2 sc in one stitch)
- dec – Invisible Decrease
- sl st – Slip Stitch
- ch – Chain
- BLO – Back Loop Only
- FLO – Front Loop Only
- 3rd loop hdc – Half double crochet worked in the third loop (horizontal bar behind the stitch) for textured effect
- FO – Fasten Off
👣 BOOTIE CONSTRUCTION (Make 2)
SOLE (White)
Foundation: Ch 11
Round 1:
- Starting in 2nd ch from hook: 9 sc
- 3 sc in last ch (to turn corner)
- Working along opposite side of foundation chain: 8 sc
- 2 sc in same st as first sc (30)
- Place marker at beginning of round
Round 2:
- inc, 8 sc, inc ×3, 8 sc, inc ×2 (26)
Round 3:
- 1 sc, inc, 8 sc, (1 sc, inc) ×3, 8 sc, (1 sc, inc) ×2 (32)
Round 4:
- sc around (32)
Do NOT fasten off. Continue directly to body.
BODY – TOE SECTION (White)
Round 5:
- Working in BLO (this creates the fold for the sole): sc around (32)
Rounds 6-9:
- sc around (32) [4 rounds total]
At this point, mark the toe area (the center front 12-14 stitches). You will add the face here later.
HEADBAND – RED TEXTURED SECTION
Switch to red yarn:
Round 10:
- Working in the 3rd loop (the horizontal bar behind each stitch): hdc around (32)
- This creates a chunky ribbed texture
Round 11:
- Continue working in 3rd loop: hdc around (32)
This 2-round section creates the distinctive chunky red headband.
CUFF – UPPER WHITE SECTION
Switch back to white:
Rounds 12-16:
- sc around (32) [5 rounds total]
Round 17 (optional decorative edge):
- (sc, ch 2, sc in same st) in each st around for scalloped edge
- OR simply FO after Round 16 for plain edge
FO and weave in ends.
😊 SNOWMAN FACE (Add to each bootie)
Work on the toe section (front center of bootie, Rounds 6-9 area)
Eyes:
- Insert 8mm safety eyes between Rounds 7-8
- Position approximately 4-5 stitches apart
- Ensure placement is centered on toe
- Secure backing inside bootie before stuffing
Carrot Nose (Orange):
Method 1 – Embroidered:
- Using orange yarn and tapestry needle
- Create a triangle shape centered between and slightly below eyes
- Make 3-4 horizontal stitches, each shorter than the last, building toward the point
Method 2 – Crocheted (more dimensional):
- With orange: ch 4
- Starting in 2nd ch from hook: sl st, sc, hdc (3)
- FO with long tail
- Sew to face as triangle with point outward
Smile (Black):
- Using black yarn or embroidery thread
- Stitch a curved smile below the nose
- Make smile approximately 8-10 stitches wide
- Use backstitch or stem stitch for smooth curve
Rosy Cheeks (Pink):
- Using pink yarn
- Create small circular blush marks on each side of face
- Make 4-6 tiny stitches in circular pattern
- Position below and to sides of eyes
Face should be completed and secured before adding holly decoration.
🍃 HOLLY LEAVES (Green) – Make 4 total (2 per bootie)
For pointed holly leaf shape:
Ch 8
Row 1:
- Starting in 2nd ch from hook: sl st, sc, hdc, dc, hdc, sc, sl st
- Ch 1, turn
Row 2 (working along opposite side of foundation chain):
- sl st, sc, hdc, dc, hdc, sc, sl st
Pointed edges (optional for more definition):
- In the center dc of each side, work: (sl st, ch 2, sl st in same st)
- This creates small pointed peaks
FO with long tail for sewing.
Shape:
- Pinch base slightly to create pointed oval
- The center points give it the classic holly appearance
🔴 HOLLY BERRIES (Red) – Make 6 total (3 per bootie)
For each berry:
Round 1: MR, 6 sc (6)
Round 2: sc around (6)
DO NOT CLOSE YET:
- Add tiny bit of stuffing (just enough to make berry rounded)
- Pull tight and FO with long tail for sewing
Berries should be small, plump, and dimensional.
🪡 ASSEMBLY
Holly Decoration Placement:
- Position check:
- Holly should sit on the red headband (Rounds 10-11)
- Center the decoration directly above the snowman’s face
- Use pins to test placement before sewing
- Attach leaves:
- Sew 2 holly leaves to red band
- Angle them slightly outward in a “V” or spread position
- Overlap bases slightly at center
- Secure firmly with matching green yarn
- Attach berries:
- Cluster 3 red berries at the center where leaves meet
- Position in triangular arrangement
- Sew securely through both berry and bootie
- Ensure berries sit on top of leaves for dimension
✨ FINISHING TOUCHES
- Weave in all ends neatly on inside of bootie
- Check face security:
- Ensure eyes are tight
- Verify all embroidery is secure
- Add extra stitches if needed for durability
- Shape booties:
- Gently block soles flat if needed
- Shape cuff opening to be round and even
- Fluff holly berries
- Optional stiffening:
- For firmer soles, crochet an additional sole piece and sew to bottom
- Or apply fabric stiffener to sole only
📏 SIZE CHART & ADJUSTMENTS
Size Guide
AgeSole LengthFoundation ChainBody Rounds (R6-9)Cuff Rounds (R12-16)0-3m8.5 cm (3.25")Ch 93 rounds4 rounds3-6m10 cm (4")Ch 114 rounds5 rounds6-9m11.5 cm (4.5")Ch 135 rounds6 rounds9-12m12.5 cm (5")Ch 156 rounds7 rounds
DETAILED SIZE ADJUSTMENTS
Newborn (0-3 months):
Sole:
- Ch 9
- R1: 7 sc, 3 sc in last, 6 sc other side, 2 sc in last (18)
- R2: inc, 6 sc, inc ×3, 6 sc, inc ×2 (24)
- R3: 1 sc, inc, 6 sc, (1 sc, inc) ×3, 6 sc, (1 sc, inc) ×2 (30)
- R4: sc around (30)
Body:
- R5: BLO sc around (30)
- R6-8: sc around (30) [3 rounds]
Red band: Same (2 rounds)
Cuff:
- R11-14: sc around (30) [4 rounds]
Baby (3-6 months) – MAIN PATTERN SIZE:
Follow pattern as written above.
Baby (6-9 months):
Sole:
- Ch 13
- Follow same increasing pattern to reach 36 sts by R3
Body:
- Work 5 rounds (R6-10) instead of 4
Red band: Same (2 rounds)
Cuff:
- Work 6 rounds instead of 5
Baby (9-12 months):
Sole:
- Ch 15
- Follow same increasing pattern to reach 40 sts by R3
Body:
- Work 6 rounds before red band
Red band: Same (2 rounds)
Cuff:
- Work 7 rounds
ELEMENTS THAT STAY THE SAME:
- Red headband: Always 2 rounds with 3rd loop hdc
- Holly leaves: 2 per bootie (same size)
- Holly berries: 3 per bootie (same size)
- Face placement: Always centered on toe area
💡 PRO TIPS FOR PHOTO ACCURACY
- Sole shaping:
- Work tightly for firm sole
- The BLO round creates the crucial fold
- Never fasten off between sole and body
- Red headband texture:
- The 3rd loop hdc creates horizontal ribbing
- Keep tension consistent for even texture
- This is the signature look of these booties
- Face positioning:
- Mark the center front before adding face
- Eyes should be on Rounds 7-8
- Keep face elements close together for cute proportions
- Holly berries:
- Don’t overstuff – just a pinch of filling
- Small berries look more realistic
- Cluster tightly at leaf bases
- White yarn choice:
- Bright white works best for snowman look
- Avoid cream or off-white
- Cotton or cotton-blend recommended for structure
- Symmetry:
- Make both booties identical
- Use stitch counts carefully
- Mirror holly placement exactly
🎄 CARE INSTRUCTIONS
- Hand wash in cool water with mild soap
- Lay flat to dry
- Do not machine wash (safety eyes may come loose)
- Store flat or displayed on small form
🎁 GIFT PRESENTATION IDEAS
- Tie pair together with red ribbon
- Package in clear gift box with tissue
- Add matching hat or mittens
- Include care card
- Photograph baby wearing them for memorable keepsake
⛄ TROUBLESHOOTING
Problem: Sole curling up
- Solution: Work R4 of sole and R5 of body more loosely
Problem: Face looks stretched
- Solution: Add face after all rounds complete, with bootie laid flat
Problem: Red band not textured enough
- Solution: Ensure you’re working in 3rd loop (horizontal bar), not back loop
Problem: Holly won’t stay in place
- Solution: Sew through multiple stitches, anchor at several points
Problem: Bootie too loose around ankle
- Solution: Add one decrease round before cuff (work dec evenly around)
These Snowman Baby Booties are perfect for:
- Christmas photos
- Holiday gifts
- Baby’s first Christmas
- Festive baby showers
- Winter wonderland themes
Your little one will be ready to play in a winter wonderland! ⛄❄️🎄
Happy crocheting!