Step into a storybook garden with the Amigurumi Mushroom with Watering Can, a delightfully whimsical crochet creation that’s bursting with charm! 🍄🌼 With its bright red dome cap sprinkled in dainty daisies, spiral blush cheeks, and teardrop-shaped body, this mushroom feels like it wandered out of a fairy tale and into your yarn basket. The tiny watering can tucked by its side and the fluttering butterflies with embroidered spots add layers of personality and playfulness that make this project truly magical.
Perfect for spring displays, woodland-themed décor, or gifting to nature-loving friends, this pattern invites you to stitch up a little world of wonder. You can customize the butterflies, play with flower colors, or even add a few embroidered vines to the mushroom’s base for extra enchantment. Whether perched on a shelf or nestled in a cozy corner, the Mushroom with Watering Can is a joyful way to celebrate the beauty of handmade imagination—one stitch and smile at a time! 🧶🦋
🍄 Amigurumi Mushroom with Watering Can Crochet Pattern
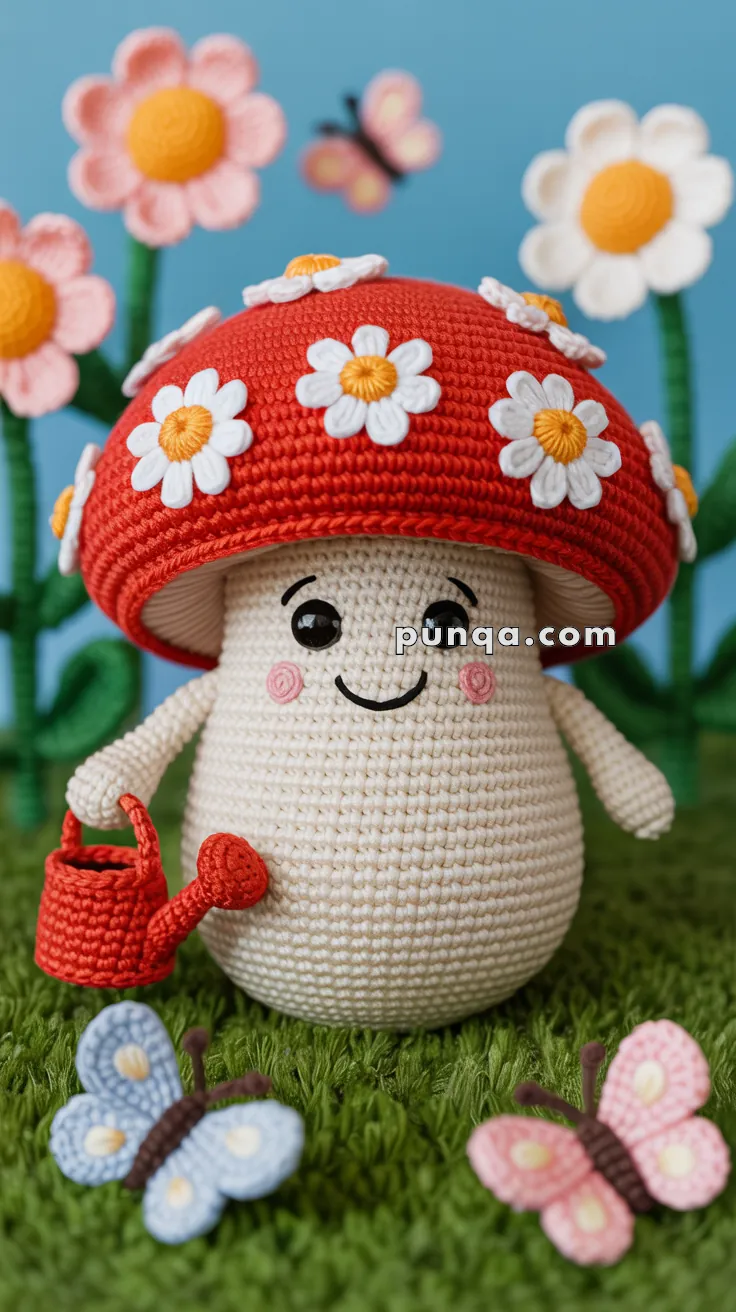
This whimsical amigurumi mushroom features a bright red dome cap decorated with daisies, a teardrop-shaped body, spiral blush cheeks, a tiny watering can, and two butterflies with embroidered spots. It’s a cheerful spring project that looks just like the photo!
✨ Skill Level
Intermediate – involves shaping, applique, and detail embroidery.
📏 Finished Size
~22–25 cm (9–10 in) tall with DK/worsted yarn and 2.5–3.0 mm hook.
🧶 Materials
- Cream/beige yarn – mushroom body & arms
- Red yarn – mushroom cap + watering can
- White yarn – flower petals, underside of cap
- Yellow yarn – flower centers + butterfly spots
- Black yarn/thread or 12 mm safety eyes – eyes, eyebrows, mouth embroidery
- Pink yarn – blush cheeks & pink butterfly
- Light blue yarn – blue butterfly
- Brown yarn – butterfly bodies & antennae
- Hook: 2.5–3.0 mm
- Stuffing (polyfill)
- Yarn needle, scissors, stitch markers
🧾 Abbreviations (US Terms)
MR = magic ring
sc = single crochet
inc = increase (2 sc in same st)
dec = decrease (sc2tog)
ch = chain
sl st = slip stitch
st(s) = stitch(es)
FO = fasten off
🧵 Pattern
Mushroom Body (Cream, teardrop shape)
- MR, 6 sc (6)
- inc around (12)
- (sc, inc) × 6 (18)
- (2 sc, inc) × 6 (24)
- (3 sc, inc) × 6 (30)
- (4 sc, inc) × 6 (36)
- (5 sc, inc) × 6 (42)
- (6 sc, inc) × 6 (48)
9–18. sc around (48) – wide lower belly. - (6 sc, dec) × 6 (42)
20–23. sc around (42) - (5 sc, dec) × 6 (36)
25–28. sc around (36) - (4 sc, dec) × 6 (30)
30–32. sc around (30) – narrowing neck.
FO, stuff firmly into rounded teardrop shape.
Arms (Make 2, Cream)
- MR, 6 sc (6)
2–12. sc around (6)
FO, stuff lightly.
👉 Sew arms lower on body (around R10–12).
Mushroom Cap (Red Dome with White Underside)
Underside (White):
- MR, 6 sc (6)
- inc around (12)
- (sc, inc) × 6 (18)
- (2 sc, inc) × 6 (24)
- (3 sc, inc) × 6 (30)
- (4 sc, inc) × 6 (36)
- (5 sc, inc) × 6 (42)
- (6 sc, inc) × 6 (48)
- (7 sc, inc) × 6 (54)
- (8 sc, inc) × 6 (60)
FO.
Cap Dome (Red):
- MR, 6 sc (6)
- inc around (12)
- (sc, inc) × 6 (18)
- (2 sc, inc) × 6 (24)
- (3 sc, inc) × 6 (30)
- (4 sc, inc) × 6 (36)
- (5 sc, inc) × 6 (42)
- (6 sc, inc) × 6 (48)
- (7 sc, inc) × 6 (54)
- (8 sc, inc) × 6 (60)
- (9 sc, inc) × 6 (66)
12–15. sc around (66) – creates full dome.
FO.
👉 Sew red dome over white underside. Stuff lightly between layers for fullness. Attach cap to top of body.
Daisies for Cap (Make 8–10)
Centers (Yellow, slightly raised):
- MR, 6 sc (6).
- inc around (12).
- sl st around, stuff lightly. FO.
Petals (White, worked around center):
Attach white, (ch 6, sl st in next st) × 6. FO.
Sew evenly across cap.
Face Details
- Eyes: Insert 12 mm black safety eyes between R18–20, ~10 sts apart. Add embroidered white sparkle.
- Cheeks: With pink, MR, 6 sc (6). Sew under eyes. Embroider spiral detail.
- Mouth: Embroider thin curved black smile between cheeks.
- Eyebrows: Small black lines above eyes.
Watering Can (Red, larger cylinder with flat base + round spout)
Body:
- MR, 6 sc (6)
- inc around (12)
- (sc, inc) × 6 (18)
- (2 sc, inc) × 6 (24)
5–10. sc around (24) - (2 sc, dec) × 6 (18)
FO, stuff.
Handle: ch 12, sc back, sew to side.
Spout:
- MR, 6 sc (6).
- sc around (6) for 4 rounds.
- inc around (12).
- sc around (12). FO.
Sew bulb to can, embroider tiny “holes” with black thread.
Butterflies (Make 2 – Blue & Pink)
Body (Brown):
Ch 12, sc back (11). Fold in half for thickness.
Antennae (Brown):
Ch 6, sl st back, attach 2 strands to head.
Wings (Make 4 per butterfly):
Top wings (oval, larger):
- MR, 6 sc (6)
- inc around (12)
- (sc, inc) × 6 (18)
- sc around (18) → elongate into oval with 2 extra ch at row end.
FO.
Bottom wings (teardrop, smaller):
- MR, 6 sc (6)
- (sc, inc) × 3 (9)
- sc around (9). FO.
Attach 2 large + 2 small wings to body.
Spots (Yellow/White):
Embroider dots on each wing.
- Blue butterfly → cream/yellow dots.
- Pink butterfly → pale yellow/cream dots.
🪡 Assembly Order
- Sew cap to mushroom body.
- Attach arms.
- Embroider/attach face details.
- Sew daisies on cap.
- Place watering can in one arm.
- Assemble butterflies (body + wings + antennae), embroider spots.
- Position butterflies near mushroom for display.
🌟 Finishing Touches
Your mushroom amigurumi is complete 🍄✨. With its domed red cap, raised daisies, teardrop body, spiral blush cheeks, watering can, and fluttering butterflies, it’s a perfect springtime friend that matches the photo detail-for-detail.


Nagyon aranyos ez a gomba! Örülök, hogy ingyenes! Köszönöm.