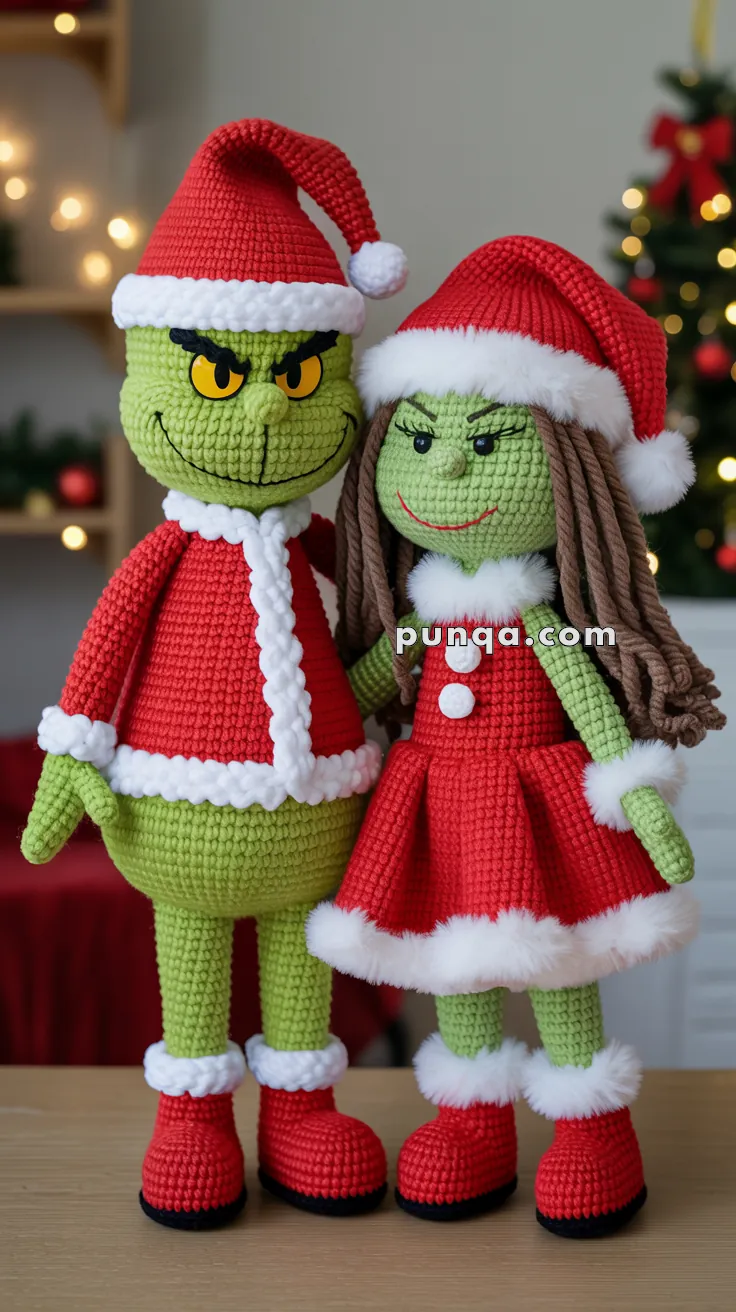
Bring a mischievous twist to your holiday crafting with the Amigurumi Grinch Couple—a delightfully grumpy duo that’s full of personality and festive flair! 💚🎄 With their signature scowls, fuzzy green fur, and cozy red outfits, these two are ready to steal the spotlight (and maybe a few presents) from your Christmas décor. Whether perched on a mantel or tucked into a gift basket, they’re the perfect blend of sass and seasonal charm.
This pattern is a joy for character lovers and holiday enthusiasts alike. Customize each Grinch with expressive eyebrows, playful accessories, or even tiny hearts to hint at their growing holiday spirit. Whether you’re crafting them as a couple, besties, or a comically chaotic pair, the Grinch Couple brings laughter, nostalgia, and a whole lot of handmade magic to your festive lineup. 🧶✨
💚🎅 Amigurumi Grinch Couple Crochet Pattern
Bring festive mischief to your holiday décor with this adorable Grinch couple! Their bright expressions, fluffy Santa outfits, and charming handmade details make them a delightful addition to any Christmas display.
✨ Skill Level
Advanced – includes shaping, expressive embroidery, fluffy trims, and outfit construction.
📏 Finished Size
- Male Grinch: ~30 cm (12 inches)
- Female Grinch: ~27 cm (10.5 inches)
🧶 Materials
Yarn
- Green (worsted): 200 g total
- Red (worsted): 150 g total
- White fluffy yarn: 120 g
- Yellow yarn: 40 g
- Brown yarn: 40 g (female hair)
- Black embroidery thread: facial details, boot soles
- Red embroidery thread: female smile
Tools & Supplies
- Hook: 2.5–3.0 mm
- Polyester fiberfill
- Yarn needle
- Stitch markers
- Scissors
- Wire:
- Legs: 40 cm per doll (20 cm each leg)
- Optional arms: 10 cm each
- Optional: fabric glue for wire tips
🧵 Abbreviations (US Terms)
- MR – magic ring
- sc – single crochet
- inc – increase
- dec – invisible decrease
- ch – chain
- sl st – slip stitch
- st(s) – stitch(es)
- BLO – back loop only
- FO – fasten off
🧠 Head (Make 2)
Using green yarn:
- MR 6 (6)
- inc × 6 (12)
- (sc, inc) × 6 (18)
- (2 sc, inc) × 6 (24)
- (3 sc, inc) × 6 (30)
- (4 sc, inc) × 6 (36)
- (5 sc, inc) × 6 (42)
- (6 sc, inc) × 6 (48)
9–18. sc (48) - (6 sc, dec) × 6 (42)
- (5 sc, dec) × 6 (36)
- (4 sc, dec) × 6 (30)
- (3 sc, dec) × 6 (24)
Stuff firmly. Leave a long tail for sewing.
👃 Nose (Make 2)
- MR 6 (6)
- inc × 6 (12)
3–4. sc (12)
Sew slightly below the eye line, centered.
👀 Eyes (Make 4)
Using yellow yarn:
- MR 6 (6)
- inc × 6 (12)
- (sc, inc) × 6 (18)
Placement
- Inner edges 5–6 stitches apart
- Positioned around Rounds 12–14
- Slight inward downward tilt
🎨 Facial Embroidery
Male
- Eyebrows: Thick, sharply angled black arches
- Pupils: Large, inward-tilting
- Smile: Wide curved grin
Female
- Eyebrows: Soft brown arches
- Pupils: Medium, angled inward
- Smile: Thin red smile
💇♀️ Female Hair
- Cut 100–120 strands, 40–50 cm each
- Attach on Rounds 7–17 (back & sides)
- Create center part
- Brush for volume
- Trim to mid-thigh length
🧍 Male Body
Using green yarn:
- MR 6 (6)
- inc × 6 (12)
- (sc, inc) × 6 (18)
- (2 sc, inc) × 6 (24)
5–16. sc (24)
Switch to red (jacket):
17–28. sc (24)
Stuff firmly.
🧍 Female Body
Using green yarn:
- MR 6 (6)
- inc × 6 (12)
- (sc, inc) × 6 (18)
- (2 sc, inc) × 6 (24)
5–12. sc (24) - (2 sc, dec) × 6 (18)
Switch to red:
14–20. sc (18)
Stuff firmly.
✋ Arms (Make 4)
Using green yarn:
- MR 6 (6)
2–12. sc (6)
Switch to red:
13–15. sc (6)
Add 2 fluffy rounds at the wrists.
Optional: insert 10 cm wire.
🦵 Legs (Make 4)
Using green yarn:
- MR 6 (6)
- inc × 6 (12)
3–20. sc (12)
Insert wire and stuff around it.
👢 Boots (Make 4)
Sole (black)
- MR 6 (6)
- inc × 6 (12)
- (sc, inc) × 6 (18)
- BLO sc (18)
Boot Body (red)
5–6. sc (18)
7. inc to 20 sts
8–9. sc (20)
10. (sc, dec) × 6, sc 2 (14)
11–13. sc (14)
Fluffy Boot Cuff
Work 4 rounds fluffy yarn.
Insert legs and sew in place.
👕 Male Jacket Details
Bottom Hem
Add 3 rounds fluffy yarn around the bottom.
Front Opening Trim
Create two vertical fluffy trim lines:
- Start at Round 17, 3 stitches from center
- Surface sl st down to Round 28
- Repeat symmetrically
Collar
At Round 16:
- sc around
- sc around
- Work front 16 sts only
- ch 1, turn, sc across
- FO
Pom-Pom
Sew one white pom-pom at the neckline.
👗 Female Dress
Skirt (wide flare)
Attach red yarn at Round 20:
- (2 sc, inc) × 6 → 24
- sc (24)
- (3 sc, inc) × 6 → 30
- sc (30)
- (4 sc, inc) × 6 → 36
- sc (36)
- (5 sc, inc) × 6 → 42
- sc (42)
- (6 sc, inc) × 6 → 48
- sc (48)
- (7 sc, inc) × 6 → 54
- sc (54)
- (8 sc, inc) × 6 → 60
14–15. sc (60)
Skirt Trim
Add 6 rounds of fluffy yarn.
Neckline Trim
Add 3 rounds fluffy yarn around neckline.
Front Buttons
Sew two white pom-poms down the bodice.
🎅 Santa Hats (Make 2)
Work increases until reaching 57 stitches.
Rounds 19–35: sc around.
Hat Brim
Add 5–6 rounds fluffy yarn.
Pom-Pom
Sew white pom-pom at the tip.
Shaping
- Male hat droops right
- Female hat droops slightly left
- Tack tip with a few stitches
🧵 Final Assembly
1. Heads
Sew eyes, attach nose, embroider expressions.
Add female hair.
2. Attach to Bodies
Sew securely around the neck.
3. Legs & Boots
Insert wire ends into bodies.
Sew legs at the bottom center.
4. Arms
Attach at Rounds 18–19.
Angle slightly forward.
5. Clothing Details
Add jacket trims, skirt hem, fluffy cuffs, neckline trims, and buttons.
6. Hats
Sew brim around head.
Tack hat tips for a cute droop.
7. Final Touches
Fluff all white yarn.
Style female hair.
Adjust smiles and posture.
🌟 Display & Care Tips
Display:
Place together as a pair for the cutest effect.
Cleaning:
Spot clean only.
Storage:
Keep dry and away from direct sunlight.
Maintenance:
Fluff white yarn as needed.
💚 Enjoy Your Handmade Grinch Couple!
These festive companions bring a joyful touch to the holiday season with expressive faces, fluffy trims, and charming handmade details. They make wonderful décor pieces or thoughtful gifts for Christmas lovers of all ages.
Happy Crocheting! 🧶✨