Celebrate the cozy spirit of fall with this charming Amigurumi Pumpkin Harvest Duo crochet pattern! 🎃🍂 Featuring two adorable pumpkin pals in different sizes, this delightful pair brings rustic charm and seasonal warmth to your handmade décor. Whether you’re crafting for autumn displays, Thanksgiving centerpieces, or simply love stitching up festive accents, these textured cuties are perfect for adding a touch of harvest magic to your home.
Designed with beginner-friendly techniques and plenty of room for customization, this pattern invites you to play with earthy tones, chunky yarns, and fun extras like curly vines or embroidered leaves. Display them stacked, nestled in a basket, or scattered across your mantel for a cozy farmhouse vibe. Whether you’re new to amigurumi or a seasoned stitcher, this Pumpkin Harvest Duo is a joyful and satisfying project—perfect for stitching up a little fall flair, one loop at a time! 🧶🧡🌾
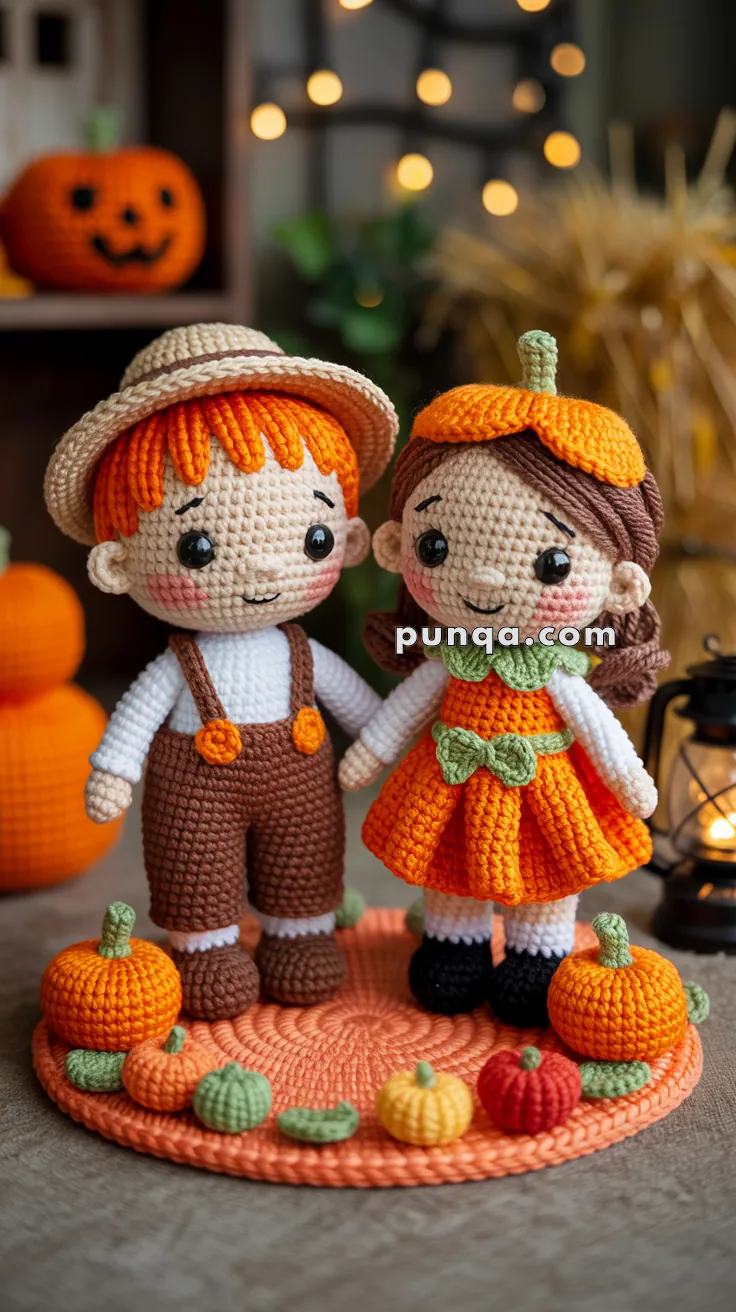
🍁 Amigurumi Pumpkin Harvest Couple Crochet Pattern
Celebrate the season with this adorable pumpkin-inspired couple – the boy farmer in overalls and straw hat, and the girl in her pumpkin dress with leafy details. To complete the scene, this pattern also includes mini pumpkins that can be scattered around them for a festive display.
✨ Skill Level
Intermediate – Requires basic amigurumi knowledge, color changes, shaping, and small accessory assembly (pumpkin ridges, pleated skirt, socks).
📏 Finished Size
Each doll: approx. 20–22 cm tall (8–9 in)
Pumpkins: 3–6 cm wide
Mat: 15 cm across
🧵 Materials
- Cotton or acrylic DK yarn in: skin, brown, orange, green, white, beige, pink
- 2.5–3.0 mm crochet hook
- 12 mm safety eyes (2 pairs)
- Yarn needle
- Stitch markers
- Stuffing
- Blush or pink yarn for cheeks
🔡 Abbreviations (US Terms)
MR – Magic Ring
sc – single crochet
inc – increase (2 sc in same st)
dec – decrease (sc2tog)
sl st – slip stitch
ch – chain
st – stitch
FLO – front loop only
BLO – back loop only
FO – fasten off
🧒 Pumpkin Boy
Head (skin color)
- MR, 6 sc (6)
- inc x6 (12)
- (sc, inc) x6 (18)
- (2 sc, inc) x6 (24)
- (3 sc, inc) x6 (30)
- (4 sc, inc) x6 (36)
- (5 sc, inc) x6 (42)
8–16. sc around (42) - (5 sc, dec) x6 (36)
- (4 sc, dec) x6 (30)
👉 Place 12 mm safety eyes between rows 11–12, 7 sts apart. Add pink yarn circles for blush under eyes. - (3 sc, dec) x6 (24)
- (2 sc, dec) x6 (18)
- (sc, dec) x6 (12)
- dec x6 (6) FO.
👂 Ears (make 2 per doll, skin color)
- MR, 6 sc (6)
- (sc, inc) x3 (9)
- sc around (9)
- (2 sc, inc) x3 (12)
- sc around (12) FO, leave long tail.
👉 Flatten slightly, sew to the sides of the head between rows 10–12, aligned with the eyes.
👃 Nose (tiny oval, skin color)
- Ch 4, sc in 2nd ch from hook, sc in next, 3 sc in last ch. Continue along other side: sc, 2 sc in last st (8)
- sc around (8) FO, leaving tail.
👉 Stuff lightly, sew centered between eyes, just above smile line. Add a couple of stitches in darker thread below for a small curve.
Body (white shirt, then brown pants)
- MR, 6 sc (6)
- inc x6 (12)
- (sc, inc) x6 (18)
- (2 sc, inc) x6 (24)
5–8. sc around (24)
Switch to white:
9–14. sc around (24)
Switch to brown: - (3 sc, inc) x6 (30)
16–20. sc around (30) - (3 sc, dec) x6 (24)
- (2 sc, dec) x6 (18) FO. Stuff.
Arms (make 2, skin → white sleeves)
- MR, 6 sc (6)
- inc x6 (12)
3–4. sc around (12)
Switch to white:
5–12. sc around (12)
FO. Leave tail. Stuff lightly.
Legs with Socks + Shoes (make 2, start brown → white)
- MR, 6 sc (6)
- inc x6 (12)
- (sc, inc) x6 (18)
4–5. sc around (18) - (sc, dec) x6 (12)
Switch to white (socks):
7–9. sc around (12) FO. Stuff.
👉 Add separate sock cuff:
Ch 12, join, sc around 2 rows. Sew above shoe.
Suspenders
Ch 35 in brown. Attach front to pants with 2 orange buttons, cross in back.
Hair + Hat
Hair: Cut orange yarn strands, attach to head front as bangs.
Hat: Beige, work in rounds:
- MR 6 sc (6)
- inc x6 (12)
- (sc, inc) x6 (18)
Continue until 60 sts. Work 4 rows sc. FLO, add brim: (sc, inc) repeat.
👧 Pumpkin Girl
Head – same as boy.
Body (white top → orange skirt)
1–8. as boy (24)
Switch to white:
9–12. sc around (24)
Switch to orange (dress):
13. FLO, sc around (24)
14. (sc, inc) x12 (36)
15. (2 sc, inc) x12 (48)
16–20. sc around (48) → this makes a flared pleated skirt. FO.
Arms (make 2, skin → white sleeves) – same as boy.
Legs with Shoes (make 2, black shoes → skin)
1–5. as boy’s shoes (18 → 12 sts)
6–8. sc around black.
Switch to skin: sc around until desired leg length. FO.
Bow Belt + Collar
Bow: Ch 40 in green, tie at waist.
Collar: Ch 36, join, (3 dc, sl st) repeat for scalloped collar.
Pumpkin Hat
Orange:
- MR 6 sc (6)
- inc x6 (12)
- (sc, inc) x6 (18)
Continue to 42 sts. Work 4 rows. FO.
Stem (green): MR 5 sc, 3 rows. FO. Sew on top.
🎃 Mini Pumpkins (make several)
- MR, 6 sc (6)
- inc x6 (12)
- (sc, inc) x6 (18)
4–6. sc around (18) - (sc, dec) x6 (12)
- dec x6 (6) FO.
Stuff. Use yarn needle with orange yarn, wrap vertically around pumpkin 6–8 times, pulling tightly to form ridges.
Stem: MR 5 sc, sl st. FO. Attach.
🍂 Round Mat
Orange yarn.
- MR 6 sc (6)
- inc x6 (12)
- (sc, inc) x6 (18)
- (2 sc, inc) x6 (24)
Continue spiral increases in BLO only until 15 cm across. FO.
🧩 Assembly
- Sew arms to body at row 9.
- Sew legs to base.
- Add hair (orange bangs for boy, brown long strands in braid for girl).
- Attach hats and accessories.
- Place pumpkins around mat.
✨ Finishing Touches
- Add pink blush circles with yarn or powder to cheeks.
- Embroider boy’s small eyebrows in black.
- Tie girl’s braid with green bow.
🎉 Final Words
Your Pumpkin Couple Amigurumi is ready! With their matching pumpkins and cozy autumn vibe, they’ll make a perfect centerpiece for your fall décor. Whether displayed on a shelf, used as seasonal table decoration, or gifted to a loved one, these little friends will bring warmth and smiles all season long.