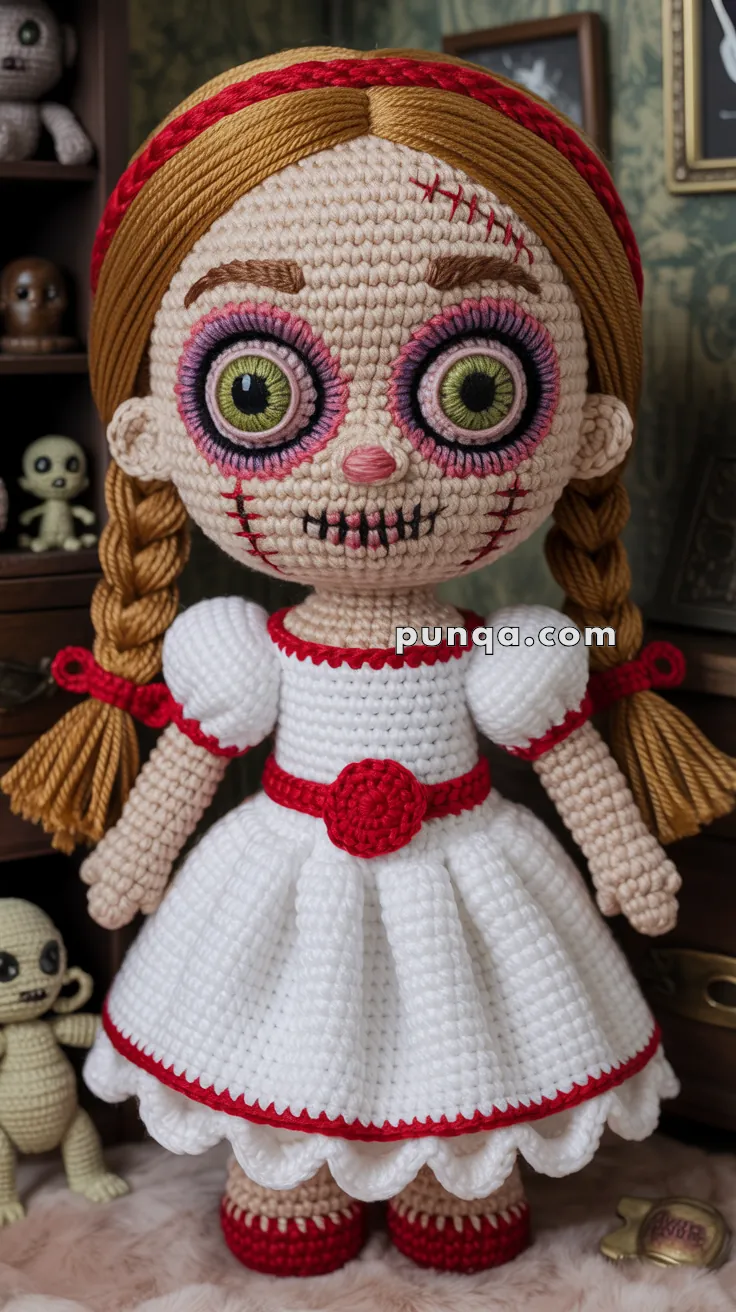
Ready to stitch up something spine-tinglingly adorable? 🧶👻 Meet the Amigurumi Annabelle Creepy Doll, a hauntingly cute crochet creation inspired by the infamous horror icon. With her porcelain-pale skin, vintage dress, and eerie stitched smile, this doll is the perfect blend of spooky and sweet—ideal for Halloween décor, horror-themed gifts, or just adding a little mischief to your amigurumi lineup. Whether you’re a thrill-seeking crocheter or a fan of creepy-cute aesthetics, Annabelle is sure to cast a spell on your hook and your heart. 🩸🎀
This pattern invites you to play with texture, expression, and mood—think dramatic braids, haunting eyes, and a dress that whispers of ghost stories past. Customize her look with blood-red accents, aged lace, or even a tiny crocheted chair to complete the haunted vibe. Whether she’s perched on a shelf or peeking out from a yarn basket, this eerie little doll is a conversation starter and a delightfully wicked project to sink your stitches into. Dare to crochet… if you’re brave enough. 😈🪡🕯️
👻 Annabelle-Inspired Amigurumi Doll Crochet Pattern
This hauntingly sweet doll blends classic amigurumi construction with bold embroidered details, oversized eyes, braided hair, and a voluminous white dress trimmed in bright red. The finished doll has a strong visual presence—expressive, eerie, and beautifully crafted.
✨ Skill Level
Intermediate – includes shaping, color changes, layered embroidery, and costume construction.
📏 Finished Size
Approx. 11–12 inches (28–30 cm) tall with braids and shoes.
🧶 Materials
- Light beige – skin
- White – dress, sleeves
- Red – trims, belt, headband, shoes
- Dark golden brown – hair
- Pink, purple, black, green – facial embroidery
- 2.5–3.0 mm crochet hook
- 16–18 mm safety eyes (large) or crocheted irises
- Polyfill stuffing
- Tapestry & embroidery needles
- Stitch markers
🧵 Abbreviations (US Terms)
MR – magic ring
sc – single crochet
inc – increase
dec – decrease
sl st – slip stitch
BLO – back loops only
FLO – front loops only
FO – fasten off
🧵 Head (Light Beige)
- MR, 6
- inc ×6 = 12
- (1 sc, inc) ×6 = 18
- (2 sc, inc) ×6 = 24
- (3 sc, inc) ×6 = 30
- (4 sc, inc) ×6 = 36
- (5 sc, inc) ×6 = 42
8–20. sc around (42) ← enlarged head for oversized facial features - (5 sc, dec) ×6 = 36
- (4 sc, dec) ×6 = 30
- (3 sc, dec) ×6 = 24
- (2 sc, dec) ×6 = 18
- (1 sc, dec) ×6 = 12
- dec ×6 = 6
FO and close.
Eye placement: Between R10–11, spaced very wide apart.
👀 Large Layered Eyes (Crochet Instead of Regular Safety Eyes)
Outer Eye (White – Make 2)
- MR, 6
- inc ×6 = 12
FO.
Iris (Light Green – Make 2)
- MR, 6
- (1 sc, inc) ×3 = 9
FO.
Dark Pupil (Black – Make 2)
MR, 6, FO.
Sew pupil → center of iris → onto white base.
Attach both completed eyes to the head.
🎨 Facial Embroidery
Use photo as guide for spacing.
- Pink eye rings:
Work surface slip-stitches or back-stitching around each eye in multiple layers to create the thick circular halo. - Purple shading:
Add a second outer ring lightly overlapping the pink. - Lower eye darkness:
Add thin black back-stitches directly below each eye. - Nose (pink):
Small horizontally stitched oval placed between the eyes. - Mouth:
Black vertical stitches across the width of the mouth area. - Cheek scars:
Four–five red crossing stitches on each cheek. - Forehead scar:
Small angled red dashes near left eyebrow.
Eyebrows
Crochet or embroider curved brown eyebrows set tightly above the eyes.
💇 Hair Cap & Braids
Hair Cap (Golden Brown)
- MR, 6
- inc ×6 = 12
- (1 sc, inc) ×6 = 18
- (2 sc, inc) ×6 = 24
- (3 sc, inc) ×6 = 30
- (4 sc, inc) ×6 = 36
- (5 sc, inc) ×6 = 42
8–12. sc around (42)
FO.
Sew cap onto the head.
Hair Strands
Cut long golden-brown yarn strands and attach them in backward-loop fashion around the hairline and crown.
Part the hair at the center and smooth downward to form two thick sections.
Braids (2)
- Divide each side into three chunks and braid tightly.
- Secure ends with red yarn ties.
- Make sure the braids lie close to the body like the photo.
Headband (Red)
Ch 70 (adjust to fit).
sl st across to thicken the strip.
Sew firmly across the top of the hair, tucking slightly into the strands.
🧸 Body (Light Beige → White)
- MR, 6
- inc ×6 = 12
- (1 sc, inc) ×6 = 18
- (2 sc, inc) ×6 = 24
5–8. sc around (24)
Switch to white (upper dress bodice):
9–16. sc around
FO and stuff.
✋ Arms (2× – Light Beige → White)
- MR, 6
- (1 sc, inc) ×3 = 9
3–10. sc around (9)
Switch to white:
11–14. sc around (sleeve)
FO, stuff lightly.
Sleeve Bows
Using red yarn:
Ch 20 → tie into a bow → sew onto the outer sleeve.
🦵 Legs (2× – Light Beige → Red Shoes)
Start with skin color:
- MR, 6
- inc ×6 = 12
3–6. sc around (12)
Switch to red (shoes):
7–12. sc around (12)
FO first leg.
Join Legs
Continue from second leg:
13. ch 3, join to first leg, sc around both legs and across chain = ~30 sts
14–20. sc around
Switch to white (dress interior):
21–24. sc around
FO and stuff body.
👗 Dress (White with Bold Red Accents)
Skirt
With white:
- Join yarn at waist, sc around
- inc in every 4th stitch
- sc around
- (4 sc, inc) around
5–14. sc around (full skirt length)
Ruffled Hem + Red Stripe
Switch to red:
15. sc around
Switch to white:
16. (sc, ch 2, sc in next st) repeat for scalloped hem
FO and weave in ends.
Waist Belt
With red:
Ch long strip to fit waist → sew in place.
Front Rosette
- MR, 6
- inc ×6 = 12
- (1 sc, inc) ×6 = 18
FO.
Sew to center front of belt.
🧵 Assembly
- Sew head securely onto the torso.
- Attach arms aligned with the sleeve border.
- Place dress onto the body; sew lightly at neckline and waist.
- Sew braids so they rest over the shoulders.
- Add final embroidery touches to deepen the eerie expression.
🎃 Finishing Touches
- Sew red headband firmly into the hairline.
- Adjust braids so they sit smoothly along the sides.
- Deepen pink/purple shading around eyes with extra surface stitches.
- Position the rosette and belt symmetrically.
- Smooth the scalloped hem to create a perfect wave around the skirt.
🕯️ And there she is—your haunting little doll brought to life, stitch by stitch.
Whether she rests on a shelf, sits among your handmade collection, or watches quietly from a corner, she’s sure to captivate anyone who sees her.