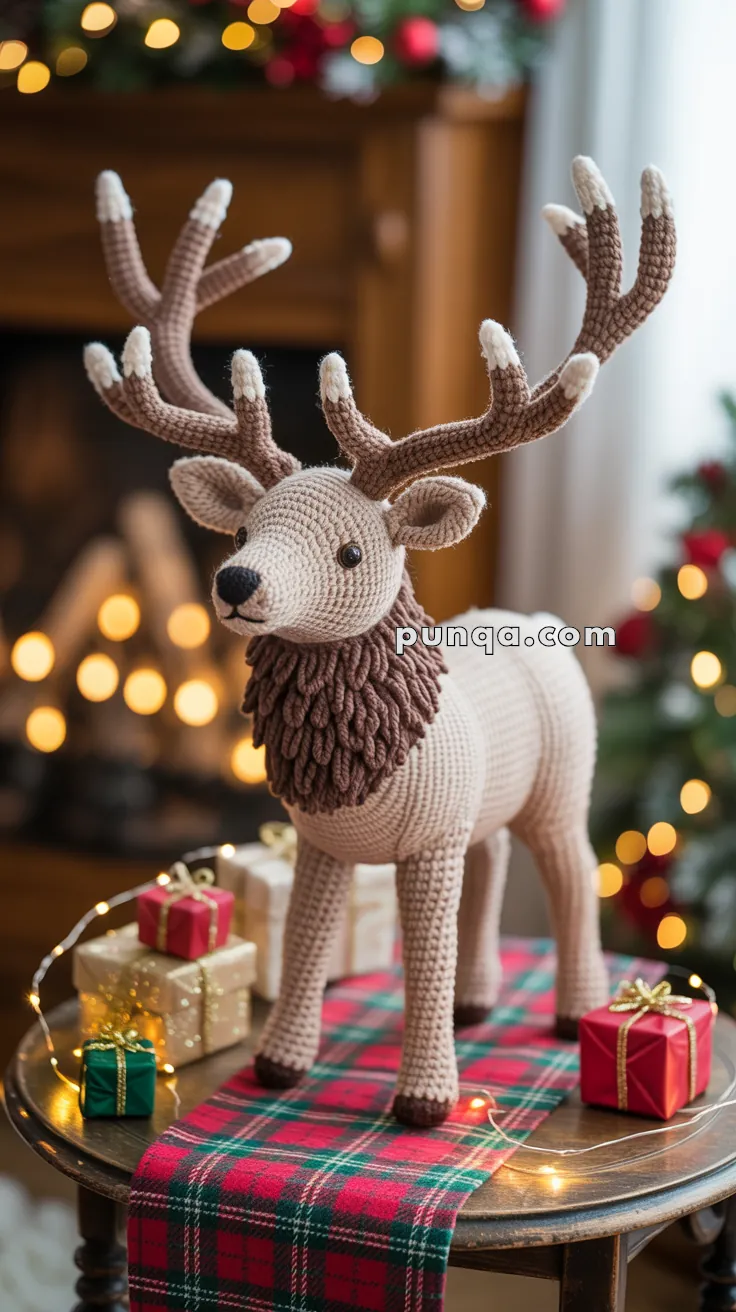
Wander into the woodland with this majestic Amigurumi Elk crochet pattern! With its proud antlers, gentle eyes, and cozy forest charm, this handmade creature is perfect for nature lovers, rustic décor, or anyone who enjoys stitching up a touch of wilderness. Whether you’re crafting a winter scene, a woodland nursery, or a thoughtful gift for an outdoor enthusiast, this elk brings quiet strength and beauty to every loop. 🧶🦌🌲
Designed for detail and character, this pattern invites you to explore sculpted shaping, textured yarns, and fun extras like a scarf, snow-dusted antlers, or even a tiny pine tree companion. Customize your elk with earthy tones or go whimsical with bold colors and accessories. Whether perched on a shelf, nestled in a gift basket, or starring in a handmade forest tableau, this Elk Amigurumi is a joyful and satisfying project—perfect for stitching up a little handmade wilderness, one loop at a time! 💖✨🍂
🦌 Amigurumi Elk Crochet Pattern
Celebrate the holidays with this majestic amigurumi elk! With its impressive antlers, festive charm, and cuddly shape, this hand-crocheted reindeer alternative will be a joyful addition to your holiday decor. Whether placed near the fireplace or under the tree, it’s sure to bring handmade magic to your home.
✨ Skill Level
Intermediate – involves shaping, color changes, and assembly.
📏 Finished Size
Approx. 12–14 inches tall (30–35 cm) including antlers
🧶 Materials
- DK or light worsted weight yarn in:
- Cream/light beige (main body)
- Dark brown (hooves, beard, antlers base)
- White (antler tips)
- Black or dark brown (nose)
- 3.0 mm crochet hook (or size to match gauge)
- Safety eyes (10–12 mm)
- Stuffing (polyester fiberfill)
- Yarn needle
- Stitch marker
- Wire for antlers (optional for shape)
- Hot glue gun (optional, for stiff antler tips)
🧵 Abbreviations (US Terms)
- MR – Magic ring
- ch – Chain
- sc – Single crochet
- inc – Increase (2 sc in one st)
- dec – Decrease (sc 2 together)
- sl st – Slip stitch
- BLO – Back loop only
- FO – Fasten off
🦌 Pattern Instructions
🧍 Body & Legs (Worked from bottom up)
Make 2 legs in dark brown:
- MR, 6 sc [6]
- (sc, inc) x3 [9]
3-6. sc around [9] - Change to beige, sc around [9]
8-14. sc around [9] - FO and stuff firmly.
Repeat for second leg, but do not FO.
Join Legs for Body:
- Ch 3, attach to the second leg, sc around second leg, sc across chain, sc around first leg, sc across other side of chain [24]
2-10. sc around [24] - (sc 2, dec) x6 [18]
12-14. sc around [18] - (sc, dec) x6 [12]
- Stuff firmly. FO, leaving long tail for attaching neck.
🧣 Neck & Chest Beard
Neck Base (continue from body):
- Attach yarn to center-top of body, sc in 12 sts around the opening [12]
2-5. sc around [12] - (sc 2, inc) x3 [15]
7-8. sc around [15], FO
Beard Loops (Make separately):
Use dark brown and loop stitch technique (or ch 5, sl st in next st for faux loop):
- Ch 9, sl st in second ch from hook and across [8], FO
- Make 6–8 strands.
- Sew to the neck base, layering around the bottom and sides.
🦌 Head & Snout
Head (start at nose):
- With beige, MR, 6 sc [6]
- inc x6 [12]
- (sc, inc) x6 [18]
- (2 sc, inc) x6 [24]
5-10. sc around [24] - (2 sc, dec) x6 [18]
12-14. sc around [18] - Place safety eyes between R8–9, approx. 10 sts apart
- (sc, dec) x6 [12]
- dec x6 [6] – FO, stuff and sew to top of neck
Snout Tip (optional detail):
- Embroider or crochet a small black oval and sew to the tip of the snout.
👂 Ears (Make 2)
With beige:
- MR, 6 sc [6]
- (sc, inc) x3 [9]
3-5. sc around [9] - Flatten and sl st across, FO and leave tail.
- Sew onto the head, slightly curved upward.
🦌 Antlers (Make 2 Main + 4 Small Branches)
Main Branch:
- With dark brown, MR, 6 sc [6]
2-18. sc around [6] - Change to white, 2 rounds [6]
- FO and stuff lightly or insert wire
Side Branches (Make 2 per antler):
- MR, 5 sc [5]
2-8. sc around [5] - Change to white, 2 rounds
- FO and sew onto main branch at staggered heights
- Sew antlers symmetrically to top of head
Optional: Use wire inside for shape and bend.
🎄 Tail (Optional)
- MR, 6 sc in beige
2-4. sc around [6] - FO and sew to back of the body
🎁 Assembly & Finishing
- Sew the head securely to the neck
- Position and attach ears and antlers
- Add beard strands if not already done
- Weave in all ends
- Shape the legs to stand stable
- Optional: Use stiffener for antlers to stand firm
🎉 Final Touch
Add a tartan scarf, tiny wrapped gifts, or fairy lights around the elk for the perfect holiday display. This majestic reindeer alternative is ready to light up your mantel or Christmas table!
🧡 Final Words
This amigurumi elk brings warmth, charm, and a touch of rustic elegance to your handmade Christmas decorations. Whether you’re gifting it or keeping it, you’ll love the joy it brings. Happy crocheting and may your holidays be handmade and magical!