Step into timeless charm with this Amigurumi Elegant Lady in Yellow Dress crochet pattern! With her flowing golden gown, graceful posture, and delicate features, this lovely doll brings a touch of vintage glamour to your handmade collection. Whether you’re crafting a keepsake gift, adding to your lineup of character dolls, or simply indulging in a project full of poise and personality, this pattern is a beautiful way to stitch up elegance in every loop. 💛🧶👒
Designed for detail and flair, this pattern invites you to play with soft textures, classic color palettes, and sweet extras like a dainty handbag, a wide-brimmed hat, or even a tiny parasol. Customize her hairstyle, add a pearl necklace, or give her a bouquet for extra charm. Whether she’s perched on a vanity, gifted with love, or displayed as a centerpiece, this Elegant Lady in Yellow Dress is a joyful and satisfying project—perfect for bringing a little handmade grace to your day! 💖✨🌼
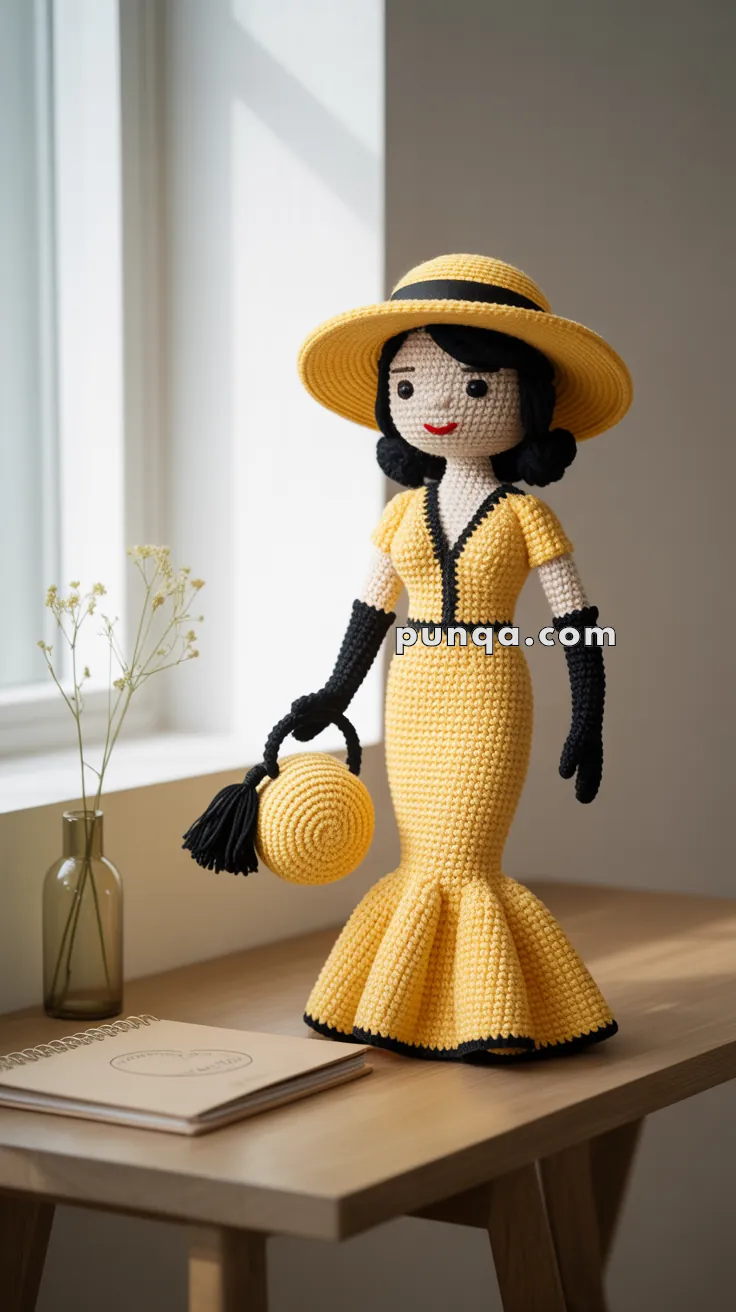
👗 Elegant Vintage Lady Amigurumi Doll Pattern
Create a stunning amigurumi fashion doll featuring a glamorous yellow mermaid gown with black trim, opera-length gloves, a wide-brimmed sun hat, and a chic round handbag. Perfect for collectors, vintage fashion enthusiasts, or as a sophisticated handmade gift!
✨ Skill Level
Advanced – Requires knowledge of shaping, color changes, detailed accessories, and fine finishing techniques.
📏 Finished Measurements
- Total Height: 30-33 cm (12-13 in)
- Head Circumference: 18 cm (7 in)
- Body Length: 8 cm (3.1 in)
- Dress Length: 16 cm (6.3 in)
- Hat Brim Diameter: 10 cm (4 in)
🧶 Materials Needed
Yarn
- DK weight cotton or cotton-blend yarn:
- Skin tone (beige/peach): 20g (40m)
- Yellow: 65g (130m)
- Black: 35g (70m)
- Red (for lips): Small amount or embroidery thread
Total yarn needed: Approximately 120-125g
Other Supplies
- Crochet hook: 2.5 mm
- Safety eyes: 6-7 mm black (or black beads)
- Polyester fiberfill stuffing
- Tapestry needle
- Stitch markers
- Black embroidery thread (for finger details)
- Wire: 20-gauge for hat brim (optional)
- Black tassel for handbag (or make with yarn)
- Scissors
⏱️ Time to Complete
8-12 hours depending on experience level
📖 Abbreviations (US Terms)
- MR = Magic Ring
- ch = Chain
- sc = Single Crochet
- hdc = Half Double Crochet
- dc = Double Crochet
- inc = Increase (2 sc in same st)
- dec = Decrease (sc2tog)
- sl st = Slip Stitch
- st(s) = Stitch(es)
- BLO = Back Loop Only
- FLO = Front Loop Only
- FO = Fasten Off
👤 Pattern Instructions
HEAD (Skin Tone)
Round 1: MR, 6 sc (6)
Round 2: inc x6 (12)
Round 3: [sc, inc] x6 (18)
Round 4: [sc 2, inc] x6 (24)
Round 5: [sc 3, inc] x6 (30)
Round 6: [sc 4, inc] x6 (36)
Rounds 7-14: sc around (36)
Round 15: [sc 4, dec] x6 (30)
Round 16: [sc 3, dec] x6 (24)
Insert safety eyes between Rounds 11-12, approximately 6-7 stitches apart.
Round 17: [sc 2, dec] x6 (18)
Stuff head firmly.
Round 18: [sc, dec] x6 (12)
Round 19: dec x6 (6)
FO, leaving long tail. Thread through remaining stitches and pull tight to close.
NOSE (Skin Tone)
Round 1: MR, 4 sc (4)
Round 2: sc around (4)
FO, leaving long tail. Sew to center of face between eyes, slightly below eye level. Add very light stuffing to give subtle dimension.
NECK (Skin Tone)
Round 1: MR, 6 sc (6)
Round 2: inc x6 (12)
Round 3: [sc, inc] x6 (18)
Rounds 4-6: sc around (18)
Stuff lightly. Do NOT fasten off – continue to body.
BODY (Skin Tone, then Yellow)
Round 7: sc around (18)
Round 8: [sc 2, inc] x6 (24)
Round 9: [sc 3, inc] x6 (30)
Rounds 10-12: sc around (30)
Round 13: Switch to yellow (start of dress bodice). sc around (30)
DRESS – BODICE WITH V-NECKLINE (Yellow with Black Trim)
Round 14: [sc 4, inc] x6 (36)
Rounds 15-16: sc around (36)
Now create the V-neckline with black trim:
Row 17: Working in rows now (not rounds):
- With black yarn, join at center front
- Sc down one side of the V for 4-5 stitches
- Ch 1, turn
- Sc back up
- FO
- Repeat on the other side to create symmetrical V
- Continue working in yellow in rounds for the bodice
Rounds 17-20: With yellow, sc around (36)
Stuff body and bodice firmly as you work.
DRESS – FITTED HIP/THIGH SECTION (Yellow)
Rounds 21-38: sc around (36)
This creates the long, fitted mermaid-style silhouette through the hips and thighs (approximately 18 rounds of fitted section).
Continue stuffing as you work to maintain the sleek shape.
DRESS – DRAMATIC FLARE BASE (Yellow)
Round 39: [sc 5, inc] x6 (42)
Round 40: [sc 6, inc] x6 (48)
Round 41: [sc 7, inc] x6 (54)
Round 42: [sc 8, inc] x6 (60)
Round 43: [sc 9, inc] x6 (66)
Round 44: [sc 10, inc] x6 (72)
Round 45: sc around (72)
Round 46: sc around (72)
Round 47: Switch to black. sc around (72)
Round 48: Still with black, sc around (72)
FO and weave in ends.
DRESS FLARE – RUFFLE OVERLAY (Yellow)
To create the dramatic pleated/ruffled flare effect:
Return to Round 39 (first increase round). Working in the front loops of those stitches:
Round 1: Join yellow in FLO of Round 39. [sc, inc] around (63)
Round 2: [sc 2, inc] around (84)
Round 3: [sc 3, inc] around (105)
Round 4: [sc 4, inc] around (126)
Round 5: sc around (126)
Round 6: sc around (126)
Round 7: Switch to black. sc around (126)
Round 8: Still with black, sc around (126)
FO and weave in ends.
This creates the very full, dramatic trumpet/mermaid flare with multiple layers.
LEGS (Make 2 – Yellow, hidden inside dress)
Round 1: MR, 6 sc (6)
Round 2: inc x6 (12)
Rounds 3-20: sc around (12)
Stuff lightly. FO, leaving long tail.
Sew legs inside the bottom of the dress to provide stability and allow the doll to stand. Position them so feet are at the bottom edge of the black trim.
ARMS (Make 2 – Skin Tone)
Round 1: MR, 5 sc (5)
Round 2: [sc, inc] x2, sc (7)
Rounds 3-4: sc around (7)
Round 5: [sc, dec] x2, sc (5)
Rounds 6-20: sc around (5)
Stuff only the hand portion (Rounds 1-5) very lightly. Leave upper arm unstuffed for flexibility.
FO, leaving long tail for sewing.
OPERA GLOVES (Make 2 – Black)
Round 1: MR, 5 sc (5)
Round 2: [sc, inc] x2, sc (7)
Rounds 3-24: sc around (7)
Round 25: [sc, dec] x2, sc (5)
FO, leaving long tail.
Slip glove over arm piece. The glove should cover the entire arm from fingertips to where arm meets shoulder. Sew the top edge of glove to the shoulder area.
FINGERS (Embroidery Detail)
Using black embroidery thread or thin black yarn:
- Mark 4 finger positions on the hand section (between Rounds 1-4 of glove)
- Embroider 3-4 short vertical lines (approximately 3-4 stitches each) to define individual fingers
- Weave in ends inside the glove
HAIR (Black)
Hair Cap Base:
Round 1: MR, 6 sc (6)
Round 2: inc x6 (12)
Round 3: [sc, inc] x6 (18)
Round 4: [sc 2, inc] x6 (24)
Round 5: [sc 3, inc] x6 (30)
Round 6: [sc 4, inc] x6 (36)
Rounds 7-14: sc around (36)
FO, leaving long tail for sewing.
HAIR STYLING – WAVY BOB (Black)
Creating the Textured Bob:
Method 1 – Loop Fringe Hair:
- Cut 90-110 strands of black yarn, each 10-12 cm long
- Fold each strand in half
- Using a crochet hook, pull the folded loop through a stitch on the hair cap
- Pull the ends through the loop and tighten (creates a fringe/tassel effect)
- Attach loops very densely all around the cap, starting from the bottom edge and working up
- Leave the top center area less dense for the part
- Trim to create a wavy bob shape approximately 2.5-3 cm long
- Style with a deep side part on the left side
- Use your fingers to separate and fluff the strands to create waves
Method 2 – Crocheted Wave Curls:
- Ch 12, starting in 2nd ch from hook: [2 hdc in each ch] across
- This creates a wavy/ruffled strand
- Make 50-60 curls
- Sew curls densely all around hair cap in overlapping rows
- Style into a wavy bob with side part
HAT – CROWN (Yellow)
Round 1: MR, 6 sc (6)
Round 2: inc x6 (12)
Round 3: [sc, inc] x6 (18)
Round 4: [sc 2, inc] x6 (24)
Round 5: [sc 3, inc] x6 (30)
Round 6: [sc 4, inc] x6 (36)
Rounds 7-11: sc around (36)
This creates the dome that sits on top of the head.
HAT – BLACK BAND
Round 12: Switch to black. sc around (36)
Round 13: sc around (36)
Round 14: sc around (36)
HAT – WIDE BRIM (Yellow)
Round 15: Switch to yellow. [sc 5, inc] x6 (42)
Round 16: [sc 6, inc] x6 (48)
Round 17: [sc 7, inc] x6 (54)
Round 18: [sc 8, inc] x6 (60)
Round 19: [sc 9, inc] x6 (66)
Round 20: [sc 10, inc] x6 (72)
Round 21: [sc 11, inc] x6 (78)
Round 22: [sc 12, inc] x6 (84)
Round 23: sc around (84)
Round 24: sc around (84)
FO and weave in ends.
Optional: Insert thin wire around the outer edge of the brim between Rounds 23-24 for structure and to create a gentle upward curve. Stitch in place.
The brim should measure approximately 10-11 cm (4-4.3 in) in diameter and should have a gentle upward curve.
HANDBAG (Yellow)
Bottom Circle:
Round 1: MR, 6 sc (6)
Round 2: inc x6 (12)
Round 3: [sc, inc] x6 (18)
Round 4: [sc 2, inc] x6 (24)
Round 5: [sc 3, inc] x6 (30)
Bag Sides:
Round 6: sc in BLO around (30) – creates ridge at bottom
Rounds 7-12: sc around (30)
Top Rim:
Round 13: [sc 3, dec] x6 (24)
Round 14: sc around (24)
FO, leaving long tail.
Stuff bag moderately to give it a round, structured shape (like a hatbox).
HANDBAG HANDLE (Black)
Method 1 – Crocheted Handle:
- Ch 40
- Sc in 2nd ch from hook and across (39 sc)
- Ch 1, turn
- Sc across (39 sc)
- FO, leaving tails for sewing
Method 2 – Twisted Cord:
- Cut 3 strands of black yarn, each 80 cm long
- Tie together at one end
- Twist tightly until cord begins to kink
- Fold in half and let it twist on itself
- Knot both ends
- Trim to approximately 12-14 cm finished length
Sew handle ends to opposite sides of bag rim (Round 14).
HANDBAG TASSEL (Black)
- Cut 25-30 strands of black yarn, each 10 cm long
- Gather all strands together and tie tightly in the middle with another strand
- Fold bundle in half at the tie point
- Wrap a strand around the bundle 1 cm from fold, wrapping 8-10 times tightly
- Thread end through wraps with needle to secure
- Weave end down into the tassel
- Trim tassel ends evenly to approximately 3.5-4 cm
- Sew to bottom center of handbag
🧵 Assembly Instructions
Step 1: Attach Head to Neck/Body
- Position head on top of neck section
- Use the long tail from head and tapestry needle
- Sew around the neck area with small, tight stitches all around
- Ensure head is centered and secure
- Add extra stuffing to neck if needed for stability
Step 2: Attach Legs Inside Dress
- Position legs inside the bottom of the dress
- Sew the top of each leg to the inside of the dress body (around Round 13-14)
- Legs should be positioned so the feet reach the bottom black trim
- This provides stability for standing
- The legs are completely hidden inside the dress
Step 3: Attach Arms with Gloves
- Position arms at shoulder level (approximately where yellow bodice meets skin tone, around Round 13)
- Sew arms to sides of body using long tails from both arm and glove
- Arms should be angled slightly forward
- Ensure gloves extend all the way to shoulder, covering entire arm
- Make several secure stitches at shoulder attachment point
Step 4: Style and Attach Hair
- Pin hair cap to head, covering the entire top and back of head
- The front hairline should be at approximately Round 8 of the head
- Sew hair cap securely all around the edge with small stitches
- Style the bob with a deep left side part
- Fluff and separate hair strands to create wavy texture
- Trim any uneven strands to create a neat bob approximately 2.5-3 cm long
- Optional: Use a tiny amount of fabric stiffener or diluted white glue on fingertips to set the waves
Step 5: Attach Hat
- Position hat on top of head, tilted slightly back and to the right
- The black band should sit just above the hairline
- Sew through the crown of hat into the hair cap/head with several stitches
- Secure the back of the crown as well
- Brim should frame the face elegantly and curve gently upward
- If using wire in brim, adjust to desired curve
Step 6: Create Face Details
Eyes:
- Already inserted during head construction at Rounds 11-12
Eyebrows (Black):
- Using black embroidery thread or thin black yarn
- Embroider two thin curved lines above eyes
- Each eyebrow should be approximately 1 cm long
- Slightly arched shape
- Position about 2-3 rows above eyes
Mouth (Red):
- Using red embroidery thread or thin red yarn
- Embroider a small curved smile approximately 1-1.2 cm wide
- Position between Rounds 13-14 of head, centered below nose
- Create a subtle upward curve
- Add a tiny V or indent at each corner for dimension
Optional Details:
- Add a small highlight to each eye with white thread (tiny dot)
- Use pink chalk or makeup powder for subtle cheek blush
- Add eyelash lines with black thread if desired
Step 7: Attach Handbag to Hand
- Position handbag handle in the right hand (or left, as preferred)
- Wrap the gloved fingers around the handle
- Sew handle securely to the hand area with black thread
- Make several stitches to ensure bag doesn’t slip
- The bag should hang naturally at the doll’s side
- Ensure tassel hangs freely at bottom of bag
🎨 Color Variations
Classic Combinations:
Red Carpet Glamour:
- Red dress with black trim
- Black gloves and hat
- Black handbag with red tassel
Winter Elegance:
- Navy blue dress with cream trim
- Cream gloves and navy hat
- Navy handbag with cream tassel
Garden Party:
- Mint green dress with white trim
- White gloves and mint hat
- Mint handbag with white tassel
Hollywood Glam:
- Black dress with gold trim
- Black gloves and hat
- Black handbag with gold tassel
Vintage Rose:
- Dusty pink dress with burgundy trim
- Burgundy gloves and dusty pink hat
- Pink handbag with burgundy tassel
💡 Tips for Success
✨ Tight Tension: Keep stitches very tight throughout to prevent stuffing from showing, especially on the head, body, and fitted dress section.
✨ Stuffing the Dress: Stuff the fitted portion of the dress (Rounds 13-38) very firmly to maintain the sleek, form-fitting silhouette. The flare should hang freely without stuffing.
✨ Mermaid Flare: The dramatic flare comes from aggressive increasing in the overlay ruffle. Don’t be afraid to make it very full!
✨ Opera Gloves Length: These are VERY long – 24 rounds! They should cover the entire arm from fingertips almost to the shoulder.
✨ Hat Brim Shaping: The brim needs many increase rounds (8-9 rounds) to achieve the wide, dramatic curve. Use wire for best results.
✨ Face Embroidery: Use thin embroidery thread rather than yarn for the most delicate facial features. Practice on a scrap piece first.
✨ Hair Volume: Dense hair application is key! The more strands you add, the fuller and more realistic the bob will look. Attach loops very close together.
✨ V-Neckline: The black V can be embroidered after completing the dress, or worked in as you go. Make it subtle but visible.
✨ Handbag Structure: Stuff the bag enough to make it look round and structured like a hatbox, not flat.
✨ Standing Stability: The internal legs combined with the wide dress base allow the doll to stand independently. Ensure legs are sewn securely.
✨ Color Changes: When switching between yellow and black, carry the unused color along the inside to minimize ends to weave in.
✨ Blocking: Steam blocking the dress flare and hat brim helps them hold their dramatic shapes.
📐 Measurement Checkpoints
- After Round 6 of head: Should measure approximately 11.5 cm circumference
- After Round 6 of neck: Should measure approximately 5.5 cm circumference
- After Round 12 of body: Should measure approximately 9.5 cm circumference
- After Round 38 of dress (fitted section): Should measure approximately 11.5 cm tall from bodice start
- Dress flare at bottom: Should measure approximately 23 cm circumference
- Hat brim diameter: Should measure approximately 10-11 cm across
- Handbag height: Should measure approximately 4.5 cm tall
- Handbag diameter: Should measure approximately 9.5 cm across
🎁 Display & Gifting Ideas
This elegant lady doll is perfect for:
- 🏛️ Vintage fashion doll collections
- 🎨 Display on shelves, mantels, or in glass cabinets
- 🎁 Sophisticated handmade gifts for fashion lovers
- 👗 Fashion inspiration and design reference
- 📸 Photography props and styling
- 🏪 Craft fair premium items
- 💝 Special occasion presents (birthdays, Mother’s Day, anniversaries)
- 🎭 Costume design inspiration
- 🖼️ Framed shadow box displays
🌟 Styling & Posing Suggestions
Classic Poses:
- Standing upright with one hand holding bag, other hand at side
- Slight tilt of head toward handbag side
- Hat angled elegantly back
- Can pose with one leg slightly forward (if legs are wired)
Display Tips:
- Place on a small circular base or platform
- Add miniature props (tiny flowers, vintage books)
- Display against a neutral backdrop to highlight colors
- Group with other fashion dolls in complementary colors
❤️ Final Thoughts
This Elegant Vintage Lady brings timeless glamour and sophistication to the world of amigurumi! The dramatic mermaid gown with its fitted silhouette and voluminous flare, combined with opera-length gloves and a wide-brimmed hat, creates an unforgettable fashion statement reminiscent of 1940s-1950s Hollywood elegance.
The key to success with this pattern is patience and attention to detail. The fitted dress shaping requires firm stuffing and consistent tension. The dramatic skirt flare needs aggressive increasing to achieve that show-stopping trumpet silhouette. The delicate facial features and dense, wavy hair complete her refined appearance.
Take your time with each element—from the individually embroidered fingers on the gloves to the perfectly positioned hat and the structured round handbag. These details transform this from a simple amigurumi into a true work of art.
The result is a stunning display piece that showcases advanced crochet skills and celebrates vintage fashion. She’s sure to be admired and treasured!
Happy crocheting, and enjoy creating your own elegant fashion icon! 👗✨🎩💛


Super duper tutorial i m very impressed