Bring the magic of the ocean to life with this Amigurumi Under the Sea Mobile crochet pattern! Perfect for nurseries, playrooms, or anyone who dreams of seaside adventures, this enchanting mobile features a delightful collection of sea creatures—think smiling jellyfish, curious crabs, gentle turtles, and playful fish—all suspended in a whimsical underwater dance. Whether you’re crafting a handmade baby shower gift or adding a splash of ocean charm to your own space, this pattern lets you stitch up a floating world of aquatic wonder. 🐠🐙🌊
Designed for creativity and storytelling, this pattern invites you to mix soft pastels or bold brights, experiment with textures, and personalize each sea friend with expressive details like tiny fins, sleepy eyes, or even a sparkle of embroidery. Hang them from a wooden hoop or driftwood for a natural touch, and watch as your mobile sways gently like waves in the sea. This Amigurumi Under the Sea Mobile is a joyful and satisfying project—perfect for bringing a tide of handmade magic to every stitch! 💖🧶✨
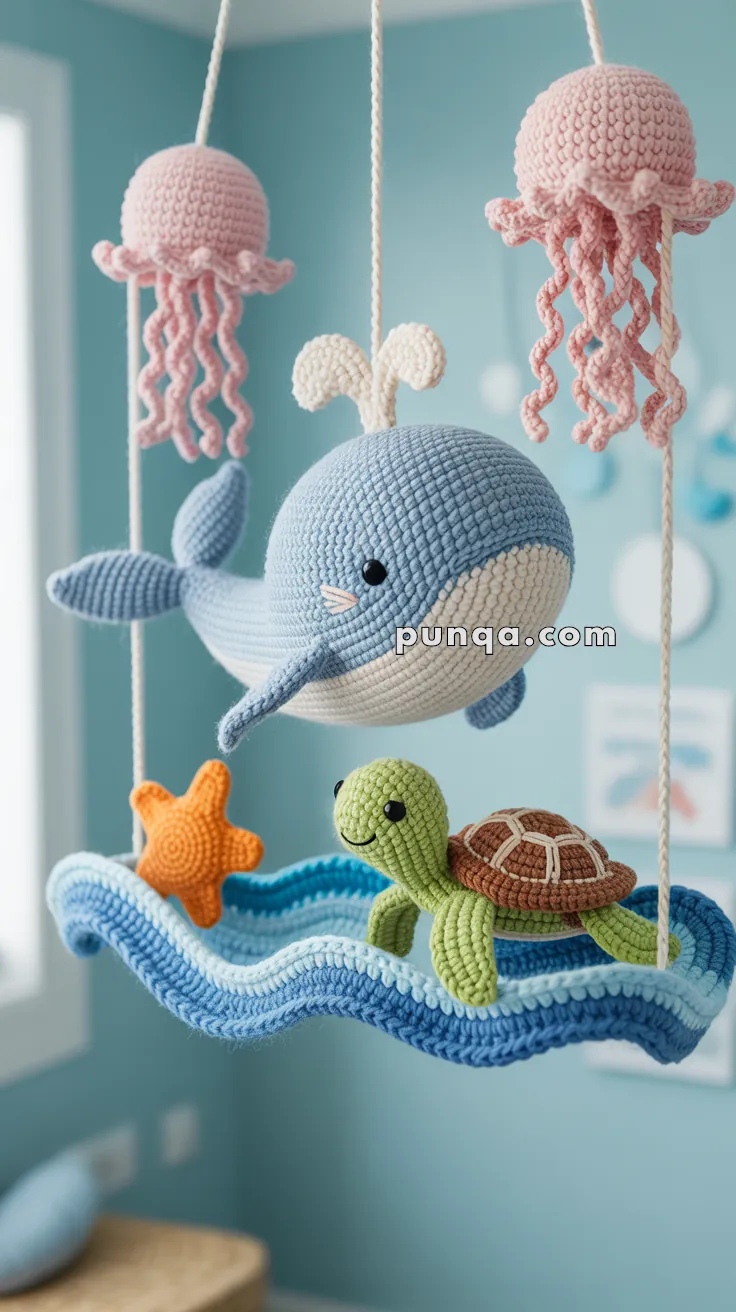
🌊 Under the Sea Mobile Crochet Pattern
Bring ocean dreams to life with this adorable baby mobile featuring a whale, sea turtle, starfish, jellyfish, and a wavy water base! These sweet sea creatures are ideal for nursery decor, crib mobiles, or ocean-themed gifts.
✨ Skill Level
Intermediate
Includes amigurumi shaping, spiral tentacles, surface embroidery, and mobile assembly.
📏 Finished Sizes (Approx.)
- Whale: 18–20 cm (7–8 in)
- Turtle: 10–12 cm (4–5 in)
- Jellyfish: 14–16 cm (5½–6½ in) including tentacles
- Starfish: 7 cm (2¾ in)
- Wave Base: 25–30 cm (10–12 in) wide, gently curved
🧶 Materials
Yarn (DK / Light Worsted – matte cotton preferred)
- Light blue + cream – whale
- Chartreuse / soft green – turtle body
- Medium brown + cream – turtle shell
- Dusty pink – jellyfish
- Bright orange – starfish
- Dark blue, medium blue, light blue – wave base
- White – whale water spout accents
Tools & Notions
- 2.5–3.0 mm crochet hook
- Polyester fiberfill
- 6 mm safety eyes (or embroidered eyes)
- Tapestry needle
- Stitch markers
- Strong cotton cord or nylon line (for hanging)
- Wooden hoop (25–30 cm diameter)
🧵 Abbreviations (US Terms)
MR – magic ring
ch – chain
sc – single crochet
hdc – half double crochet
dc – double crochet
tr – treble crochet
inc – increase
dec – invisible decrease
sl st – slip stitch
FO – fasten off
🐳 Whale
Body (Light Blue – worked in continuous rounds)
MR, 6 sc (6)
inc ×6 (12)
(sc, inc) ×6 (18)
(2 sc, inc) ×6 (24)
(3 sc, inc) ×6 (30)
(4 sc, inc) ×6 (36)
Rounds 7–19: sc around (36)
(4 sc, dec) ×6 (30)
Round 21: sc around
(3 sc, dec) ×6 (24)
Round 23: sc around
(2 sc, dec) ×6 (18)
(sc, dec) ×6 (12)
Stuff firmly, shaping into a smooth oval.
FO and close.
Belly (Cream – Oval Panel)
Ch 7
Round 1: sc in 2nd ch, sc 4, 3 sc in last ch, rotate, sc 4, 2 sc in first ch (14)
Round 2: inc, sc 4, inc ×3, sc 4, inc ×2 (22)
Round 3: sc around (22)
FO, leave long tail.
Sew neatly onto underside, slightly forward-facing.
Side Fins (Make 2 – Light Blue)
MR, 6 sc
(sc, inc) ×3 (9)
Rounds 3–5: sc around
Flatten lightly. FO.
Attach low on the body, angled gently downward.
Tail Fluke (Single Piece – Light Blue)
MR, 6 sc
inc ×6 (12)
(sc, inc) ×6 (18)
(2 sc, inc) ×6 (24)
Round 5: sc around
Flatten horizontally and pinch center slightly before sewing to body.
Water Spout (White – Soft Loops)
Make 2 pieces:
- Ch 14, 2 sc in each ch back
FO.
Sew together at base and attach to top center of whale head.
Face
- Eyes: 6 mm safety eyes between rounds 10–11, spaced 6 stitches apart
- Mouth: optional tiny embroidered stitch in cream or light gray
🐢 Turtle
Head (Green)
MR, 6 sc
inc ×6 (12)
(sc, inc) ×6 (18)
Rounds 4–7: sc around
Insert eyes between rounds 4–5.
(dec, sc) ×6 (12)
FO, stuff lightly.
Belly (Green)
MR, 6 sc
inc ×6 (12)
(sc, inc) ×6 (18)
(2 sc, inc) ×6 (24)
Round 5: sc around
FO.
Shell (Brown)
MR, 6 sc
inc ×6 (12)
(sc, inc) ×6 (18)
(2 sc, inc) ×6 (24)
(3 sc, inc) ×6 (30)
FO.
Shell Pattern (Cream – Surface Embroidery)
Embroider 1 central hexagon with 5 surrounding hexagons using chain stitch.
Flippers (Make 4 – Green)
MR, 6 sc
(sc, inc) ×3 (9)
Rounds 3–5: sc around
Flatten and FO.
Assembly
- Sew shell to belly
- Insert head at front
- Attach 2 flippers front, 2 back
- Embroider a small curved smile
🌸 Jellyfish (Make 2)
Bell (Dusty Pink)
MR, 6 sc
inc ×6 (12)
(sc, inc) ×6 (18)
(2 sc, inc) ×6 (24)
(3 sc, inc) ×6 (30)
Rounds 6–8: sc around
Ruffle Edge
sl st, ch 3, sl st in same stitch around.
Stuff very lightly. FO.
Tentacles (9–10 per jellyfish)
Ch 30
2 sc in each ch back (tight spiral)
FO.
Attach evenly around the bell edge.
⭐ Starfish
MR, 5 sc
inc ×5 (10)
For each arm (×5):
- Ch 6
- sl st in 2nd ch, sc, sc, hdc, dc
- sl st into next body stitch
FO.
🌊 Wave Base (Single Sculpted Piece)
Foundation
Ch 52
Rows 1–3 (Dark Blue): sc across
Rows 4–5 (Medium Blue): sc across
Rows 6–7 (Light Blue): sc across
Wave Shaping
Row 8: sc 3, hdc 2, dc 3, hdc 2, sc 3 repeat
Row 9: sc, hdc, dc, tr, dc, hdc, sc, sl st repeat
FO.
Gently curve into a rolling wave shape.
Lightly tack ends to maintain arc.
🔗 Hanging & Assembly
- Whale: hangs freely from head
- Jellyfish: suspended higher than whale
- Turtle + starfish: sewn directly onto wave base
- Wave base: attached to lower section of hoop
Top hanger:
- 4 equal cords tied evenly around hoop
- Gather and knot securely at center
⚠️ Safety Notes
- Hang out of baby’s reach
- Secure all knots and seams firmly
- Remove mobile once baby can sit or reach
🌼 Final Note
This under-the-sea mobile is designed to feel soft, calm, and balanced, with rounded forms and gentle motion that soothe rather than stimulate. Every element flows naturally, creating a peaceful ocean scene perfect for a nursery or heartfelt handmade gift.
Enjoy crafting your little ocean world 🌊🐳🐢✨


Gracias por compartir y mil felicidades por tan hermoso trabajo
HERMOSO!!MUCHAS GRACIAS POR COMPARTIR .