Curl up with cozy charm and floral sweetness in this Amigurumi Sleeping Cat & Daisy Vase crochet pattern! Featuring a peacefully snoozing kitty nestled beside a vase of cheerful daisies, this heartwarming design brings together the calm of a catnap and the joy of blooming flowers. Whether you’re crafting a thoughtful gift, decorating a sunny shelf, or simply love whimsical amigurumi, this pattern lets you stitch up a serene little scene that radiates comfort and cuteness. 🐱🌼💤
Designed for creativity, this pattern invites you to play with soft neutrals for the cat, bright pops of yellow and white for the daisies, and textured stitches to bring each element to life. Add embroidered details like sleepy eyes, a tiny collar, or even a butterfly perched on a petal for extra flair. Whether you’re making it as a cozy keepsake or just for the joy of crafting, this Amigurumi Sleeping Cat & Daisy Vase is a delightful and satisfying project—perfect for bringing a touch of handmade tranquility to every stitch! 🧶💖🌿
🐱 Sleeping Cat & Daisy Pitcher Crochet Pattern
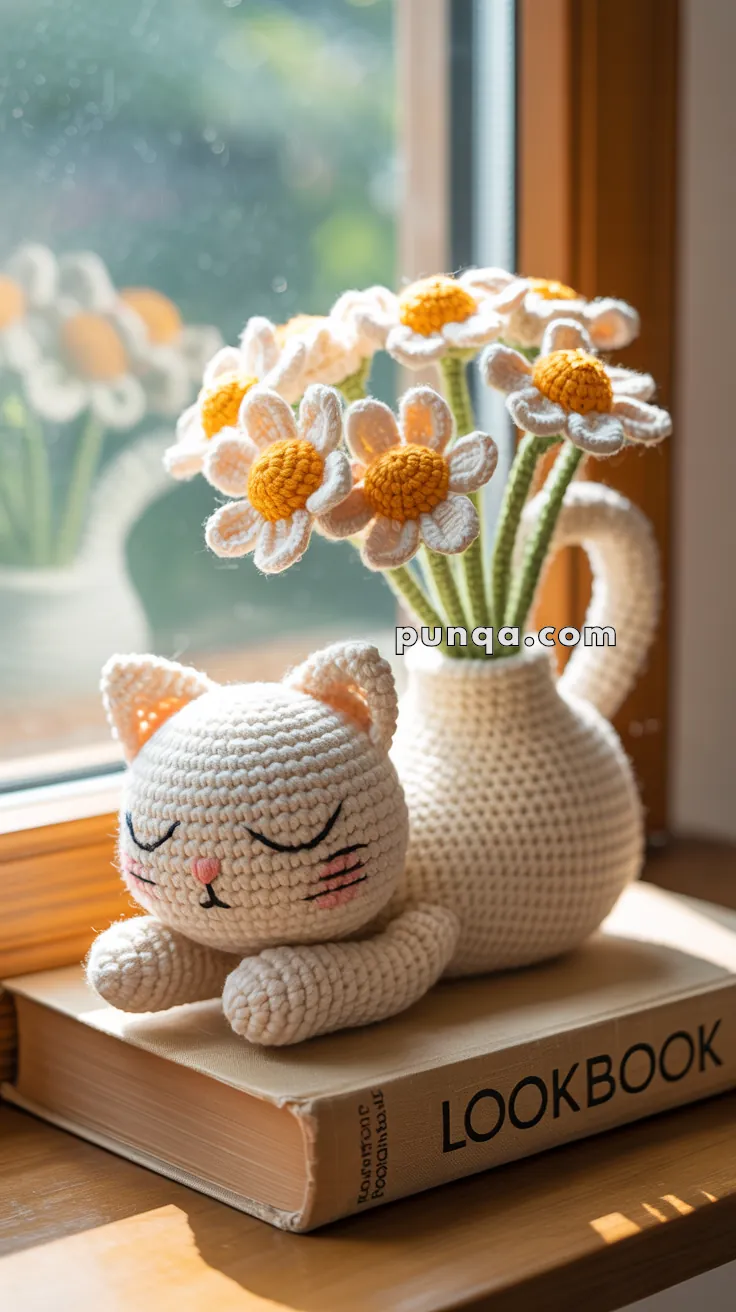
Capture a peaceful sunlit moment in yarn form: a cream-colored sleeping cat resting beside a rounded pitcher of daisies. The soft loaf-shaped cat, warm yellow flower centers, and gentle arch of petals create a scene that feels quiet, tender, and deeply handmade. Whether displayed on a shelf, windowsill, or stack of books, this small arrangement radiates calm charm and timeless coziness.
✨ Skill Level
Intermediate – involves shaping, color changes, small floral components, neat assembly, and embroidery.
📐 Finished Size
- Cat: ~13–14 cm long
- Pitcher (without flowers): ~11–12 cm tall
- Full display (with daisies): ~17–18 cm tall
(using DK cotton yarn and a 2.5–2.75 mm hook)
🧶 Materials
- DK cotton yarn:
- Cream – cat & pitcher
- Light pink – nose, inner ears, cheeks
- Black – facial embroidery
- Warm yellow – daisy centers
- White – petals
- Soft leaf-green – stems
- Crochet hook: 2.5–2.75 mm
- Fiberfill stuffing
- Tapestry needle
- Thin floral wire (optional, for stems)
🪡 Abbreviations (US Terms)
MR – magic ring
sc – single crochet
inc – increase (2 sc in 1 st)
dec – invisible decrease
ch – chain
sl st – slip stitch
FO – fasten off
🐾 Sleeping Cream Cat
Worked as one continuous smooth oval with no visible neck indent.
Head & Body
Cream
R1: MR, 6 sc
R2: inc x6 (12)
R3: (1 sc, inc) x6 (18)
R4: (2 sc, inc) x6 (24)
R5: (3 sc, inc) x6 (30)
R6–R16: 30 sc around
Stuff firmly as you go, shaping into a gentle loaf with more fullness in the front half.
R17: (3 sc, dec) x6 (24)
R18: (2 sc, dec) x6 (18)
R19: (1 sc, dec) x6 (12)
R20: dec x6 (6)
FO and close.
Flatten the underside slightly so the cat rests solidly.
Front Paws (Make 2)
Cream
R1: MR, 6 sc
R2: inc x6 (12)
R3–R4: sc around (12)
R5: (1 sc, dec) x4 (8)
R6–R8: sc around (8)
Stuff lightly and flatten closed.
Placement:
Attach both paws at the front underside around R9–R10, side-by-side, touching, pointing outward and resting on the surface.
Lean the head slightly downward so it nestles onto the paws.
Ears (Make 2 – Small and Rounded)
Cream
R1: MR, 4 sc
R2: (1 sc, inc) x2 (6)
R3: sc around (6)
Pinch base and sew on top of head, angled slightly outward and positioned toward the back.
Inner ear:
Use light pink to stitch a tiny triangular accent.
Optional Tail
Cream
Ch 16
Sc in 2nd ch and along (15)
FO, sew to rear of cat and curve gently along side.
Face Embroidery
Use black and pink yarn:
- Eyes: long, curved lines tilted upward at outer corners
- Add 2–3 short lashes at outer corner of each eye
- Tiny pink rounded nose
- Short mouth line below nose
- 3 whiskers on each side
- Soft blush ovals under eyes in pale pink
Keep all facial features small, neat, and slightly curved for a serene expression.
🌼 Crochet Daisies
Make 6–7 daisies in varied stem lengths for a natural cluster.
Daisy Centers (Tight and Small)
Warm yellow
R1: MR, 6 sc
R2: inc x6 (12)
R3: sc around (12)
FO with long tail. Light stuffing optional for a domed look.
Petals (8 Per Flower)
White – worked as rounded ovals
For each petal:
Ch 6
R1: Starting in 2nd ch from hook, sc 3, hdc 1, 3 sc in last ch (tip).
Continue down the other side: hdc 1, sc 3, sl st to first st.
FO, leaving a tail for sewing.
Make 8 petals per flower.
Assembly:
Sew petals around center, overlapping slightly so the flower looks full and soft, just like in the photo.
Stems
Soft leaf-green
Ch 22–30 (varied lengths for natural look)
Sc back along chain.
Optional: insert thin floral wire and crochet tightly around it for shaping.
FO, leaving a long tail for assembling to the flower center and pitcher.
Attach each stem securely along the back of its flower center.
🏺 Cream Pitcher
Smooth and rounded shape with a defined rim and an outward-arching handle.
Pitcher Body
Cream
R1: MR, 6 sc
R2: inc x6 (12)
R3: (1 sc, inc) x6 (18)
R4: (2 sc, inc) x6 (24)
R5: (3 sc, inc) x6 (30)
R6: (4 sc, inc) x6 (36)
R7–R10: sc around (36) – this forms the full belly
R11: (4 sc, dec) x6 (30)
R12–R13: sc around (30)
R14: (3 sc, dec) x6 (24)
R15: sc around (24)
R16: (2 sc, dec) x6 (18)
R17: sc around (18)
R18: sc around (18) for a solid rim ring
FO.
Stuff firmly, especially the lower and middle belly, until pitcher stands straight with a rounded silhouette.
Handle
Cream
Ch 22
Sc in 2nd ch and along (21)
FO.
Shape into a soft C-curve.
Attach:
- Top of handle to pitcher rim (Round 18 area)
- Bottom of handle to belly (Round 11–12 area)
Handle should bow outward slightly and return inward, about 2–3 cm at its farthest point.
🌿 Scene Assembly
Daisy Cluster
- Gather stems together just below the flowers
- Wrap base with green yarn and knot
- Insert through pitcher opening
- Stitch through multiple stems from different angles to secure the bouquet inside
- Curve stems gently backward and outward so petals fan above the cat
Cat Placement
Rest the cat so paws sit flat on the surface and head leans gently downward toward them.
Place beside the pitcher (a book stack works beautifully).
Add tiny securing stitches under the body if permanent display is desired.
🌸 Final Touches
- Slightly angle flowers rather than keeping them upright
- Add a touch of blush under the cat’s eyes
- Curve the tail subtly if included
- Shape pitcher handle into a soft arc
🌤️ A Peaceful Handmade Moment
Once complete, you’ll have a tender scene that looks lifted straight from the photograph: a loaf-shaped sleeping cat with delicately embroidered features, tiny rounded ears, joined paws resting forward, and a rounded pitcher filled with soft white daisies. It’s small, calm, and full of quiet beauty — a little handmade pause in the middle of your day.
Set it by the window, nestle it on your favorite book, or gift it to someone who needs a moment of peace. This gentle vignette is proof that even the simplest stitches can create something that feels warm, serene, and alive.