Add a touch of sophistication to your crochet collection with this Amigurumi Butler pattern! Inspired by the elegance and charm of a classic butler, this delightful design captures the refined details of a well-dressed attendant, complete with a distinguished outfit and polished demeanor. Whether you’re crafting for fun, creating a unique decorative piece, or simply enjoy making character-inspired amigurumi designs, this pattern lets you stitch up a miniature butler bursting with personality! 🏰✨
Designed for customization, this pattern allows you to experiment with different colors, embroidered details, or even tiny accessories like a miniature tray or bow tie for extra charm. Craft a classic butler with traditional hues, create a whimsical version with bold colors, or even stitch up a full set of themed amigurumi for a charming display! Whether gifted as a cherished keepsake, displayed as a stylish accent, or made simply for the joy of crafting, this Amigurumi Butler is a fun and creative project—perfect for bringing a touch of handmade elegance to every stitch! 🧶💖
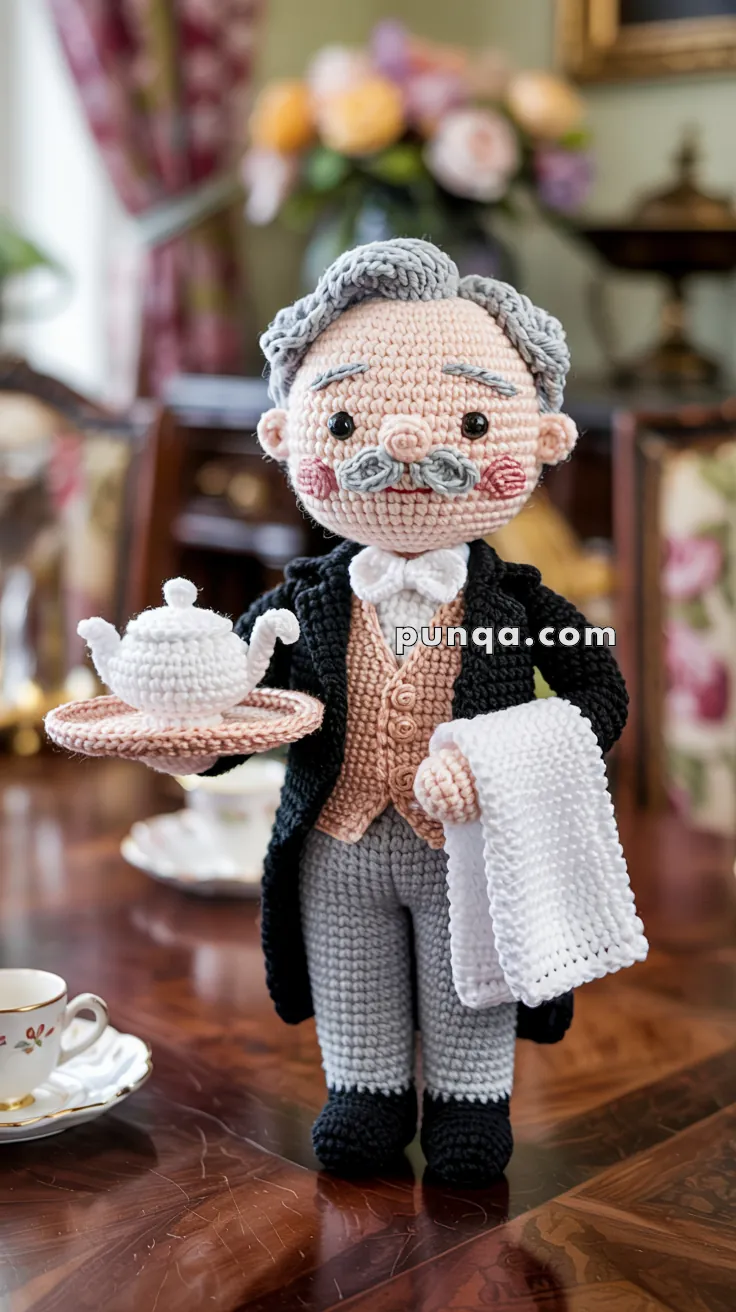
🫖 Amigurumi Butler Crochet Pattern (with Tray & Teapot)
This dignified butler brings tea and charm to any shelf! He wears a black frock coat with lapels and tails over a peach vest, light-grey trousers, and black shoes. His silver curls, curled mustache, and rosy cheeks complete the look—plus a saucer-style tray with a white teapot and a neatly folded towel over his right arm. ☕🎩
✨ Skill Level
Intermediate — shaping, color changes, small accessories, and neat assembly.
📏 Finished Size
~9–10 in (23–25 cm) tall with DK yarn and a 2.5–3.0 mm hook.
🧶 Materials (amounts are generous)
- DK cotton or acrylic:
- Light beige (skin) – 25 g
- Silver grey (hair, brows, mustache) – 20 g
- Peach/rust (vest) – 20 g
- Light grey (trousers) – 25 g
- Black (coat, shoes) – 35 g
- White (shirt, bow tie, towel, teapot) – 35 g
- Blush pink (cheeks, optional embroidery) – scraps
- 2.5–3.0 mm hook
- 8–10 mm black safety eyes
- Fiberfill
- Tapestry needle & stitch markers
- Optional: thin cardboard circle for tray base; thin craft wire for tray support
🧵 Abbreviations (US)
MR – magic ring
sc – single crochet
inc – increase (2 sc in same st)
dec – decrease (sc2tog)
ch – chain
sl st – slip stitch
BLO – back loop only
FLO – front loop only
FO – fasten off
👨 Head (Light Beige)
R1: MR, 6 sc [6]
R2: inc × 6 [12]
R3: (sc, inc) × 6 [18]
R4: (2 sc, inc) × 6 [24]
R5: (3 sc, inc) × 6 [30]
R6: (4 sc, inc) × 6 [36]
R7: sc around [36]
R8: sc around [36]
R9: sc around [36]
R10: sc around [36]
— place safety eyes between R10–R11, 7 sts apart —
R11: sc around [36]
R12: sc around [36]
R13: sc around [36]
R14: (4 sc, dec) × 6 [30]
R15: (3 sc, dec) × 6 [24]
R16: (2 sc, dec) × 6 [18]
R17: (sc, dec) × 6 [12]
Stuff very firmly.
R18: dec × 6 [6]
FO, close.
👂 Ears ×2 (Light Beige)
R1: MR, 5 sc [5]
FO, flatten slightly and sew between R9–R10.
👃 Nose (Light Beige — rounded)
R1: MR, 6 sc [6]
R2: (sc, inc) × 3 [9]
R3: sc around [9]
R4: (sc, dec) × 3 [6]
FO, stuff lightly and sew centered between eyes.
🧑🦳 Hair: Horseshoe Cap + Top Swirl (Silver Grey)
Horseshoe Cap (leaves bald forehead):
R1: MR, 6 sc [6]
R2: inc × 6 [12]
R3: (sc, inc) × 6 [18]
R4: (2 sc, inc) × 6 [24]
R5: (3 sc, inc) × 6 [30]
R6: (4 sc, inc) × 6 [36]
R7: sc around [36]
FO. Pin around sides and back of head, leaving the top-front bald; sew in a C/Horseshoe shape.
Side Curls & Swirl:
Make 3–4 strands: ch 16, work 3 sc in each ch to end (strand coils). FO and sew along temples and crown.
Make one longer swirl: ch 24, 3 hdc in each ch, FO; spiral and stitch on top center pointing slightly forward.
Eyebrows (silver): embroider two short upward arcs above eyes.
Cheeks: MR, 5 sc with blush pink, FO and sew at cheek points (or brush on powder blush).
Mustache (two pieces, silver):
Each side: ch 7, sl st in 2nd ch, sc, hdc, dc, hdc, sc; FO. Sew mirrored under nose with tips slightly curled upward.
👔 Body (worked bottom-up; trousers → vest → shirt → collar base)
Start with Light Grey (trousers).
R1: MR, 6 sc [6]
R2: inc × 6 [12]
R3: (sc, inc) × 6 [18]
R4: (2 sc, inc) × 6 [24]
R5: sc around [24]
R6: sc around [24]
R7: sc around [24]
R8: sc around [24]
R9: sc around [24]
R10: sc around [24]
Switch to Peach/Rust (vest).
R11: sc around [24]
R12: sc around [24]
R13: sc around [24]
R14: sc around [24]
Switch to White (shirt).
R15: sc around [24]
R16: sc around [24]
Switch to Black; work BLO for a neat collar ridge.
R17: BLO sc around [24]
R18: (2 sc, dec) × 6 [18]
R19: sc around [18]
FO. Stuff well and ladder-stitch head to body along R19.
👞 Legs ×2 (Black shoes → Light Grey trousers)
Start with Black.
R1: MR, 6 sc [6]
R2: inc × 6 [12]
R3: sc around [12]
Switch to Light Grey.
R4: sc around [12]
R5: sc around [12]
R6: sc around [12]
R7: sc around [12]
R8: sc around [12]
R9: sc around [12]
FO, stuff lightly, and sew under body.
💪 Arms ×2 (Skin → White cuff → Black sleeve)
Start with Light Beige.
R1: MR, 6 sc [6]
R2: inc × 6 [12]
R3: sc around [12]
R4: sc around [12]
Switch to White (shirt cuff).
R5: sc around [12]
R6: sc around [12]
Switch to Black (sleeve).
R7: sc around [12]
R8: sc around [12]
R9: sc around [12]
R10: sc around [12]
R11: sc around [12]
R12: sc around [12]
FO, stuff lightly.
Placement:
- Left arm: bend slightly forward to support tray (palm up).
- Right arm: down and slightly forward to carry towel. Sew both to body at R16–R17 level.
🧥 Frock Coat: Lapels & Tails (Black)
Front Lapels (make 2, worked flat):
Ch 8
Row 1: sc in 2nd ch, sc to end [7]
Row 2: sc across [7]
Row 3: dec, sc 3, dec [5]
Row 4: sc across [5]
Row 5: dec, sc 1, dec [3]
Row 6: sc across [3]
FO. Sew one on each front side starting at the BLO ridge (R17) with points angling toward vest.
Collar Band:
Attach Black at back neck; ch 20; sl st back along chain. FO. Curve around back neck and tack ends behind lapels.
Tails (make 2):
Ch 7
Row 1: sc in 2nd ch and across [6]
Row 2: sc across [6]
Row 3: sc across [6]
Row 4: sc across [6]
Row 5: sc across [6]
Row 6: sc across [6]
Row 7: sc across [6]
FO and sew diagonally at lower back so tips point down, mirroring the photo.
🤵 Vest Front (Peach/Rust)
Ch 9
Row 1: sc in 2nd ch and across [8]
Row 2: sc across [8]
Row 3: sc across [8]
Row 4: sc across [8]
FO and sew centered on chest between lapels.
Buttons: embroider 3–4 French knots vertically down the center.
White Bow Tie:
Ch 7
Row 1: hdc in 2nd ch and across [6]
Row 2: hdc across [6]
FO. Wrap center tightly and sew at neck.
(Optional wing collar: ch 10, sl st back; fold into a small V and tack behind bow.)
🧻 Towel (White — waffle texture)
Ch 13
Row 1: sc in 2nd ch and across [12]
Row 2: ch 1, sc, FLO sc repeat to end [12]
Row 3: ch 1, sc, BLO sc repeat to end [12]
Row 4: repeat Row 2
Row 5: repeat Row 3
Row 6: repeat Row 2
Row 7: repeat Row 3
Row 8: repeat Row 2
Row 9: repeat Row 3
Row 10: sc across [12]
FO. Fold in half lengthwise and tack over right forearm.
🍽️ Saucer-Style Tray & Teapot
Saucer/Tray (pale blush/rose)
R1: MR, 6 sc [6]
R2: inc × 6 [12]
R3: (sc, inc) × 6 [18]
R4: (2 sc, inc) × 6 [24]
R5: (3 sc, inc) × 6 [30]
R6: (4 sc, inc) × 6 [36]
R7: FLO sc around to raise rim [36]
R8: sc around [36]
FO. Optional: glue to a thin cardboard circle for rigidity.
Teapot (White)
Body:
R1: MR, 6 sc [6]
R2: inc × 6 [12]
R3: (sc, inc) × 6 [18]
R4: (2 sc, inc) × 6 [24]
R5: sc around [24]
R6: sc around [24]
R7: (2 sc, dec) × 6 [18]
R8: (sc, dec) × 6 [12]
R9: dec × 6 [6]
FO, stuff and close.
Lid:
R1: MR, 6 sc [6]
R2: (sc, inc) × 3 [9]
R3: sc around [9]
FO. Add a tiny MR 4-sc “knob”; sew atop lid.
Spout:
Ch 7, sl st in 2nd ch, sc 5, FO. Curve and sew to body.
Handle:
Ch 8, sl st back to start, FO. Shape into a loop and sew opposite spout.
Sew teapot centered on saucer. Tack saucer firmly to left palm/arm. For extra support, run a couple of invisible stitches from saucer edge to coat front.
🧵 Final Assembly & Details
- Sew head to body securely (whipstitch around several times).
- Attach legs evenly so he stands flat.
- Sew arms in positions noted (left arm under tray; right arm with towel).
- Add a tiny white eye-sparkle stitch.
- Shape mustache curls and hair swirl; secure with tiny stitches.
- Steam lightly to relax fabric; avoid over-steaming the towel’s texture.
And there you have it — your charming little butler is complete! ☕✨
Every stitch brings him to life, from his tidy curls to the tiny teapot balanced on his tray. Whether displayed on a shelf or gifted to someone who loves tea and vintage elegance, this refined gentleman will always be ready to serve with grace and a smile.
Happy crocheting — may your hooks stay swift and your stitches full of character! 🧶💖