Add a touch of vintage charm to your crochet collection with this Amigurumi Granny Pin Cushion pattern! Whether you’re crafting for sewing enthusiasts, adding a cozy accent to your handmade creations, or simply enjoy making adorable amigurumi designs, this free pattern lets you stitch up a delightful granny-inspired pin cushion bursting with personality. With her tiny apron, sweet expression, and practical design, this crochet granny captures the essence of warmth and creativity in every stitch. Perfect for gifting to fellow crafters, decorating a sewing space, or simply celebrating the joy of handmade creations, this amigurumi granny pin cushion is sure to bring smiles—one stitch at a time! 🧵✨
Designed for customization, this pattern allows you to experiment with different colors, embroidered details, or even tiny accessories like miniature sewing tools or a tiny rocking chair for extra charm. Craft a classic granny with soft neutral tones, create a whimsical version with bright hues, or even stitch up a full set of craft-inspired amigurumi for a delightful display! Whether gifted as a cherished keepsake, displayed as a cozy accent, or made simply for the joy of crafting, this Amigurumi Granny Pin Cushion is a fun and creative project—perfect for bringing a touch of handmade nostalgia to every stitch! 🧶💖
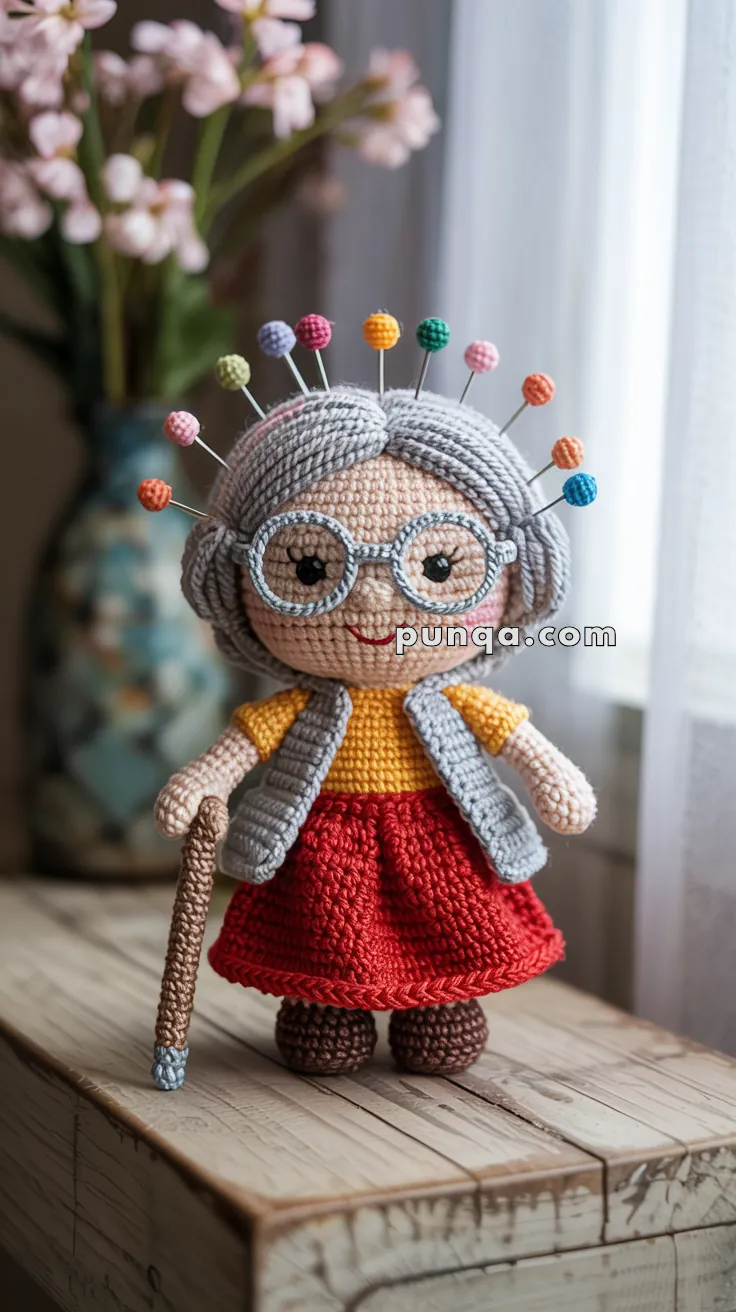
👵 Granny Pin Cushion Amigurumi Pattern
This adorable granny brings warmth and charm to any sewing space. Her soft grey layered hair wrapped around her head, colorful sewing pins, chibi face, ribbed vest, bright yellow shirt, brick-red skirt with a rope-style hem, small brown shoes, and wooden cane give her the perfect handmade personality. Though her legs are hidden beneath the skirt, they give her extra structure and balance while keeping her external look unchanged. She’s the perfect crafting companion for any maker’s table. ❤️🧵
✨ Skill Level
Intermediate — includes sculpted hair sections, textured clothing, layered components, and small accessories.
📏 Finished Size
7–8 inches (18–20 cm) using DK yarn and a 2.5–3 mm hook.
🧶 Materials
DK yarn:
- Light beige – skin
- Grey – hair
- Yellow – shirt
- Light grey – vest
- Brick red – skirt
- Dark brown – shoes + cane
- Pale blue – cane tip
- Soft grey – glasses
Other:
- 2.5–3 mm hook
- 8–9 mm safety eyes
- Polyfill stuffing
- Tapestry needle
- Stitch marker
- 14 colorful sewing pins
- Optional: short floral wire for cane
- Optional: blush for cheeks
🧵 Abbreviations (US Terms)
MR – magic ring
sc – single crochet
inc – increase
dec – decrease (sc2tog)
sl st – slip stitch
ch – chain
BLO – back loop only
FO – fasten off
🧠 Head
Light beige
R1: MR, 6 sc
R2: inc x6 (12)
R3: (1 sc, inc) x6 (18)
R4: (2 sc, inc) x6 (24)
R5: (3 sc, inc) x6 (30)
R6–13: sc around (30)
Insert safety eyes between R8–R9, spaced 8–9 stitches apart.
R14: (3 sc, dec) x6 (24)
R15: (2 sc, dec) x6 (18)
R16: (1 sc, dec) x6 (12)
R17: dec x6 (6)
Stuff firmly and FO.
Embroider a tiny curved smile and add light blush.
💇 Hair
This hairstyle includes a smooth base cap, soft coiled sides, and layered crown “rope” strips with a clean center part.
Hair Cap
Grey
R1: MR, 6 sc
R2: inc x6 (12)
R3: (1 sc, inc) x6 (18)
R4: (2 sc, inc) x6 (24)
R5: (3 sc, inc) x6 (30)
R6–8: sc around (30)
FO.
Sew to head neatly.
Side Coils (Make 2)
Grey
R1: MR, 6 sc
R2–28: sc around (6), lightly stuff as you go
FO.
Roll gently into soft spiral coils.
Sew low on each side of the head, covering the ear area and curving toward the front.
Crown Rope Strips (Make 3–4)
Grey
R1: MR, 5 sc
R2–10: sc around (5), lightly stuffing
FO.
Lay horizontally from forehead toward the back.
Create a clear center hair part by leaving a 2–3 stitch gap between left and right sections. Sew firmly.
Sewing Pins
Insert ~14 colorful sewing pins around the crown in a neat arc.
👓 Glasses
Soft grey
Lenses (Make 2)
R1: MR, 6 sc
R2: inc x6 (12)
R3: (1 sc, inc) x6 (18)
R4: sc around (18)
Do not cut yarn after second lens.
Bridge
Ch 3–4, sl st onto first lens.
FO.
Sew glasses low on the face so the top edges slightly overlap the eyes.
👕 Body & Shirt
Yellow
R1: MR, 6 sc
R2: inc x6 (12)
R3: (1 sc, inc) x6 (18)
R4: (2 sc, inc) x6 (24)
R5: (3 sc, inc) x6 (30)
R6–10: sc around (30)
Stuff lightly so the body stays soft and slightly squishy.
👗 Skirt (Brick Red)
Join yarn at bottom of shirt.
R1: sc around (30)
R2: (4 sc, inc) x6 (36)
R3–6: sc around (36)
R7: (5 sc, inc) x6 (42)
R8–12: sc around (42)
Rope-Style Hem
Work 1 tight round of reverse single crochet (crab stitch) around the hem.
This creates the exact twisted rope edge seen in the photo.
FO.
🦶 Shoes (2)
Dark brown
R1: MR, 6 sc
R2: inc x6 (12)
R3: (1 sc, inc) x6 (18)
R4–5: sc around (18)
R6: (4 sc, dec) x3 (15)
R7: (3 sc, dec) x3 (12)
R8–9: sc around (12)
Stuff shoes very firmly.
FO and set aside.
🦵 Hidden Legs (Under the Skirt) – Make 2
These legs are not visible but give internal stability and a natural doll structure.
Light beige
R1: MR, 6 sc (6)
R2: inc x6 (12)
R3–14: sc around (12)
R15: (2 sc, dec) x3 (9)
R16–18: sc around (9)
Stuff lightly — flexible, not stiff.
FO, leaving long tail.
Feet (2)
Dark brown
R1: MR, 6 sc (6)
R2: inc x6 (12)
R3: (1 sc, inc) x6 (18)
R4–5: sc around (18)
R6: (1 sc, dec) x6 (12)
R7: sc around (12)
Stuff firmly.
FO.
Sew each foot to a leg.
🧵 Attaching Legs & Shoes
- Turn the doll upside down.
- Sew the tops of the legs directly to the underside of the body, evenly spaced.
- Insert each foot into a shoe.
- Sew the feet securely inside the shoes.
- Adjust the skirt so it drapes naturally and hides the legs completely.
This gives the doll strong internal structure while keeping the external look identical to the photo.
✋ Arms (2)
Light beige
R1: MR, 5 sc
R2–3: sc around (5)
Switch to yellow (shirt color)
R4–9: sc around (5)
Lightly stuff the hands only.
FO.
Sew to body just below the neckline, angled outward.
🪵 Cane
Shaft
Dark brown
R1: MR, 6 sc
R2–12: sc around (6)
Insert thin wire if desired.
Switch to pale blue
R13–14: sc around (6)
FO.
Handle
Dark brown
R1: MR, 5 sc
R2–5: sc around (5), lightly stuffed
FO and sew to top of shaft.
Pose cane so it touches the ground, giving the granny a natural third point of balance.
🧥 Ribbed Vest (Light Grey)
This vest is worked flat in the round and left open in front.
Foundation chain: ch 32–36 (measure around body; it must be slightly loose).
Join into a ring without twisting.
R1–14: sc in BLO around.
Do not close the front.
Work 1 round of sc along each front edge to create clean borders.
Sew vest only across the shoulders and underarms so it lays naturally.
✨ Final Finishing
- Insert 14 colorful sewing pins into the hair arc
- Adjust glasses so they sit round and even
- Shape the hair coils and crown ropes softly
- Gently flare the skirt
- Position the cane for stability
- Add soft blush to cheeks
💖 Closing Note
This granny brings warmth and nostalgia to any craft room, with her layered grey hair, soft smile, rope-edged skirt, tiny cane, and colorful sewing pins. Whether she’s keeping you company while you sew or adding charm to your display shelf, she’s a delightful reminder of the joy of handmade creativity.


Nagyon aranyos elfogom készíteni