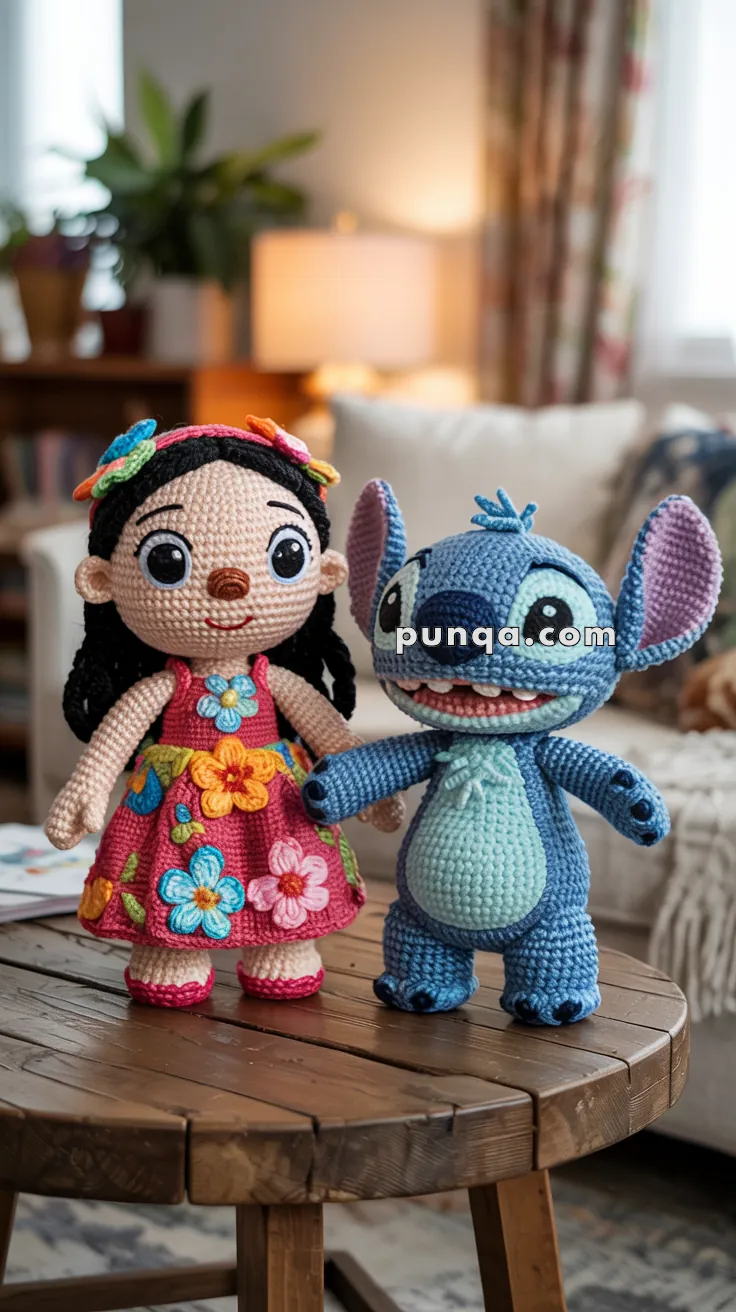
Bring the magic of friendship to life with this Amigurumi Lilo & Stitch Duo crochet pattern! Whether you’re crafting for Disney fans, adding a touch of nostalgia to your collection, or simply love making adorable character dolls, this free pattern lets you stitch up the beloved Hawaiian girl and her mischievous blue alien. With Lilo’s signature red dress and Stitch’s playful ears, this crochet duo captures the heartwarming bond of two unlikely best friends in every stitch. Perfect for gifting to fellow Disney lovers, decorating a whimsical space, or simply celebrating the joy of crochet, this amigurumi set is ready to bring smiles and adventure to your handmade treasures! 🌺✨
Designed for customization, this pattern allows you to personalize Lilo & Stitch with embroidered details, different outfit variations, or even tiny accessories like a ukulele or a flower crown for extra charm. Experiment with textured stitches for added realism, craft a dynamic pose that radiates personality, or even create a full Lilo & Stitch-inspired set with Scrump, Nani, and Jumba! Whether displayed as a cherished keepsake, gifted to a fellow crochet enthusiast, or stitched up simply for the joy of crafting, this Amigurumi Lilo & Stitch Duo is a fun and nostalgic project—perfect for bringing the magic of Ohana to every stitch! 🧶🌊
🌺 Amigurumi Lilo & Stitch Crochet Pattern
Bring the aloha spirit to your craft corner with this adorable Lilo & Stitch crochet duo! Lilo’s bright smile, braided hair, and colorful flower dress perfectly complement Stitch’s cheeky grin and floppy blue ears. Together, they radiate warmth, color, and charm — a delightful project for any amigurumi lover.
✨ Skill Level
Intermediate to Advanced – Includes shaping, color work, embroidery, and detailed assembly.
📏 Finished Size
Each doll stands about 9–10 inches (23–25 cm) tall when made with DK or light-worsted yarn and a 2.5–3.5 mm hook.
🧶 Materials
- Skin tone yarn – 40 g (Lilo’s head, arms, legs)
- Red yarn – 30 g (Lilo’s dress)
- Black yarn – 20 g (hair and lashes)
- Pink yarn – 10 g (sandals and blush)
- White yarn – 15 g (flowers, Stitch’s belly, teeth, and claws)
- Light, medium, and dark blue yarns – 60 g total (Stitch’s body and details)
- Beige yarn – 10 g (Stitch’s mouth and belly patch)
- Pale pink yarn – 10 g (inner ears and tongue)
- Yellow, green, and orange yarns – small amounts (flowers)
- Crochet hook – 2.5–3.5 mm
- Fiberfill stuffing
- Safety eyes (10–20 mm sizes)
- Tapestry needle, stitch markers, and scissors
👧 LILO
🧠 Head (Skin Tone)
Rnd 1: MR, 6 sc
Rnd 2: inc x6 (12)
Rnd 3: (1 sc, inc) x6 (18)
Rnd 4: (2 sc, inc) x6 (24)
Rnd 5: (3 sc, inc) x6 (30)
Rnd 6: (4 sc, inc) x6 (36)
Rnd 7: (5 sc, inc) x6 (42)
Rnd 8–15: sc around (42)
Rnd 16: (5 sc, dec) x6 (36)
Rnd 17: (4 sc, dec) x6 (30)
Rnd 18: (3 sc, dec) x6 (24) – begin stuffing
Rnd 19: (2 sc, dec) x6 (18)
Rnd 20: (1 sc, dec) x6 (12)
Rnd 21: dec x6 (6)
FO and close tightly.
Eyes:
White Eye Background (Make 2):
Rnd 1: MR, 6 sc
Rnd 2: inc x6 (12)
Rnd 3: (1 sc, inc) x6 (18)
Rnd 4: (2 sc, inc) x6 (24)
Rnd 5: sc around (24)
FO and flatten slightly.
Sew both to face between Rnds 9–12, spaced about 6–7 stitches apart.
Add 10–12 mm black safety eyes or crochet small black circles and sew in the center.
Embroider 4–5 curved lashes above each eye.
Nose: Embroider a small oval (3–4 stitches wide) with brown thread between Rnds 12–13.
Mouth: Embroider a gentle curved smile below the nose at Rnd 14 using brown or dark thread.
💇 Hair (Black)
Crochet a fitted cap by following the head pattern up to R14. Attach it to the top of the head.
Cut 60–70 strands of black yarn, each about 30–35 cm long.
Attach strands across the crown using the latch-hook method.
Part the hair down the middle and divide into two sections. Braid each section, secure the ends, and drape over the shoulders.
Flower Crown:
Crochet 8–10 flowers in bright tropical colors.
Attach them in an arc from one side of the head to the other, creating a halo around the top.
👂 Ears (Make 2 – Skin Tone)
Rnd 1: MR, 6 sc
Rnd 2: inc x6 (12)
Rnd 3: sc around (12)
FO, flatten, and sew to sides of the head between Rnds 10–13 beneath the hair.
👗 Body & Dress (Red)
Rnd 1: MR, 6 sc
Rnd 2: inc x6 (12)
Rnd 3: (1 sc, inc) x6 (18)
Rnd 4: (2 sc, inc) x6 (24)
Rnd 5–10: sc around (24)
Switch to skin tone:
Rnd 11: (2 sc, dec) x6 (18)
Rnd 12: (1 sc, dec) x6 (12)
Stuff firmly and FO.
Dress Skirt:
Attach red yarn to waist FLO.
Rnd 1: (1 sc, inc) around.
Rnd 2–6: sc around to form flared skirt.
FO.
Straps:
Ch 12, sc back (11), FO.
Attach across shoulders.
Flowers:
For each petal: (Ch 2, 3 dc, ch 2, sl st in base).
Make 10–15 flowers in assorted colors.
Sew randomly across the skirt for a full, 3D floral effect.
💪 Arms (Make 2 – Skin Tone)
Rnd 1: MR, 6 sc
Rnd 2: inc x6 (12)
Rnd 3–6: sc around (12)
Rnd 7: (2 sc, dec) x3 (9)
Rnd 8–12: sc around (9)
Stuff lightly and sew to shoulders angled slightly forward.
🦵 Legs & Sandals (Skin Tone + Pink)
Rnd 1: MR, 6 sc
Rnd 2: inc x6 (12)
Rnd 3–10: sc around (12)
Switch to pink and sl st around bottom edge.
Embroider two diagonal sandal straps on each foot.
Stuff and sew to body base.
👽 STITCH
🧠 Head (Light Blue)
Rnd 1: MR, 6 sc
Rnd 2: inc x6 (12)
Rnd 3: (1 sc, inc) x6 (18)
Rnd 4: (2 sc, inc) x6 (24)
Rnd 5: (3 sc, inc) x6 (30)
Rnd 6: (4 sc, inc) x6 (36)
Rnd 7: (5 sc, inc) x6 (42)
Rnd 8–14: sc around (42)
Rnd 15: (5 sc, dec) x6 (36)
Rnd 16: (4 sc, dec) x6 (30)
Rnd 17: (3 sc, dec) x6 (24) – begin stuffing
Rnd 18: (2 sc, dec) x6 (18)
Rnd 19: (1 sc, dec) x6 (12)
Rnd 20: dec x6 (6)
FO and close.
Eyes:
Crochet large black ovals:
Ch 6, sc 4, 3 sc in end, rotate, sc 4, 2 sc in end (14)
sc around (14)
Add a small white highlight stitch in upper corner.
Sew to face between Rnds 9–11, angled outward.
👃 Nose (Dark Blue)
Ch 8, sc 6, 3 sc in end, rotate, sc 6, 2 sc in end (16)
Next: inc, sc 5, inc x3, sc 6, inc x2 (22)
Stuff lightly and sew horizontally below and between eyes.
😄 Mouth & Teeth
Embroider a wide mouth in dark blue, extending 3–4 stitches beyond each side of the nose.
Fill mouth area with beige yarn using surface crochet.
Add 7–8 white triangular teeth along upper edge.
Sew a pink oval tongue in center-bottom.
Outline the entire mouth again with dark blue for clean edges.
💙 Body (Light Blue + Beige Belly)
Rnd 1: MR, 6 sc
Rnd 2: inc x6 (12)
Rnd 3: (1 sc, inc) x6 (18)
Rnd 4: (2 sc, inc) x6 (24)
Rnd 5: (3 sc, inc) x6 (30)
Rnd 6–11: sc around (30)
Switch to beige:
Rnd 12–14: sc around (30)
Rnd 15: (3 sc, dec) x6 (24)
Rnd 16: (2 sc, dec) x6 (18)
Rnd 17: (1 sc, dec) x6 (12)
Rnd 18: dec x6 (6)
Stuff and close.
Belly Patch (Beige):
Rnd 1: MR, 6 sc
Rnd 2: inc x6 (12)
Rnd 3: (1 sc, inc) x6 (18)
Rnd 4: (2 sc, inc) x6 (24)
Rnd 5: sc around (24)
Flatten and sew to body front.
💪 Arms (Make 4 – Light Blue)
Rnd 1: MR, 6 sc
Rnd 2: inc x6 (12)
Rnd 3–6: sc around (12)
Rnd 7: (2 sc, dec) x3 (9)
Rnd 8–10: sc around (9)
Stuff lightly.
At tip, embroider 3 short white claws.
Attach 2 arms near the shoulders and 2 lower on the torso, angled forward.
🦵 Legs (Make 2 – Light Blue)
Rnd 1: MR, 6 sc
Rnd 2: inc x6 (12)
Rnd 3: (1 sc, inc) x6 (18)
Rnd 4–6: sc around (18)
Rnd 7: (2 sc, dec) x6 (12)
Rnd 8–10: sc around (12)
Embroider 3 white claws on each foot.
Stuff firmly and attach to bottom of body.
🌿 Ears (Make 2)
Outer (Blue):
Ch 16, sc 2, hdc 2, dc 6, hdc 2, sc 2, ch 1, turn.
Repeat for 2 more rows, decreasing 1 stitch each side.
Work down the opposite side for an oval shape about 7–8 cm tall.
Inner (Pink):
Ch 12, make same shape, about 5–6 cm tall.
Sew pink to blue and attach to head between Rnds 7–12, angled slightly backward.
🔹 Spikes (Make 3 – Dark Blue)
Ch 8, sc 7, ch 1, turn.
Decrease 1 stitch each row until 1 remains.
Sew 3 spikes in a line down the back of the head.
🐾 Tail (Light Blue)
MR, 6 sc
Rnd 2–4: sc around (6)
Stuff lightly and sew to lower back.
🧩 Assembly
1️⃣ Sew Lilo’s head to her body, then attach arms and legs.
2️⃣ Arrange hair braids over shoulders and secure.
3️⃣ Add flower crown around the top of the head.
4️⃣ Sew Stitch’s head to body.
5️⃣ Attach ears, arms, legs, spikes, and tail.
6️⃣ Shape and position both figures upright.
🌴 Finishing Touch
Your handcrafted Lilo & Stitch duo is complete — full of joy, color, and the spirit of aloha! Lilo’s expressive eyes and braided hair pair perfectly with Stitch’s big grin and floppy ears, making them an unforgettable set for any Disney or amigurumi collection.💙🌺


thank you for the work you do to provide your patterns I have used several and appreciate them very much
Obrigada pelo molde!
É muito caprichoso, maravilhoso e perfeito. Nota mil pelo trabalho.
Grata!
Thank you for your pattern. I am so excited to do it. God bless you always 😊
#iloveliloandstitch