Dive into the world of Bikini Bottom with this Amigurumi SpongeBob & Patrick Duo crochet pattern! Whether you’re crafting for cartoon lovers, adding a splash of nostalgia to your collection, or simply enjoy making playful character dolls, this free pattern lets you stitch up the iconic best friends in all their goofy glory. With SpongeBob’s signature square shape, bright yellow body, and cheerful grin alongside Patrick’s lovable starfish form and laid-back charm, this crochet duo captures the fun and friendship of the beloved series in every stitch. Perfect for gifting to fellow fans, decorating a whimsical space, or simply celebrating the joy of crochet, this amigurumi SpongeBob & Patrick set is ready to bring laughter to your handmade treasures! 🍍✨
Designed for customization, this pattern allows you to personalize SpongeBob & Patrick with embroidered details, different outfit variations, or even tiny accessories like a Krabby Patty or jellyfish net for extra flair. Experiment with textured stitches for added realism, craft a dynamic pose that radiates personality, or even create a full Bikini Bottom-inspired set with Squidward, Sandy, and Mr. Krabs! Whether displayed as a cherished keepsake, gifted to a fellow cartoon enthusiast, or stitched up simply for the joy of crafting, this Amigurumi SpongeBob & Patrick Duo is a fun and nostalgic project—perfect for bringing the magic of underwater adventures to every stitch! 🧶🌊
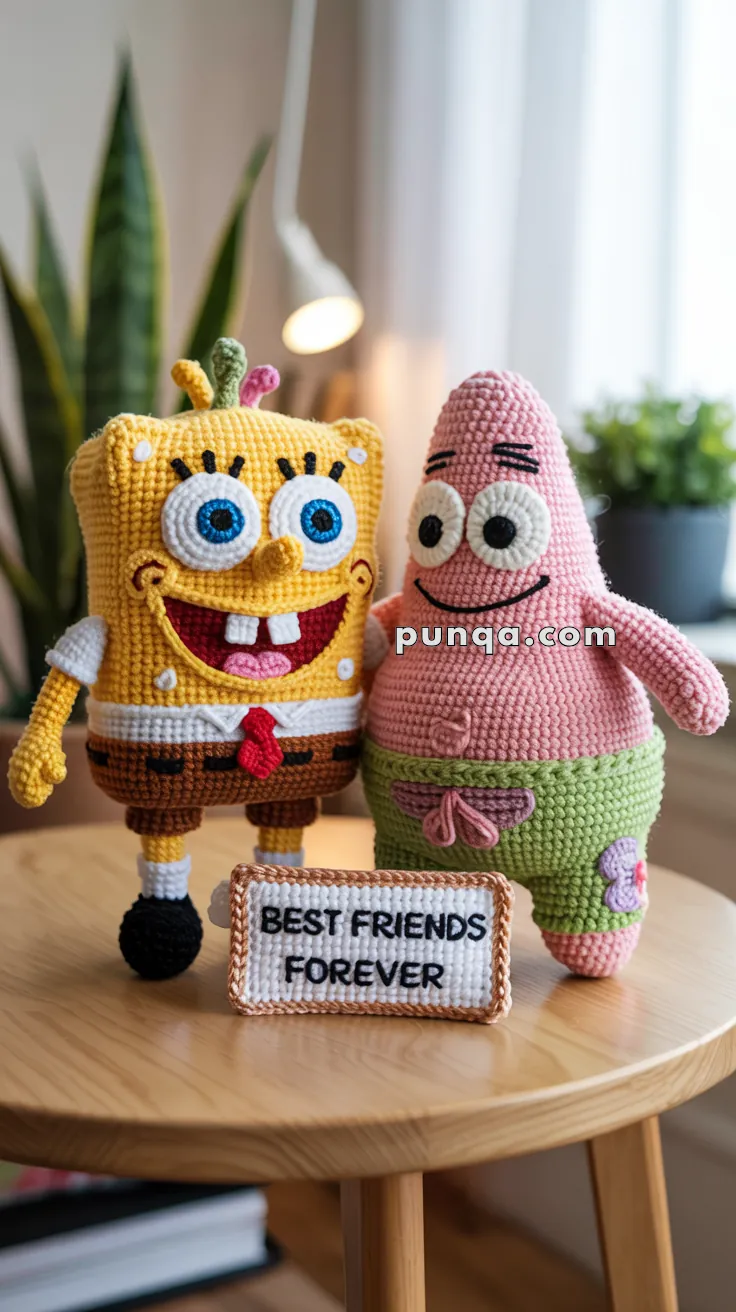
🧜♂️SpongeBob & Patrick Best Friends Forever Amigurumi Pattern
Create Bikini Bottom’s most iconic duo with this detailed amigurumi pattern! This design captures every adorable detail of SpongeBob SquarePants and Patrick Star, from SpongeBob’s sponge texture to Patrick’s signature smile. Display them with their “Best Friends Forever” sign for the perfect tribute to their friendship!
✨ Skill Level
Intermediate to Advanced – This pattern involves flat panel construction, precise embroidery, color changes, and 3D shaping techniques.
📏 Finished Size
Approximately 10-12 inches (25-30 cm) tall using DK weight yarn and 2.5mm hook.
🧶 Complete Materials List
Yarn – DK Weight (Light Worsted) Cotton or Acrylic:
For SpongeBob:
- Bright Yellow: 70g (body, nose, arms, legs)
- White: 30g (eyes, collar, buttons, socks)
- Dark Brown: 35g (pants)
- Black: 20g (shoes, belt, pupils)
- Bright Blue: 12g (irises)
- Red: 12g (tie, mouth)
- Pink: 8g (tongue, antennae)
- Green: 8g (antennae)
- Orange or Yellow: 5g (antennae)
For Patrick:
- Light Pink: 80g (body, arms)
- Light/Sage Green: 25g (shorts)
- Lavender/Light Purple: 12g (flowers)
- Black: 12g (pupils, embroidery)
- White: 25g (eyes)
- Medium/Dark Pink: 8g (details, tongue)
For Sign:
- White or Cream: 18g
- Brown or Tan: 12g
- Black embroidery floss
Other Supplies:
- 2.5mm crochet hook
- Tapestry needle (yarn needle)
- Embroidery needle
- Stitch markers
- Straight pins for assembly
- Scissors
- Fiberfill stuffing: 150g
- Black embroidery floss (6-strand)
- Optional: Thin cardboard for SpongeBob structure and sign
- Optional: Fabric stiffener
🔤 Abbreviations (US Terms)
- MR = Magic Ring
- ch = chain
- sc = single crochet
- inc = increase (2 sc in same stitch)
- dec = invisible decrease (insert hook in front loops of next 2 sts, yarn over, pull through both, yarn over, pull through all loops)
- sl st = slip stitch
- st(s) = stitch(es)
- FO = fasten off
- FLO = front loops only
- BLO = back loops only
- rnd(s) = round(s)
📐 Important Notes
- Work in continuous rounds unless otherwise stated
- Use stitch markers to track round beginnings
- Stuff pieces firmly for best shape
- Weave in ends as you work when possible
🟨 SPONGEBOB SQUAREPANTS
📦 Body/Head (Bright Yellow – Box Shape)
SpongeBob’s rectangular body is created from flat panels sewn together.
FRONT PANEL:
- Ch 22
- Row 1: Sc in 2nd ch from hook, sc across (21 sc)
- Rows 2-30: Ch 1, turn, sc across (21 sc)
- FO, leaving 15-inch tail
BACK PANEL:
- Work exactly as Front Panel
SIDE PANELS (Make 2):
- Ch 17
- Row 1: Sc in 2nd ch from hook, sc across (16 sc)
- Rows 2-30: Ch 1, turn, sc across (16 sc)
- FO, leaving 15-inch tail
TOP PANEL:
- Ch 22
- Row 1: Sc in 2nd ch from hook, sc across (21 sc)
- Rows 2-16: Ch 1, turn, sc across (21 sc)
- FO, leaving 15-inch tail
BOTTOM PANEL:
- Work exactly as Top Panel
ASSEMBLY:
- Pin Front panel to one Side panel, matching edges carefully
- Using tapestry needle and matching yellow yarn, whip stitch or mattress stitch together
- Add other Side panel to Front, then Back panel
- Sew Top panel to all four sides
- Leave Bottom open
- Stuff VERY firmly – pack tightly into corners with chopstick or crochet hook handle
- Optional but recommended: Cut cardboard rectangles and place inside panels for crisp structure
- Sew Bottom panel in place
- Use hands to pinch and define corners and edges
🕳️ Sponge Pores (Make 18-24)
These create texture and are the SAME yellow as the body:
- With bright yellow yarn, MR, 5 sc (5)
- Sl st to first sc
- FO, leaving 8-inch tail
Placement:
- Distribute randomly across front, back, and side panels
- Keep face area (front upper section) clear
- Space evenly but randomly for natural sponge look
- Sew each circle flat against body surface
- These create subtle raised texture
👁️ Eyes (Make 2 Complete Eyes)
SpongeBob’s eyes are VERY large and expressive – they’re his most important feature!
WHITE BASE (Make 2):
- With white yarn, MR, 6 sc (6)
- Rnd 2: Inc x6 (12)
- Rnd 3: (Sc, inc) x6 (18)
- Rnd 4: (2 sc, inc) x6 (24)
- Rnd 5: (3 sc, inc) x6 (30)
- Rnd 6: Sc around (30)
- Rnd 7: Sc around (30)
- FO, leaving 15-inch tail
BLUE IRIS (Make 2):
- With bright blue yarn, MR, 6 sc (6)
- Rnd 2: Inc x6 (12)
- Rnd 3: (Sc, inc) x6 (18)
- Rnd 4: (2 sc, inc) x6 (24)
- FO, leaving 12-inch tail
BLACK PUPIL (Make 2):
- With black yarn, MR, 6 sc (6)
- Rnd 2: Inc x6 (12)
- FO, leaving 10-inch tail
ASSEMBLE EACH EYE:
- Center and sew black pupil onto blue iris
- Center and sew blue iris onto white base
- Position eyes on upper-front of body
- CRITICAL: Inner edges of eyes should slightly overlap (about 1 cm)
- Eyes should sit high on face
- Stuff a small amount behind each eye before final sewing
- Sew completely around each white base edge
EYELASHES (3 per eye):
- With 3 strands of black embroidery floss
- Make 3 straight stitches extending upward from top of each eye
- Each lash about 0.6 inches (1.5 cm) long
- Fan slightly outward
- Space evenly across top of eye
👃 Nose (Bright Yellow)
- With bright yellow, MR, 5 sc (5)
- Rnd 2: Sc around (5)
- Rnd 3: Inc, sc 4 (6)
- Rnd 4: Sc around (6)
- Rnd 5: Inc, sc 5 (7)
- Rnd 6: Sc around (7)
- Rnd 7: Inc, sc 6 (8)
- FO, leaving 12-inch tail
- Stuff lightly
- Position centered between eyes, just below where they overlap
- Sew securely in place
😁 Mouth & Face Details
MOUTH OUTLINE & FILL:
- With red yarn, use backstitch to outline a large, wide smile
- Position about 1.5 inches (4 cm) below eyes
- Create curved “U” shape, approximately 2.5-3 inches wide and 1 inch tall
- Fill mouth interior with red using long horizontal stitches or satin stitch
PINK TONGUE:
- With bright pink yarn
- Embroider small curved tongue at bottom center of mouth
- Use satin stitch to fill
- About 0.4 inches wide
WHITE TEETH (Make 2):
- With white yarn, ch 5
- Row 1: Sc in 2nd ch from hook, sc across (4 sc)
- Rows 2-4: Ch 1, turn, sc across (4 sc)
- FO, leaving 8-inch tail
- Sew both teeth at top center of mouth, side-by-side with small gap between
FRECKLES (3 per cheek):
- With brown or dark orange embroidery floss
- Make 3 small French knots or short straight stitches on each cheek
- Position below and slightly outside of eyes
📡 Antennae Curls (3 on top of head)
YELLOW CURL:
- With bright yellow, ch 20
- Sl st in 2nd ch from hook and each ch across
- FO, leaving 8-inch tail
- Gently coil/twist into spiral shape
- Sew to top of head
GREEN CURL:
- With green, ch 16
- Sl st in 2nd ch from hook and each ch across
- FO, leaving 8-inch tail
- Coil into spiral
- Sew next to yellow curl
PINK/ORANGE CURL:
- With pink or orange, ch 14
- Sl st in 2nd ch from hook and each ch across
- FO, leaving 8-inch tail
- Coil into spiral
- Sew near other curls
Position all three curls in a cluster on top center of head.
👖 Brown Pants with Legs
RIGHT LEG:
- With dark brown, MR, 6 sc (6)
- Rnd 2: Inc x6 (12)
- Rnd 3: BLO: Sc around (12)
- Rnds 4-10: Sc around (12)
- FO, leaving 6-inch tail
LEFT LEG:
- Work exactly as right leg, do NOT FO
JOIN LEGS & CREATE PANTS:
- Rnd 11: Sc around left leg (12), ch 4, sc around right leg (12), sc 4 across chain (32)
- Rnd 12: Sc around (32)
- Rnd 13: Sc 16, inc x2, sc 14 (34)
- Rnds 14-21: Sc around (34)
- FO, leaving very long tail (24+ inches)
WHITE BUTTONS (Make 4):
- With white yarn, wrap around two fingers 5 times
- Remove carefully, tie tightly in center
- Trim to create small pompom-like button
- Sew 2 buttons vertically on front of each pant leg
ATTACH PANTS:
- Position pants on lower third of body
- Pin in place carefully
- Using long tail and whip stitch, sew around top edge
- Multiple passes for security
🥾 Black Shoes (Make 2)
- With black yarn, MR, 6 sc (6)
- Rnd 2: Inc x6 (12)
- Rnd 3: BLO: Sc around (12)
- Rnds 4-5: Sc around (12)
- Rnd 6: Inc x12 (24)
- Rnds 7-8: Sc around (24)
- Rnd 9: (2 sc, dec) x6 (18)
- Rnd 10: (Sc, dec) x6 (12)
- Stuff shoe firmly
- Rnd 11: Dec x6 (6)
- FO and close opening
WHITE SOCKS:
- With white yarn and tapestry needle
- Embroider 2-3 horizontal lines around ankle area of each leg
- Position between shoe top and brown pant leg
ATTACH SHOES:
- Position at bottom of pant legs
- Sew securely around opening where leg ends
⬛ Black Belt with Yellow Buckle
BELT:
- With black yarn, ch 38 (or length to wrap around waist comfortably)
- Rows 1-2: Sc in 2nd ch from hook, sc across, ch 1, turn
- FO, leaving long tails
YELLOW BUCKLE:
- With yellow yarn, ch 5
- Rows 1-3: Sc in 2nd ch from hook, sc across, ch 1, turn (4 sc)
- FO
- Sew to center front of belt
ATTACH:
- Wrap belt around waist (where pants meet body)
- Sew ends together at back
- Tack belt to body to keep in position
👔 White Collar & Red Tie
COLLAR BAND:
- With white yarn, ch 36 (or to fit around neck area)
- Rows 1-2: Sc in 2nd ch from hook, sc across, ch 1, turn
- FO, leaving long tails
RED TIE (Simpler version):
- With red yarn, ch 10
- Row 1: Sc in 2nd ch from hook, sc across (9 sc)
- Rows 2-9: Ch 1, turn, sc across (9 sc)
- Row 10: Ch 1, turn, dec, sc 5, dec (7 sc)
- Row 11: Ch 1, turn, dec, sc 3, dec (5 sc)
- Row 12: Ch 1, turn, dec, sc 1, dec (3 sc)
- Row 13: Ch 1, turn, sc3tog (1 sc)
- FO
TIE KNOT:
- With red yarn, ch 10, sl st to first ch
- Rnd 1: Sc around (10)
- FO
- Sew to top of tie
COLLAR POINTS (Make 2 small):
- With white yarn, ch 5
- Row 1: Sc in 2nd ch from hook, sc across (4 sc)
- Row 2: Ch 1, turn, dec x2 (2 sc)
- Row 3: Ch 1, turn, dec (1 sc)
- FO
ASSEMBLY:
- Wrap collar band around neck (just below head)
- Sew ends at back
- Sew one collar point at each front corner
- Position tie at center front, below collar
- Sew tie in place
💪 Arms (Make 2 – Yellow)
- With bright yellow, MR, 6 sc (6)
- Rnd 2: Inc x6 (12)
- Rnd 3: (Sc, inc) x6 (18)
- Rnds 4-5: Sc around (18)
- Rnd 6: (Sc, dec) x6 (12)
- Rnds 7-18: Sc around (12)
- FO, leaving very long tail (20 inches)
- Stuff arms moderately
- Flatten opening slightly
- Position at shoulder level (where collar is)
- Angle slightly forward
- Sew securely using ladder stitch, passing through body multiple times
⭐ PATRICK STAR
🎈 Body (Light Pink – Rounded Cone)
Patrick has a wide base that tapers gradually to a rounded head.
BASE:
- With light pink, MR, 6 sc (6)
- Rnd 2: Inc x6 (12)
- Rnd 3: (Sc, inc) x6 (18)
- Rnd 4: (2 sc, inc) x6 (24)
- Rnd 5: (3 sc, inc) x6 (30)
- Rnd 6: (4 sc, inc) x6 (36)
- Rnd 7: (5 sc, inc) x6 (42)
- Rnd 8: (6 sc, inc) x6 (48)
- Rnd 9: (7 sc, inc) x6 (54)
BELLY SECTION (widest part):
- Rnds 10-26: Sc around (54)
BEGIN GRADUAL TAPER:
- Rnd 27: (7 sc, dec) x6 (48)
- Rnd 28: Sc around (48)
- Rnd 29: (6 sc, dec) x6 (42)
- Rnd 30: Sc around (42)
- Rnd 31: (5 sc, dec) x6 (36)
- Rnd 32: Sc around (36)
- Rnd 33: (4 sc, dec) x6 (30)
- Rnd 34: (3 sc, dec) x6 (24)
- Rnd 35: (2 sc, dec) x6 (18)
ROUNDED HEAD:
- Rnd 36: Sc around (18)
- Rnd 37: Sc around (18)
- Rnd 38: (Sc, dec) x6 (12)
- Rnd 39: Sc around (12)
- Begin stuffing VERY firmly – Patrick should be solid and sturdy
- Rnd 40: Sc around (12)
- Rnd 41: Dec x6 (6)
- FO and close opening tightly
The shape should be cone-like with wide base and distinctly rounded (not pointed) top.
🩳 Green Shorts with Purple Flowers
RIGHT LEG OPENING:
- With light/sage green, MR, 6 sc (6)
- Rnd 2: Inc x6 (12)
- Rnd 3: (Sc, inc) x6 (18)
- Rnd 4: (2 sc, inc) x6 (24)
- Rnd 5: (3 sc, inc) x6 (30)
- Rnds 6-8: Sc around (30)
- FO
LEFT LEG OPENING:
- Work exactly as right leg through Rnd 8, do NOT FO
JOIN & CREATE SHORTS:
- Rnd 9: Sc around left leg (30), ch 6, sc around right leg (30), sc 6 across chain (72)
- Rnds 10-16: Sc around (72)
- FO, leaving very long tail (24+ inches)
ATTACH SHORTS:
- Position shorts on Patrick’s lower belly area
- Pin carefully in place
- Using long tail and whip stitch, sew around waistband
- Take multiple passes for security
PURPLE FLOWERS (Make 7-9):
- With lavender/light purple, ch 2
- In 2nd ch from hook: (Sl st, ch 3, sl st) 5 times
- Pull tight to form 5-petal flower
- FO, leaving 6-inch tail
FLOWER CENTERS (Optional but nice):
- With darker purple or pink, make tiny French knot in center of each flower
ATTACH FLOWERS:
- Scatter flowers across front and sides of shorts
- Vary placement for natural look
- Sew each one securely
🌺 Belly Button
- With medium or dark pink yarn
- Position on belly, centered, just above shorts waistband
- Option 1: Ch 7, sl st in 2nd ch from hook and each ch, sew in tight spiral
- Option 2: Embroider small spiral using backstitch
- Option 3: Create dimple by inserting needle from inside, pulling gently to indent
👁️ Eyes (Make 2 – Very Large)
Patrick’s eyes are HUGE relative to his face – this is key to his expression!
WHITE BASE (Make 2):
- With white yarn, MR, 6 sc (6)
- Rnd 2: Inc x6 (12)
- Rnd 3: (Sc, inc) x6 (18)
- Rnd 4: (2 sc, inc) x6 (24)
- Rnd 5: (3 sc, inc) x6 (30)
- Rnd 6: (4 sc, inc) x6 (36)
- Rnd 7: Sc around (36)
- Rnd 8: Sc around (36)
- FO, leaving 15-inch tail
BLACK PUPIL (Make 2):
- With black yarn, MR, 6 sc (6)
- Rnd 2: Inc x6 (12)
- Rnd 3: (Sc, inc) x6 (18)
- FO, leaving 12-inch tail
ASSEMBLE EYES:
- Position black pupil slightly off-center on white base (toward inner edge)
- Sew pupil securely
- Place eyes on face with small gap between them (about 0.5 inches)
- Pupils should angle slightly inward
- Add small amount of stuffing behind each eye before final sewing
- Sew completely around white base edge
🤨 Eyebrows & Facial Features
EYEBROWS:
- With black embroidery floss (4 strands) or black yarn
- Use backstitch
- Left eyebrow: Diagonal line, upper left to lower right, about 1-1.2 inches long
- Right eyebrow: Diagonal line, upper right to lower left, about 1-1.2 inches long
- Position above eyes
- This creates Patrick’s classic worried/confused expression
SMILE:
- With black embroidery floss (3 strands)
- Use backstitch
- Create gentle curved smile below eyes
- About 2-2.5 inches wide
- Center on face, about 1-1.5 inches below eyes
TONGUE:
- With red or bright pink yarn
- Embroider small curved shape at bottom or side of mouth
- Use satin stitch to fill
- Keep small – about 0.3-0.4 inches
CHEEK WHISKER DOTS:
- With medium/dark pink yarn or floss
- Make 3 small French knots or dots on each cheek
- Position below and to sides of eyes
💪 Arms (Make 2 – Light Pink)
Patrick’s arms are simple, tubular, and somewhat floppy.
- With light pink, MR, 5 sc (5)
- Rnd 2: Inc x5 (10)
- Rnd 3: (Sc, inc) x5 (15)
- Rnds 4-16: Sc around (15)
- FO, leaving very long tail (20 inches)
- Stuff lightly – arms should be soft and slightly floppy
- Position on sides of body in upper area
- Angle downward slightly
- Sew securely using ladder stitch
🏆 “BEST FRIENDS FOREVER” SIGN
📋 Sign Base (White/Cream)
- With white or cream yarn, ch 36
- Row 1: Sc in 2nd ch from hook, sc across (35 sc)
- Rows 2-16: Ch 1, turn, sc across (35 sc)
- Do NOT FO
🖌️ Brown Border
Continue working around sign edge:
BORDER ROUND 1:
- Ch 1, do not turn
- Sc evenly down left side (about 16 sc)
- Work 3 sc in corner
- Sc across bottom (35 sc)
- Work 3 sc in corner
- Sc up right side (about 16 sc)
- Work 3 sc in corner
- Sc across top (35 sc)
- Work 3 sc in corner
- Sl st to first sc
BORDER ROUND 2 (Brown frame):
- Switch to brown/tan yarn
- Ch 1
- Sc in each st around, working 3 sc in each corner st
- Sl st to first sc
BORDER ROUND 3 (Optional thicker frame):
- Ch 1
- Sc in each st around, working 3 sc in each corner st
- Sl st to first sc
- FO
✍️ Lettering
Using black embroidery floss (5-6 strands for visibility) and backstitch:
TEXT LAYOUT:
- Line 1 (top half): “BEST FRIENDS”
- Line 2 (bottom half): “FOREVER”
TECHNIQUE:
- Use backstitch for clean letters
- Block/print style letters work best
- Each letter about 4-5 stitches tall
- Space letters evenly within each word
- Center each line on sign
- Keep stitches small and consistent
🎪 Sign Support
KICKSTAND (Optional):
- With brown yarn, ch 22
- Rows 1-10: Sc in 2nd ch from hook, sc across, ch 1, turn
- FO
- Fold into triangle
- Sew to back center of sign
CARDBOARD INSERT (Optional):
- Cut cardboard to fit inside sign
- Insert for stiffness
- Allows sign to stand on its own
OR: Simply prop sign against characters for display
🎯 COMPLETE ASSEMBLY GUIDE
Step-by-Step Assembly:
SpongeBob:
- Complete body panels, assemble, stuff firmly
- Add sponge pore texture circles
- Attach complete eyes (white, blue iris, black pupil)
- Embroider eyelashes
- Attach nose
- Embroider mouth, fill with red
- Add white teeth
- Embroider pink tongue
- Add brown freckles
- Attach pants/legs unit to body
- Add white buttons to pants
- Attach black shoes to leg bottoms
- Embroider white sock stripes
- Attach white collar band
- Add small collar points
- Attach red tie with knot
- Attach black belt with yellow buckle
- Attach both yellow arms
- Add three colored antennae curls to head top
Patrick:
- Complete cone-shaped body, stuff very firmly
- Attach green shorts to lower body
- Add purple flowers to shorts
- Add belly button detail
- Attach large eyes (white with black pupils)
- Embroider diagonal eyebrows
- Embroider curved smile
- Add pink/red tongue
- Add pink cheek dots
- Attach both pink arms
Sign:
- Complete rectangular base
- Add brown border rounds
- Embroider “BEST FRIENDS FOREVER” text
- Add support/stand if desired
💡 Critical Success Tips:
Shape is Everything:
- SpongeBob: Must be firmly stuffed with defined corners. Use cardboard inserts if needed.
- Patrick: Stuff base most firmly, gradually less toward head. Should be solid and sturdy.
Eye Placement Makes the Character:
- SpongeBob: Large eyes, high on face, inner edges MUST overlap slightly
- Patrick: Very large eyes, small gap between, pupils angled slightly inward
- Pin in place before sewing, check from all angles
Professional Finishing:
- Use ladder stitch for invisible seams
- Match yarn colors exactly
- Take multiple passes through attachment points
- Weave in ends securely as you work
Embroidery Tips:
- Use 3-4 strands of floss for lines
- Backstitch creates cleanest outlines
- Satin stitch fills areas smoothly
- Keep tension even throughout
- Practice on scrap if needed
Stuffing Strategy:
- Use small pieces
- Push into corners with tool
- Stuff as you work when possible
- Firm for structure pieces, softer for floppy pieces
🎨 Display Ideas:
Classic Display:
- Position side by side on shelf
- SpongeBob on left, Patrick on right
- Sign centered in front or between them
- Angle characters slightly toward each other
Dynamic Setup:
- Stagger depths – Patrick behind SpongeBob
- Position arms as if interacting
- Lean sign against front character
- Add props (spatula, jellyfish net)
Scene Creation:
- Blue fabric “water” base
- Bikini Bottom backdrop
- Add small accessories
- Include other characters (Gary, Mr. Krabs)
✨ Troubleshooting Common Issues:
SpongeBob isn’t rectangular:
- Stuff MUCH more firmly
- Use cardboard inserts in panels
- Physically pinch corners while stuffing
- Check panel sizes match before assembly
Patrick has pointed head:
- Add 1-2 extra rounds at size 12-18
- Shape head with hands while stuffing
- Don’t decrease too quickly at top
Eyes look wrong:
- Re-check positioning before sewing permanently
- SpongeBob: eyes must overlap
- Patrick: small gap with inward-angled pupils
- Add stuffing behind for dimension
Limbs won’t stay attached:
- Use longer yarn tails
- Sew through body multiple times
- Use ladder stitch technique
- Double your thread if needed
Embroidery looks messy:
- Practice on scrap yarn first
- Use more strands for better coverage
- Keep stitches small and even
- Backstitch for lines, satin for fills
Colors bleeding:
- Pre-wash yarn separately before starting
- Use cold water only
- Hand wash finished pieces
Sign won’t stand:
- Add cardboard insert
- Make stronger kickstand
- Use fabric stiffener
- Or simply prop against characters
🎉 Congratulations!
You’ve completed an authentic SpongeBob and Patrick amigurumi set! Every stitch celebrates their iconic friendship. From SpongeBob’s textured body and expressive blue eyes to Patrick’s flower-covered shorts and sweet smile, these handmade dolls capture the magic of Bikini Bottom.
Perfect For:
- Gifts for SpongeBob fans (all ages!)
- Room decor with personality
- Photo props and displays
- Craft show pieces
- Personal collections
- Nostalgic keepsakes
Time Investment:
- SpongeBob: 12-15 hours
- Patrick: 10-13 hours
- Sign: 2-3 hours
- Total: 24-31 hours
Skill Building:
This pattern taught you:
- Flat panel construction
- 3D shaping techniques
- Detailed embroidery
- Color changes
- Professional assembly
- Expression creation through features
💕 Final Notes:
The key to bringing these characters to life is in the details – especially eye placement and expression. Take your time with facial features, stuff firmly for proper shape, and don’t be afraid to rework something if it doesn’t look right.
SpongeBob and Patrick’s friendship has brought joy to millions, and now you’ve created a lasting tribute to their bond. Whether kept as a personal treasure or given as a heartfelt gift, these amigurumi carry the love and care of every stitch.
Happy crocheting, and may your stitches be as strong as their friendship! 🧽⭐💕