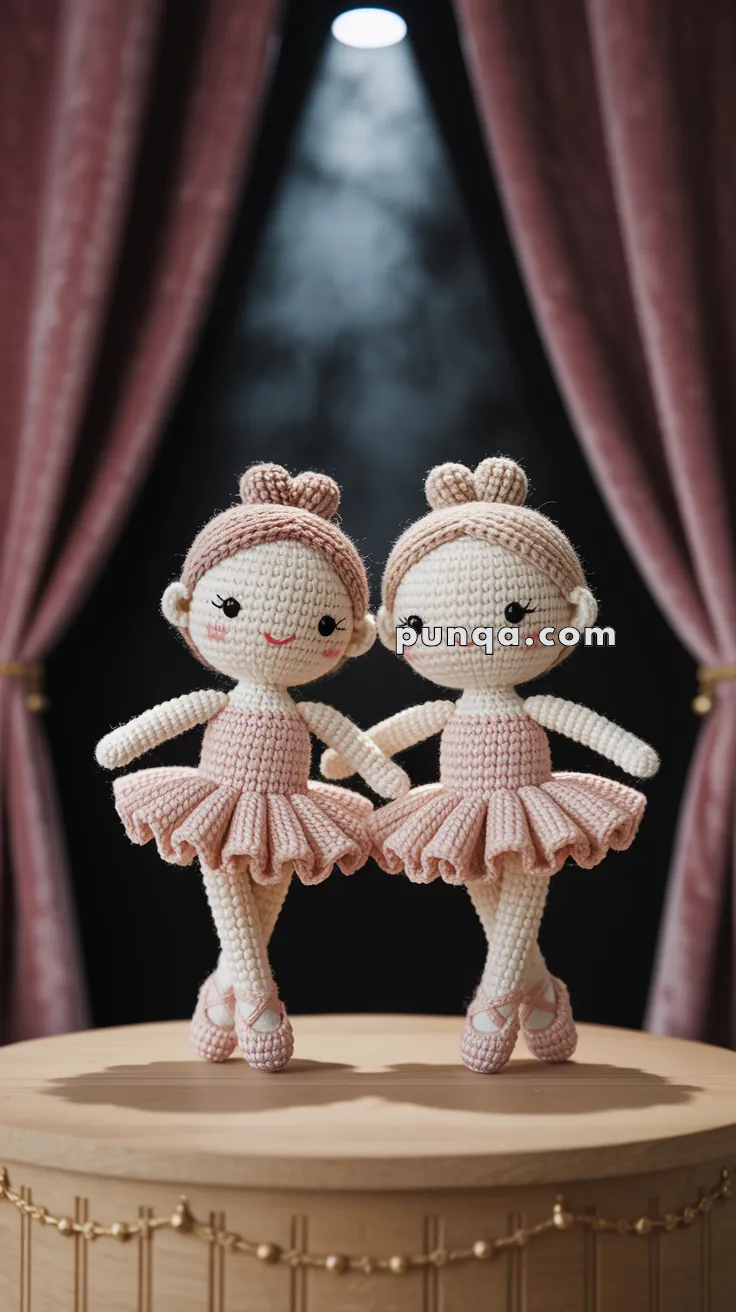
Twirl into the world of elegance with this Amigurumi Ballerina Duo crochet pattern! Whether you’re crafting for dance lovers, whimsical decor, or simply enjoy making graceful character dolls, this free pattern lets you stitch up a charming pair of ballerinas ready to pirouette into your collection. With their delicate tutus, poised expressions, and flowing ballet movements, these crochet dancers capture the beauty and artistry of ballet in every stitch. Perfect for gifting to aspiring dancers, decorating a dreamy space, or simply celebrating the joy of crochet, this amigurumi ballerina duo is a delightful way to bring elegance to your handmade treasures! 🩰✨
Designed for customization, this pattern allows you to experiment with different tutu colors, embroidered details, or even tiny accessories like ballet slippers or a miniature stage for extra charm. Craft a classic pink ballerina duo, create a pastel version for a soft aesthetic, or even stitch up a full ballet ensemble with matching dancers! Whether displayed as a graceful accent, gifted to a fellow crochet enthusiast, or made simply for the joy of crafting, this Amigurumi Ballerina Duo is a beautiful and inspiring project—perfect for bringing the magic of dance to every stitch! 🧶💃
🩰 Amigurumi Ballerina Dolls Crochet Pattern
Bring the elegance of the ballet stage to your crochet projects with these beautiful ballerina dolls! With their graceful tutus, hair buns, and delicate slippers, they make a perfect handmade gift for little dancers or a charming display piece.
📏 Finished Size
Approximately 24-26 cm (9.5-10 inches) tall using DK yarn and 2.5mm hook
🧶 Materials
Yarn (DK weight cotton):
- Skin tone (beige/cream) – approx. 50g
- Dusty pink/mauve – approx. 40g
- Light brown/caramel – approx. 20g
- Black – small amount for facial features
- Light pink – small amount for blush (optional)
Other supplies:
- 2.5mm crochet hook
- 10mm black safety eyes
- Fiberfill stuffing
- Tapestry needle
- Stitch markers
- Scissors
- Pink blush or chalk pastels (optional)
🔤 Abbreviations (US Terms)
- MR = Magic Ring
- ch = chain
- sc = single crochet
- inc = increase (2 sc in 1 st)
- dec = invisible decrease
- sl st = slip stitch
- BLO = back loop only
- FLO = front loop only
- hdc = half double crochet
- dc = double crochet
- st(s) = stitch(es)
🧵 PATTERN INSTRUCTIONS
HEAD
Use skin tone yarn
R1: MR, 6 sc (6)
R2: inc x6 (12)
R3: (sc, inc) x6 (18)
R4: (2 sc, inc) x6 (24)
R5: (3 sc, inc) x6 (30)
R6: (4 sc, inc) x6 (36)
R7: (5 sc, inc) x6 (42)
R8-16: sc around (42) – 9 rounds
👁️ STOP HERE – Insert safety eyes between R11-12, with 8 stitches between them.
R17: (5 sc, dec) x6 (36)
R18: (4 sc, dec) x6 (30)
R19: (3 sc, dec) x6 (24)
Begin stuffing head firmly
R20: (2 sc, dec) x6 (18)
R21: (sc, dec) x6 (12)
Stuff completely
R22: dec x6 (6)
FO, use needle to weave through remaining 6 stitches and pull tight to close.
BODY
Start with skin tone for upper chest/shoulder area
R1: MR, 6 sc (6)
R2: inc x6 (12)
R3: (sc, inc) x6 (18)
R4: (2 sc, inc) x6 (24)
R5-7: sc around (24) – 3 rounds
Change to dusty pink (leotard):
R8-15: sc around (24) – 8 rounds
R16: (2 sc, dec) x6 (18)
R17-18: sc around (18) – 2 rounds
R19: (sc, dec) x6 (12)
R20: sc around (12)
Stuff body firmly
FO, leave 40cm tail for sewing to head.
LEGS (make 2)
Start with dusty pink for ballet slippers
R1: MR, 6 sc (6)
R2: inc x6 (12)
R3: (sc, inc) x6 (18)
R4: BLO: sc around (18) – creates sole definition
R5-6: sc around (18) – 2 rounds
R7: 4 sc, 5 dec, 4 sc (13)
R8: 4 sc, 2 dec, 5 sc (11)
R9: 4 sc, dec, 5 sc (10)
R10: sc around (10)
Change to skin tone for leg:
R11-28: sc around (10) – 18 rounds for leg length
Stuff foot and lower leg firmly (R1-R15), upper leg lightly so it bends
FO, leave 40cm tail for sewing.
🎀 Ballet slipper ribbons (add after assembly):
- Cut 2 strands of pink yarn, each 40cm long per leg
- Starting at R11-12, weave yarn around leg in crisscross/X pattern
- Continue for 4-6 rounds up the leg
- Tie small bow at center front of ankle
- Secure with tiny stitch, trim ends to 1cm
ARMS (make 2)
Use skin tone
R1: MR, 5 sc (5)
R2-19: sc around (5) – 18 rounds
FO, leave 30cm tail.
Do NOT stuff – arms must be flexible for posing
HAIR CAP
Use light brown yarn
R1: MR, 6 sc (6)
R2: inc x6 (12)
R3: (sc, inc) x6 (18)
R4: (2 sc, inc) x6 (24)
R5: (3 sc, inc) x6 (30)
R6: (4 sc, inc) x6 (36)
R7: (5 sc, inc) x6 (42)
R8-16: sc around (42) – 9 rounds
R17: sl st around (42) – creates finished edge
FO, leave 40cm tail for sewing to head.
MAIN HAIR BUN
Use light brown yarn
R1: MR, 6 sc (6)
R2: inc x6 (12)
R3: (sc, inc) x6 (18)
R4: (2 sc, inc) x6 (24)
R5-7: sc around (24) – 3 rounds
R8: (2 sc, dec) x6 (18)
R9: (sc, dec) x6 (12)
Stuff moderately – should be plump but not rock-hard
R10: dec x6 (6)
FO, leave 30cm tail for sewing.
SMALL BUN “EARS” (make 2)
Use light brown yarn – these create the distinctive Mickey Mouse-style double bun
R1: MR, 6 sc (6)
R2: inc x6 (12)
R3: (sc, inc) x6 (18)
R4: sc around (18)
R5: (sc, dec) x6 (12)
Stuff lightly
R6: dec x6 (6)
FO, leave 25cm tail for sewing.
LAYERED TUTU
The tutu has 3 distinct layers for the full, stage-ready volume seen in the photo
LAYER 1 (Bottom/Longest layer)
Attach dusty pink yarn to FLO of R8 of body (first pink round)
Round 1: ch 3 (counts as dc), 2 dc in same st, 3 dc in each st around, sl st to top of ch-3 (72 dc)
Round 2: ch 3, dc in each st around, sl st (72 dc)
Round 3: ch 3, (2 dc in next st, dc) repeat around, sl st (108 dc)
Round 4: ch 3, (2 dc in next st, dc, dc) repeat around, sl st (144 dc)
FO and weave in ends securely.
LAYER 2 (Middle layer)
Attach dusty pink yarn to FLO of R11 of body (3 rounds above Layer 1)
Round 1: ch 3 (counts as dc), 2 dc in same st, 3 dc in each st around, sl st (72 dc)
Round 2: ch 3, (2 dc in next st, dc) repeat around, sl st (108 dc)
Round 3: ch 3, dc in each st around, sl st (108 dc)
FO and weave in ends.
LAYER 3 (Top ruffle)
Attach dusty pink yarn to FLO of R14 of body (3 rounds above Layer 2)
Round 1: ch 2 (counts as hdc), hdc in same st, 2 hdc in each st around, sl st (48 hdc)
Round 2: ch 2, hdc in each st around, sl st (48 hdc)
FO and weave in ends.
After completing all layers, gently fluff and shape tutu to stand out from body. The layers should cascade and overlap naturally.
🎨 FACIAL FEATURES
Complete embroidery guide:
👀 Eyelashes:
- Thread tapestry needle with black yarn
- Above each eye, make 3 short straight stitches angling upward and outward
- Each stitch 2-3mm long
- Space them evenly above eye, like lash rays
👃 Nose:
- Thread needle with light pink yarn
- Between R13-14, centered between eyes
- Make 2-3 tiny vertical stitches close together (creates small oval)
- Should be subtle, not prominent
😊 Smile:
- Thread needle with black yarn
- 3-4 rounds below eyes
- Create gentle curved smile with 3-4 small stitches
- Curve should be soft and sweet, not wide grin
💕 Blush cheeks:
- Option 1: Using light pink yarn, make several small circular stitches on R14-15, positioned to sides of face below outer corners of eyes
- Option 2: Use pink chalk pastel or makeup blush applied with soft brush for more realistic look
👂 Small ears (make 2) – OPTIONAL:
- MR, 6 sc (6), FO immediately
- Flatten circle and sew to sides of head at eye level (R11-12)
- Position slightly back from face front
🔧 ASSEMBLY – CORRECT ORDER
Follow this exact order for best results:
STEP 1: Complete the head
- Insert safety eyes (already done during head construction)
- Embroider eyelashes
- Embroider nose
- Embroider smile
- Add blush to cheeks
- Sew on small ears if using
STEP 2: Attach hair cap
- Position hair cap over entire top and back of head
- Front edge should align with R6-7 of head (just above eyes)
- Pin in place at several points
- Using matching brown yarn and whip stitch, sew around entire edge to secure to head
- Make sure cap is smooth and evenly positioned
STEP 3: Attach main bun
- Position main bun at top-back of head (not directly on top, but slightly toward back)
- Center it side-to-side
- Pin in place
- Sew securely using brown yarn, stitching all around base of bun
STEP 4: Attach small “ear” buns
- Position one small bun on each side of main bun
- They should sit like Mickey Mouse ears – symmetrical, at about 10 o’clock and 2 o’clock positions
- Each should touch/slightly overlap the main bun
- Pin, then sew securely with brown yarn
STEP 5: Attach head to body
- Position head on top of body
- Head should be centered, with face pointing forward
- The neck (R1 of body) should fit into the head opening
- Pin in place
- Using skin tone yarn and whip stitch or mattress stitch, sew all around where head meets body
- Add extra stuffing to neck area if needed for stability
- Make sure head doesn’t wobble
STEP 6: Attach legs
- Position both legs at bottom center of body (R20)
- Legs should be close together, almost touching
- They should angle very slightly outward (ballet first position)
- Pin both legs in place
- Using pink yarn, sew each leg securely to body
- Stitch around entire top opening of each leg to body
- Make sure legs are stable enough to support doll standing
STEP 7: Attach arms
- Position arms on sides of body at R10-11 (below shoulder, above tutu attachment point)
- Arms should hang naturally downward
- Pin in place
- Using skin tone yarn, sew around top of each arm to body
- Arms should move freely for posing
STEP 8: Create tutu layers
- If not already done, work all three tutu layers as described in pattern
- Work from bottom layer (R8) to top layer (R14)
- Weave in all ends securely
STEP 9: Add ballet ribbon ties
- For each leg:
- Cut 2 strands pink yarn, each 40-50cm long
- Hold strands together as one
- Start at front of ankle (R11-12)
- Wrap around back, cross in front, wrap around back, cross in front
- Continue crisscross pattern for 4-6 rounds up leg
- Tie bow at front center of ankle
- Secure bow with 1-2 small stitches so it won’t untie
- Trim ribbon ends to 1cm
STEP 10: Final shaping and touches
- Check all ends are woven in securely
- Shape tutu layers so they fan out dramatically
- Bottom layer should be fullest and most prominent
- Fluff each layer separately
- Pose arms in graceful position (raised to side, or one up/one down)
- Shape legs in gentle ballet stance
- Add final brush of pink blush if desired
- Use fingertips to gently “set” the hair and bun shape
💡 CRITICAL TIPS FOR SUCCESS
Stuffing:
- Head: Stuff VERY firmly – should feel solid
- Body: Stuff firmly – should hold shape
- Feet/slippers: Stuff firmly for 6 rounds, then lighter
- Legs: Stuff lightly so they bend and pose
- Arms: Do NOT stuff at all – must be completely flexible
- Buns: Stuff moderately – should be rounded but not hard
Tutu success:
- Don’t skip any rounds in the tutu layers
- Use FLO (front loop only) when attaching to body so back loops create a ridge
- Work loosely so tutu has movement and volume
- After completing, use your fingers to fluff and separate the layers
- The bottom layer should extend furthest from body
Hair bun positioning:
- Main bun: Slightly back from top center (not on very top of head)
- Small “ear” buns: Symmetrical on either side, should be very visible from front view
- This creates the signature ballerina hairstyle seen in photo
Ribbon ties:
- Don’t pull too tight or legs will pucker
- Crisscross pattern is key for authentic ballet look
- Bow should be small and neat, at center front
Proportions:
- If doll seems too short, add 2-4 rounds to legs
- If head seems too large, reduce head by 6 stitches (eliminate R7)
- If tutu seems flat, add another round to bottom layer
🎭 POSING YOUR BALLERINA
For photo-accurate display:
Classic ballet poses:
- Arms: One raised curved above head, one extended to side
- Legs: Close together, toes slightly turned out
- Head: Tilted gently to one side
Stage setup (like photo):
- Use round wooden platform or cake stand as “stage”
- Cream/light wood color works best
- Add spotlight effect with overhead lamp
- Dark background (black fabric)
- Optional: Add draped curtains at sides (burgundy/rose colored fabric)
🎨 COLOR VARIATIONS
Hair colors:
- Blonde: Cream or light yellow yarn
- Auburn: Rust or burnt orange yarn
- Black: Black or very dark brown yarn
- Red: Terracotta or burgundy yarn
Skin tones:
- Use any shade that represents your ballerina: ivory, cream, beige, tan, brown, dark brown
Tutu/costume colors:
- Classic white
- Soft lavender
- Mint green
- Pale blue
- Keep it light and delicate for ballet aesthetic
Your beautiful Amigurumi Ballerina Doll is ready to dance on stage! Perfect for ballet lovers, gifts, or as a graceful display. You can customize the hair, tutu, and shoes in any color to match your favorite ballerina!