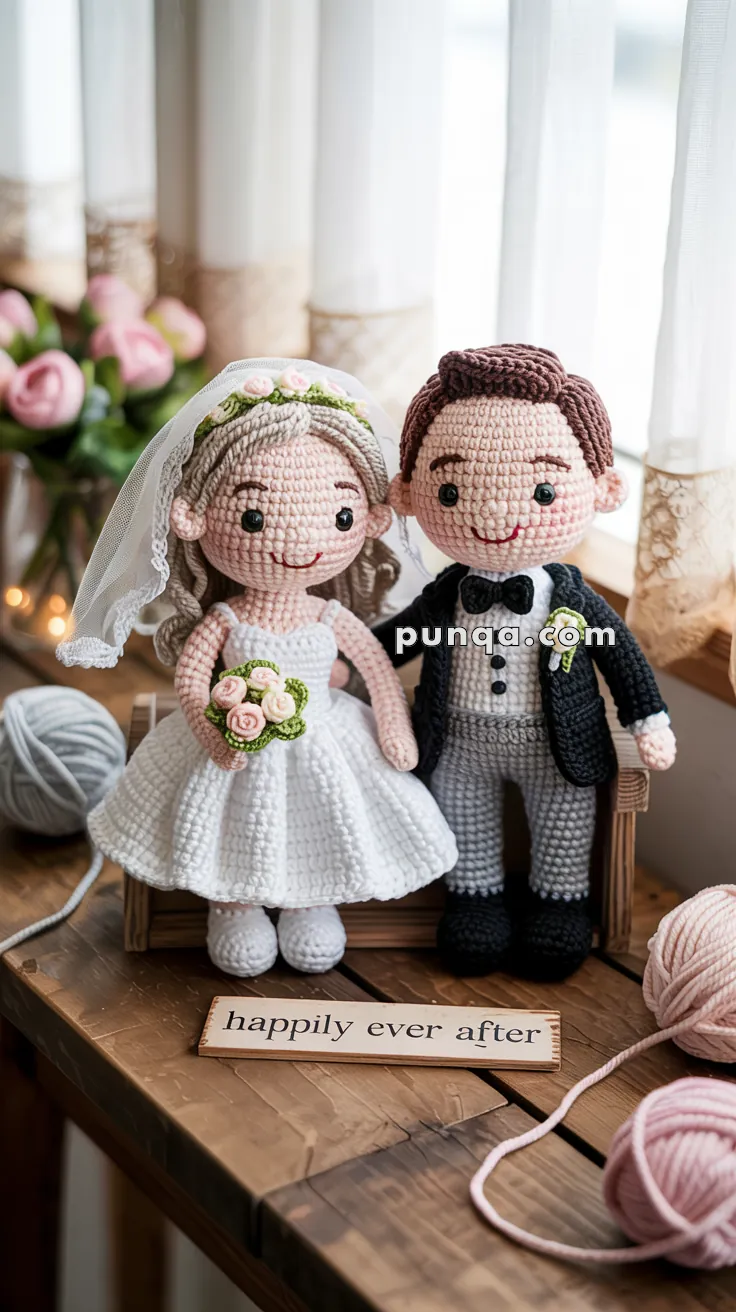
Welcome to the romantic and elegant world of amigurumi! 💍✨ Today, I’m excited to share my free crochet pattern for an Amigurumi Bride & Groom—a beautifully detailed and sentimental creation perfect for wedding keepsakes, bridal gifts, or anyone who enjoys crafting charming and meaningful plush designs! 🧶 Whether you love stitching up delicate figures, experimenting with flowing gowns and tailored suits, or simply want to add a stunning bride and groom duo to your handmade lineup, this pattern will guide you through crafting a beautifully sculpted plush with intricate lace details, a classic tuxedo, and a touch of wedding-day magic! 👰🤵
This design embraces soft whites, elegant blacks, and intricate shaping to bring a timeless and heartfelt presence to your crochet projects! 🧶✨ I’ve carefully outlined each step to ensure your Amigurumi Bride & Groom turn out just right—ready to become a treasured wedding gift or a heartfelt handmade keepsake! 🎁 So grab your hooks, pick out dreamy bridal shades, and let’s stitch up a breathtaking bride and groom duo! 💍
💍 Amigurumi Bride & Groom Crochet Pattern
This elegant crocheted wedding couple captures a joyful bride in a full flowing gown and a dapper groom in a classic tuxedo. With rounded expressive faces, visible ears, neat hairstyles, long relaxed arms, sturdy legs, and layered clothing, this pair is designed to stand beautifully together as a heartfelt handmade keepsake.
✨ Skill Level
Intermediate
Includes shaping, garment construction, and detailed assembly.
📏 Finished Size
Approx. 22–26 cm (9–10 inches) tall
🧶 Materials & Yarn Amount
- Skin tone: 80–100 g (heads, necks, hands, ears)
- White: 130–160 g (bride dress, bodice, legs, groom shirt)
- Black: 70 g (groom jacket, shoes, bow tie)
- Gray: 60 g (groom pants)
- Brown: 25 g (groom hair)
- Blonde/light brown: 35 g (bride hair)
- Green, pink, cream: small amounts (flowers & details)
Other supplies:
- 6–8 mm safety eyes
- Polyester stuffing
- Yarn needle
- Stitch marker
- Soft tulle for veil
🔤 Abbreviations (US Terms)
MR – magic ring
sc – single crochet
inc – increase
dec – decrease
ch – chain
sl st – slip stitch
BLO – back loop only
FO – fasten off
👰 Bride
Head (Smooth Round Shape)
With skin tone:
R1: MR, 6 sc (6)
R2: inc ×6 (12)
R3: (1 sc, inc) ×6 (18)
R4: (2 sc, inc) ×6 (24)
R5: (3 sc, inc) ×6 (30)
R6–10: sc around (30)
Insert eyes between R7–8.
R11: (3 sc, dec) ×6 (24)
R12: (2 sc, dec) ×6 (18)
Stuff firmly
Neck
R13–14: sc around (18)
R15: (1 sc, dec) ×6 (12)
FO leaving tail
Ears (Small, Rounded & Dimensional – Make 2)
With skin tone:
R1: MR, 6 sc
R2: (1 sc, inc) ×3 (9)
R3: sc around (9)
R4: (2 sc, inc) ×3 (12)
R5: sc around (12)
Flatten lightly and fold base slightly before sewing.
Attach to the sides of the head aligned with the eyes.
Hair (Soft, Full, Framing Face)
Create cap:
R1: MR 6
R2: inc ×6 (12)
R3: (1 sc, inc) ×6 (18)
R4: (2 sc, inc) ×6 (24)
R5: (3 sc, inc) ×6 (30)
R6–8: sc around
Sew snugly.
Attach strands along sides and back.
Style into soft waves that frame the face.
Upper Body (White Bodice – Clean Coverage)
With white:
R1: MR 6
R2: inc ×6 (12)
R3: (1 sc, inc) ×6 (18)
R4–10: sc around (18)
➡️ Keeps the entire upper torso white with no exposed shoulders.
Arms (Slim & Natural)
With skin tone:
R1: MR 6
R2–10: sc around (6)
Light stuffing at top only.
Sew slightly angled downward.
Legs (White Only)
Make 2:
R1: MR 6
R2: inc ×6 (12)
R3–6: sc around (12)
Stuff lightly and attach centered under body.
Dress Skirt (Full & Flared)
Attach white yarn at waist:
R1: inc in each stitch (36)
R2: (5 sc, inc) around
R3: (6 sc, inc) around
R4–6: sc around
R7: (ch 3, sl st) around for ruffled edge
Shape outward into a bell silhouette 👗
Veil & Crown
Attach soft tulle at back of head.
Crown:
- ch 24, join
- add tiny flowers and leaves
- sew on top 🌸
Bouquet
Make small rolled flowers and leaves.
Sew together and attach to hand 💐
🤵 Groom
Head & Neck
Same as bride.
Embroider slightly thicker brows and a wider smile 😊
Ears (Same Construction)
Attach at same height as bride for symmetry.
Hair (Neat, Structured)
Create cap same as bride.
Add short strands at front only.
Shape into a smooth side-swept style.
Body (Integrated Shirt & Pants)
Start with white:
R1: MR 6
R2: inc ×6 (12)
R3: (1 sc, inc) ×6 (18)
R4–6: sc around (18)
Switch to gray:
R7–12: sc around (18)
R13: (2 sc, dec) ×4 (14)
R14–15: sc around
Stuff firmly.
Legs with Shoes
Make 2:
Start black:
R1: MR 6
R2: inc ×6 (12)
R3–4: sc around
Switch to gray:
R5–8: sc around
Attach under body.
Jacket (Fitted Open Front)
Using black:
Join at torso and work in rows:
Row 1–6: sc across
Sew shoulders and sides, leaving front open.
Arms
With skin tone:
R1: MR 6
R2–3: sc
Switch to black:
R4–10: sc
Light stuffing. Sew at shoulders.
Shirt Details & Bow Tie
Surface stitch a vertical white panel.
Bow tie:
- ch 7
- sc 6 for 3 rows
- wrap center and sew 🎀
Add small buttons.
Boutonniere
Tiny flower + leaf sewn to lapel 🌿
🧷 Assembly
- Sew heads securely to bodies
- Attach arms evenly at shoulder height
- Position legs for balance
- Shape skirt evenly
- Optional: stitch hands together 🤝
✨ Finishing Touches
- Keep expressions soft and minimal 😊
- Ensure ears are rounded and slightly protruding
- Maintain smooth white bodice on bride
- Adjust posture so both figures stand naturally
💖 Final Result
This elegant wedding couple features soft shaping, flowing fabric details, and refined finishing touches 🤍 From the structured gown to the tailored tuxedo, every element comes together to create a heartfelt handmade keepsake full of charm and celebration 💍✨