Welcome to the enchanting and festive world of amigurumi! 🏡🎄✨ Today, I’m excited to share my free crochet pattern for a Christmas Village Scene—a heartwarming, holiday-inspired creation filled with cozy cottages, twinkling lights, and winter magic! ❄️ Whether you love crafting intricate décor pieces, enjoy building whimsical seasonal displays, or simply want to stitch up a charming miniature village that brings joy and nostalgia, this pattern will guide you through creating a beautifully detailed holiday scene full of warmth and wonder! 🎁
This design embraces classic Christmas colors, textured details, and delightful storytelling elements to bring the magic of the season to life! 🧶🏠 I’ve carefully outlined each step to ensure your Christmas Village Scene turns out just right—ready to brighten up your home, become a treasured centerpiece, or serve as a heartfelt handmade gift! ✨ So grab your hooks, pick out snowy whites, rich reds, forest greens, and twinkling accents, and let’s stitch up a picturesque winter wonderland! 🎀❄️
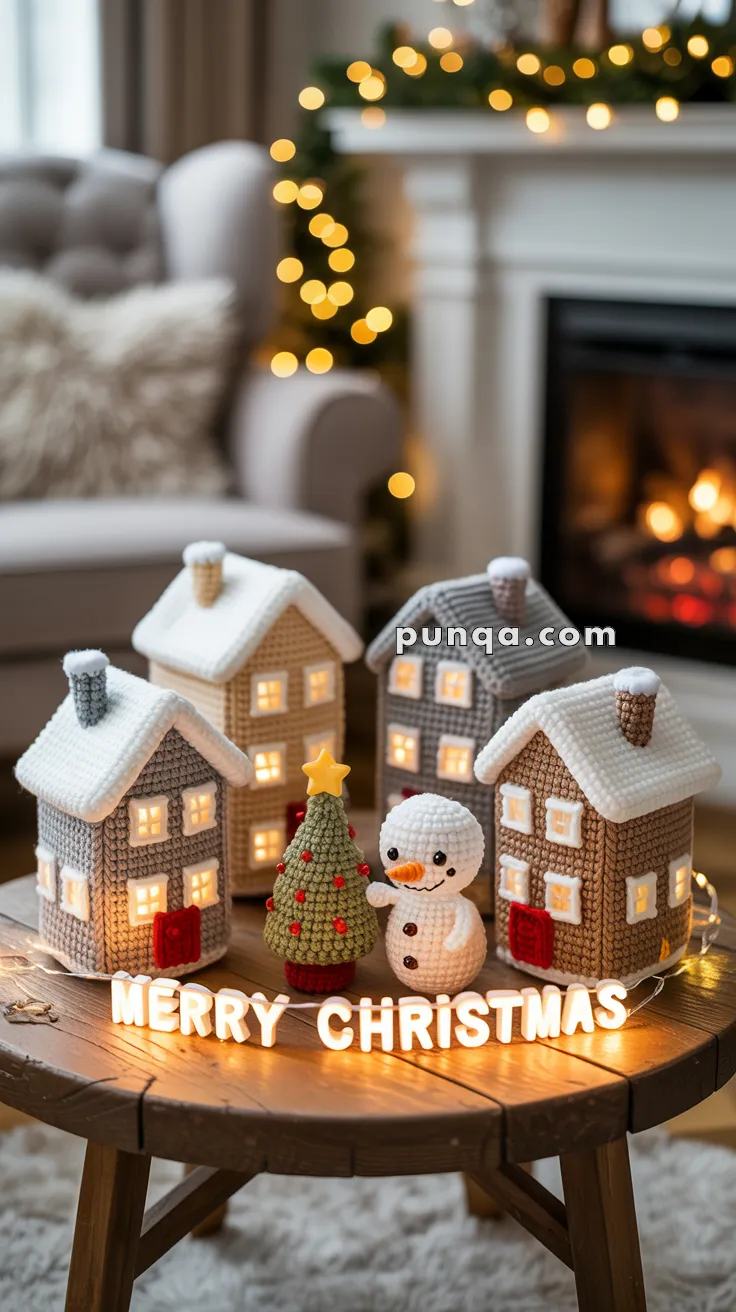
🎄 Amigurumi Christmas Village Scene Crochet Pattern
Create a magical Christmas display with this charming Amigurumi Christmas Village Scene! This pattern includes four snowy-roof houses with glowing windows, a cheerful snowman, and a decorated Christmas tree with a puffy star. Add LED tealights inside the houses and watch your handmade village come to life.
✨ Skill Level
Intermediate – involves shaping, assembly, and color changes.
📏 Finished Size
- Houses: ~14–16 cm tall (with roof & chimney)
- Tree: ~10 cm tall
- Snowman: ~9 cm tall
🧶 Materials
- Worsted cotton/acrylic yarn:
- Gray, beige, light brown (house walls – make variations)
- White (snowy roofs, snowman)
- Red (doors, tree baubles, snowman smile if desired)
- Yellow (windows, tree star)
- Black (buttons, window crossbars, snowman eyes)
- Orange (snowman carrot nose)
- Green (Christmas tree)
- Crochet hook 3.0 mm
- Polyfill stuffing
- Yarn needle
- Small black safety eyes or beads (for snowman)
- Optional: LED tealights to place inside houses
🧾 Abbreviations (US Terms)
MR = magic ring
sc = single crochet
inc = increase (2 sc in same st)
dec = decrease (sc2tog)
ch = chain
sl st = slip stitch
st(s) = stitch(es)
FO = fasten off
🏠 Snowy Roof House (Make 4)
Walls – Front/Back with Triangular Peak
Make 2 per house in wall color:
- Ch 15, sc across (14).
2–12. sc rows (14 sts). - Start roof peak: dec at each side, sc across → repeat until 1 st remains. FO.
Side Panels (Rectangles, ×2)
- Ch 15, sc across (14).
2–12. sc rows (14). FO.
Sew 4 panels together into a box shape (peaked front/back + sides).
Windows (Yellow, 4 per house side)
- Ch 4, work 3 rows sc (3 sts). FO.
Make 8–12 squares depending on house size. Sew to walls in two rows of two.
Use black or white thread to embroider crossbars.
Door (Red, 1 per house)
- Ch 5, work 6 rows sc. FO.
Sew centered on front wall.
Roof (White, Snowy)
Make 2 rectangles:
- Ch 18, sc across (17).
2–10. sc rows. FO.
Sew together along top to form pitched roof. Attach to house. Let it overhang slightly to match photo.
Chimney (Brown)
- MR, 6 sc.
2–6. sc around. FO.
Sew offset to one roof side.
🎄 Christmas Tree
Tree Cone (Green)
- MR, 6 sc
- (sc, inc) × 3 (9)
- sc around (9)
- (2 sc, inc) × 3 (12)
- sc around (12)
- (3 sc, inc) × 3 (15)
7–10. sc around (15) - (4 sc, inc) × 3 (18)
12–14. sc around (18). FO.
Pot Base (Red)
- MR, 6 sc
- inc × 6 (12)
- sc around 3 rounds. FO.
Insert tree, stitch to pot.
Puffy Star (Yellow, Make 2)
- MR, (ch 3, sl st into MR) × 5 → 5 points.
Make 2 stars, sew together lightly stuffed.
Attach to tree top.
Baubles (Red)
Embroider French knots or sew tiny crochet dots around tree.
⛄ Snowman
Bottom Body (White)
- MR, 6 sc
- inc × 6 (12)
- (sc, inc) × 6 (18)
- (2 sc, inc) × 6 (24)
5–8. sc around (24). FO, stuff.
Head (White)
- MR, 6 sc
- inc × 6 (12)
- (sc, inc) × 6 (18)
4–7. sc around (18) - (sc, dec) × 6 (12). FO, stuff, sew to body.
Nose (Orange Carrot)
- MR, 4 sc
- sc around
- dec twice (2). FO, sew to face.
Arms (White, stubby ×2)
- MR, 6 sc
2–3. sc around (6). FO.
Sew to body sides.
Details
- Eyes: attach black safety eyes/beads.
- Buttons: embroider small black dots.
- Smile: embroider black curved line.
🪡 Assembly
- Sew doors, windows, and crossbars onto houses.
- Join house walls, stuff lightly, and attach roofs with overhang. Add chimney.
- Place LED tealight inside each house for warm window glow.
- Place tree in center with puffy star and baubles.
- Add snowman beside tree.
- Arrange houses in a semi-circle around tree & snowman.
🌟 Final Touch
Now you have a beautiful Amigurumi Christmas Village Scene! With glowing windows, a happy snowman, and a festive tree, this set makes a perfect holiday centerpiece or keepsake. Add fake snow, fairy lights, or extra trees to expand your magical crochet town.
Every stitch captures the spirit of Christmas and brings warmth to your home. 🎄✨⛄


Hermoso, pueblo mágico de Navidad. Gracias