Bring a touch of woodland magic to your crochet collection with this Amigurumi Antler pattern! Whether you’re crafting for nature-inspired decor, playful gifts, or simply love unique amigurumi designs, this free pattern lets you stitch up a charming antler full of rustic charm. With its elegant curves, textured details, and cozy forest vibes, this crochet creation is perfect for adding a whimsical touch to seasonal decorations, nursery themes, or even as a fun accessory for woodland creatures. Quick and enjoyable to make, this amigurumi antler brings the beauty of the great outdoors into every stitch! 🦌✨
Designed for customization, this pattern allows you to experiment with different shades of brown, intricate textures, or even tiny embellishments like embroidered leaves or acorns for extra charm. Craft a classic deer antler, create a mystical version with soft pastels, or even stitch up a set for a stunning nature-inspired display! Whether gifted to a fellow crochet enthusiast, displayed as a cozy accent, or made simply for the joy of crafting, this Amigurumi Antler is a delightful and creative project—perfect for bringing a touch of woodland wonder to every stitch! 🧶🍂

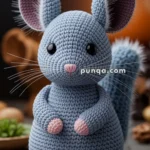
🦌 Amigurumi Antler Creature Crochet Pattern
Bring a touch of woodland magic to your amigurumi collection with this unique antlered character! Featuring elegant curved antlers, expressive ears, contrast-color limbs, and a chubby belly, this fantasy creature is equal parts majestic and adorable—perfect for display, play, or gifting.
✨ Skill Level
Intermediate – Includes shaping, color changes, and small part sewing (especially antlers).
📏 Finished Size
Approx. 10–11 inches (25–28 cm) tall using DK or worsted weight yarn and a 2.5–3.5 mm hook.
🧶 Materials
Yarn (DK or Worsted weight):
-
Color A – Body (light mauve or dusty pink)
-
Color B – Limbs & ears (turquoise or teal)
-
Color C – Tips (dark gray or brown)
-
Color D – Nose (dark gray)
Other Supplies:
-
2.5–3.5 mm crochet hook
-
Safety eyes (8 mm)
-
Tapestry needle
-
Polyfill stuffing
-
Plastic whiskers (optional) or fishing line
-
Stitch marker
🧵 Abbreviations (US Terms)
MR – Magic Ring
sc – Single Crochet
inc – Increase
dec – Decrease
sl st – Slip Stitch
ch – Chain
FO – Fasten Off
BLO – Back Loop Only
🐻 Head & Body (worked as one piece)
With Color A:
-
MR, 6 sc (6)
-
inc x6 (12)
-
(1 sc, inc) x6 (18)
-
(2 sc, inc) x6 (24)
-
(3 sc, inc) x6 (30)
6–13. sc around (30) -
(3 sc, dec) x6 (24)
-
(2 sc, dec) x6 (18)
-
sc around (18)
– Insert safety eyes between Rounds 9–10, 6 stitches apart
– Begin stuffing the head
Body:
17. (2 sc, inc) x6 (24)
18. (3 sc, inc) x6 (30)
19. (4 sc, inc) x6 (36)
20–28. sc around (36)
29. (4 sc, dec) x6 (30)
30. (3 sc, dec) x6 (24)
31. (2 sc, dec) x6 (18)
32. (1 sc, dec) x6 (12)
33. dec x6 (6)
FO, close and weave in end.
🐽 Nose
With Color D:
-
MR, 6 sc (6)
-
inc x6 (12)
3–4. sc around (12)
FO, leave tail. Stuff lightly and sew to face center below eyes.
🦴 Arms (x2)
With Color C:
-
MR, 6 sc (6)
-
inc x6 (12)
3–4. sc around (12)
Switch to Color B:
5–12. sc around (12)
FO, stuff lightly, sew to sides of body.
🐾 Legs (x2)
With Color C:
-
MR, 6 sc (6)
-
inc x6 (12)
3–4. sc around (12)
Switch to Color B:
5–10. sc around (12)
FO, stuff and sew flat to bottom of body.
👂 Ears (x2)
Inner: With Color A
Outer: With Color B
-
MR, 6 sc (6)
-
(1 sc, inc) x3 (9)
-
(2 sc, inc) x3 (12)
-
sc around (12)
FO both, place inner piece into outer and sew together. Fold slightly and stitch to sides of head.
🦌 Antlers (x2)
With Color A:
Make 1 main base, 2 mid prongs, and 1 side branch per antler.
Main Antler Base:
-
MR, 5 sc (5)
2–12. sc around (5)
FO, do not stuff.
Mid Prongs (x2 per antler):
-
MR, 4 sc (4)
2–6. sc around (4)
FO, leave tail.
Side Branch (x1 per antler):
-
MR, 4 sc (4)
2–5. sc around (4)
FO, leave tail.
Assembly:
-
Sew the 2 mid prongs to sides of the main antler base at different heights.
-
Sew the side branch diagonally near the top.
-
Attach completed antlers to top of head securely. Use pins for placement if needed.
🧷 Whiskers (Optional)
-
Cut thin plastic filament or use fishing line.
-
Thread through muzzle area and knot ends inside for secure placement. Trim as desired.
✂️ Finishing & Assembly
-
Attach arms and legs
-
Position and sew nose, ears, and antlers
-
Embroider small eyebrows or a smile if desired
-
Weave in all ends neatly
💡 Customization Ideas
-
Use metallic or speckled yarn for antlers for a fantasy vibe
-
Add a mini scarf or vest for woodland style
-
Stitch a tiny acorn, satchel, or forest accessory to hold
This charming antlered friend is ready to prance into your amigurumi forest! Whether you imagine a reindeer, woodland spirit, or magical guardian, this creature will spark imagination and joy. 🌲🦌