Welcome to the spooky and playful world of amigurumi! 🌕🐺 Today, I’m excited to share my free crochet pattern for an Amigurumi Werewolf—a fierce and whimsical creation perfect for Halloween lovers, fantasy enthusiasts, or anyone who enjoys crafting mystical and expressive plush designs! 🧶 Whether you love stitching up legendary creatures, experimenting with textured fur, or simply want to add a mischievous werewolf to your handmade lineup, this pattern will guide you through crafting a beautifully sculpted plush with pointed ears, tiny fangs, and a touch of moonlit magic! 🌙
This design embraces deep grays, earthy browns, and intricate shaping to bring a bold and enchanting presence to your crochet projects! 🧶✨ I’ve carefully outlined each step to ensure your Amigurumi Werewolf turns out just right—ready to prowl through your collection or become a treasured handmade gift! 🎁 So grab your hooks, pick out eerie hues, and let’s stitch up a fantastic werewolf! 🐺
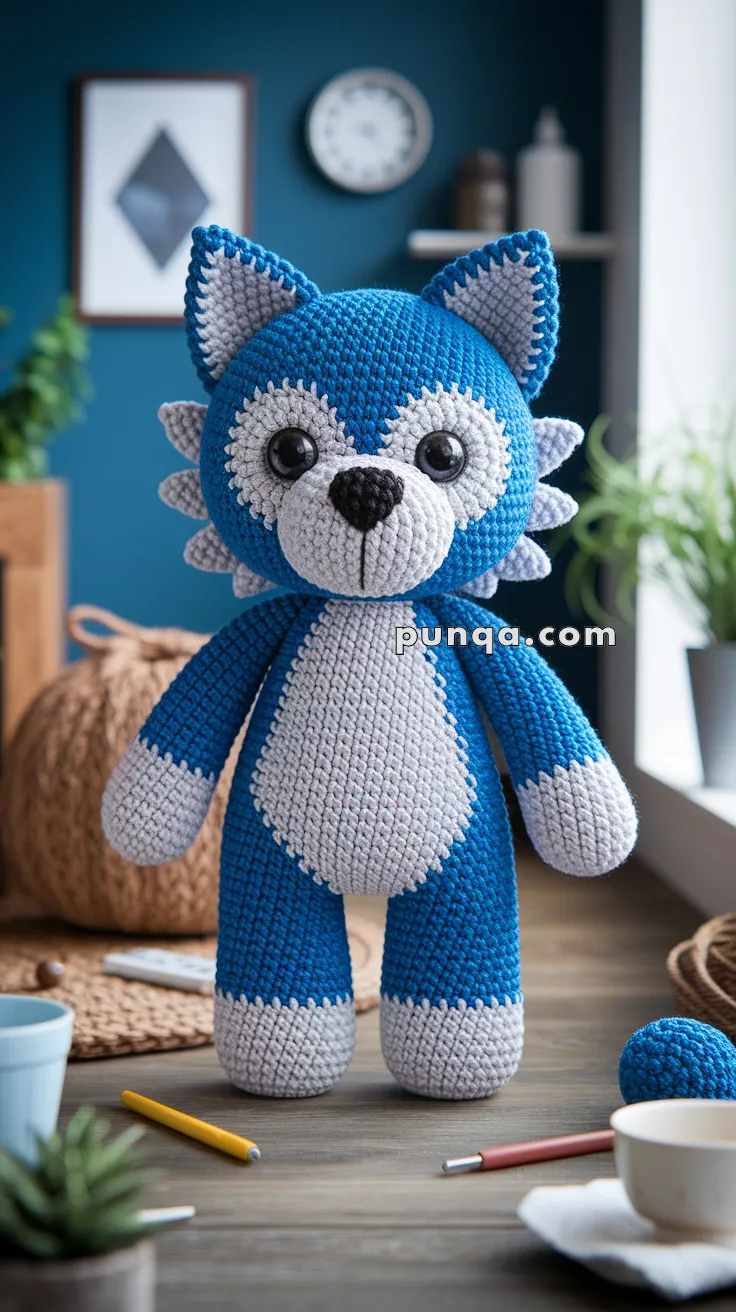
🐺 Amigurumi Werewolf Crochet Pattern
Get ready to howl with cuteness! This Amigurumi Werewolf is the perfect spooky-yet-sweet plush toy, featuring a round snout, claw-tipped paws, and a fuzzy faux-fur look made with basic stitches. With its classic upright stance and spiked mane, it’s perfect for fall displays, Halloween decor, or year-round monster lovers!
✨ Skill Level
Intermediate – involves shaping, color changes, separate applique pieces, and neat assembly.
📏 Finished Size
Approx. 28–30 cm (11–12 in) tall with DK yarn and a 3.0 mm hook.
🧶 Materials
-
DK-weight yarn:
-
Frost Blue – head, outer ears, body, arms, upper legs
-
Light Gray – face patch, inner ears, spikes, belly patch, hands, feet
-
Black – nose and a tiny bit for mouth (optional)
-
-
14 mm safety eyes (black, glossy)
-
3.0–3.25 mm crochet hook
-
Polyester fiberfill stuffing
-
Stitch marker
-
Tapestry needle
-
Scissors
Tension: Work with tight stitches so stuffing does not show through.
🧵 Abbreviations (US Terms)
MR – magic ring
sc – single crochet
inc – increase (2 sc in same st)
dec – invisible decrease (sc2tog)
sl st – slip stitch
ch – chain
FO – fasten off
🧠 Head (Blue)
R1: MR, 6 sc
R2: inc x6 (12)
R3: (1 sc, inc) x6 (18)
R4: (2 sc, inc) x6 (24)
R5: (3 sc, inc) x6 (30)
R6: (4 sc, inc) x6 (36)
R7: (5 sc, inc) x6 (42)
R8: (6 sc, inc) x6 (48)
R9–18: sc around (48)
Eyes:
Insert 14 mm safety eyes between R11–R12, about 12 stitches apart. (They go into the blue head; the gray face pieces will later be sewn around them.)
R19: (6 sc, dec) x6 (42)
R20: (5 sc, dec) x6 (36)
R21: (4 sc, dec) x6 (30)
Start stuffing firmly.
R22: (3 sc, dec) x6 (24)
R23: (2 sc, dec) x6 (18)
R24: (1 sc, dec) x6 (12)
R25: dec x6 (6)
FO, close opening, and shape into a smooth ball.
🐾 Eye Patches & Lower Muzzle (Gray)
The face is built from two eye patches plus a lower muzzle to create depth and the big gray face zone.
Eye Patches (Make 2)
R1: MR, 6 sc
R2: inc x6 (12)
R3: (1 sc, inc) x6 (18)
FO, leaving tails. Flatten gently.
Lower Muzzle
R1: MR, 6 sc
R2: inc x6 (12)
R3: (1 sc, inc) x6 (18)
R4: (2 sc, inc) x6 (24)
FO, leaving a long tail.
Lightly stuff the lower muzzle before sewing so it has a gentle 3D shape, not totally flat.
Face Assembly
-
Position the two eye patches so each sits directly under/around one eye, slightly overlapping toward the center. Stitch in place.
-
Position the lower muzzle centered under the eyes, touching the bottom edges of both eye patches so all three pieces read as one continuous gray face. Sew all around.
Nose & Mouth
With black yarn, embroider a wide triangle nose at the center-top of the lower muzzle, just under the eye line.
Add a short vertical line downward from the nose. A tiny curved mouth is optional.
👂 Ears (Make 2)
Outer Ear (Blue)
R1: MR, 6 sc
R2: (1 sc, inc) x3 (9)
R3: (2 sc, inc) x3 (12)
R4: (3 sc, inc) x3 (15)
R5: (4 sc, inc) x3 (18)
FO, do not stuff. Flatten.
Inner Ear (Gray – Slightly Larger than Before)
R1: MR, 6 sc
R2: (1 sc, inc) x3 (9)
R3: (2 sc, inc) x3 (12)
R4: (3 sc, inc) x3 (15)
FO.
Place each gray inner ear centered on a blue outer ear and sew in place. Fold base slightly and sew ears high on the head, angled a little outward, matching the reference.
🌟 Spike Crown (Back & Sides Only)
Spikes form a partial crown from behind one ear, across the back of the head, to behind the other ear – they do not come around the front.
Make 8–10 spikes.
Each Spike (Gray)
Ch 3
sc in 2nd ch from hook, dc in next ch (2 sts)
FO, leaving tail.
Arrange spikes starting just behind one ear, curving across the back of the head, and ending behind the other ear. Sew them evenly spaced along this 180–200° arc only, pointing outward.
🧍♂️ Body (Blue)
The body is slimmer than the head for chibi proportions.
R1: MR, 6 sc
R2: inc x6 (12)
R3: (1 sc, inc) x6 (18)
R4: (2 sc, inc) x6 (24)
R5: (3 sc, inc) x6 (30)
R6: (4 sc, inc) x6 (36)
R7–16: sc around (36)
Start taper:
R17: (4 sc, dec) x6 (30)
R18: (3 sc, dec) x6 (24)
R19–20: sc around (24)
Stuff body firmly as you go. FO, leaving tail for sewing head later.
🐾 Belly Patch (Gray with Blue Picot Edge)
Base Oval
Gray
R1: MR, 6 sc
R2: inc x6 (12)
R3: (1 sc, inc) x6 (18)
R4: (2 sc, inc) x6 (24)
R5–8: sc around (24)
FO and flatten. The shape should be a long oval without a sharp point.
Decorative Edge (Blue)
Join blue yarn in any stitch on the perimeter.
Repeat around:
(sl st in next st, ch 2, sl st in same st, skip 1 st)
This creates tiny picot “fur teeth” around the belly patch like in the photo. Adjust skips occasionally so it sits flat.
FO.
Center the patch on the front of the body and sew neatly.
🐾 Arms (Make 2)
Short, slightly stubby arms.
Start with Gray (hand):
R1: MR, 6 sc
R2: inc x6 (12)
R3–4: sc around (12)
Switch to Blue:
R5–12: sc around (12)
Stuff lightly. Flatten opening and sew to body at shoulder level, arms angled slightly down and outward.
🦵 Legs (Make 2)
Feet and ankles are gray; the rest of the leg is blue. There is no gray band at the top.
Start with Gray (foot + ankle):
R1: MR, 6 sc
R2: inc x6 (12)
R3: (1 sc, inc) x6 (18)
R4–7: sc around (18)
Switch to Blue (leg):
R8–16: sc around (18)
Stuff firmly. FO.
Sew legs symmetrically under the body with a small gap between them so the toy stands steadily.
🧩 Final Assembly
-
Sew the head firmly onto the body, keeping it perfectly centered and upright.
-
Check spike crown position: it should begin behind one ear, sweep across the back, and end behind the other ear with no spikes in front.
-
Confirm that the gray face pieces surround the safety eyes and that the nose is centered.
-
Ensure ears are symmetrical, slightly angled outward.
-
Attach belly patch, arms, and legs as described.
-
Shape with your hands and add a tiny embroidered mouth if desired.
💡 Optional Details
-
Add a small blue tail with a gray tip at the back.
-
Lightly brush the gray yarn with a soft brush to raise a hint of fuzz.
-
Embroider small “claws” on hands and feet with black yarn.
Whether you’re crafting for spooky season or want a magical woodland friend, this adorable werewolf is fierce, fun, and endlessly huggable! 🌕🧶