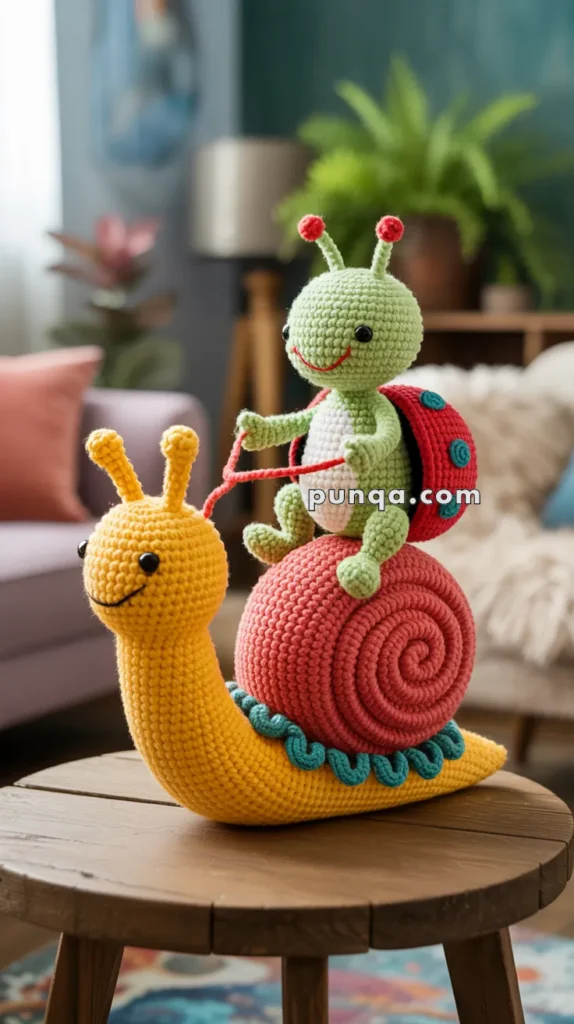
Get ready for a slow and steady adventure with this Amigurumi Turtle Riding a Snail crochet pattern! This whimsical duo brings double the charm with a tiny turtle perched proudly atop its snail companion, creating a delightful scene straight out of a storybook. Whether you’re crafting for animal lovers, adding a playful touch to your decor, or simply enjoy making imaginative amigurumi, this pattern lets you stitch up a dynamic pair full of personality! Perfect for sparking smiles and conversation, this crochet creation adds a touch of handmade magic to any space. 🐢🐌✨
Designed for customization, this pattern invites you to play with earthy tones, embroidered details, or even tiny accessories like a miniature leaf umbrella or a trail of flowers for extra flair. Craft a classic turtle and snail with natural hues, go bold with bright, cheerful colors, or even stitch up a full set of forest critters for a whimsical display! Whether gifted as a thoughtful keepsake, displayed as a charming accent, or made simply for the joy of crafting, this Amigurumi Turtle Riding a Snail is a fun and creative project—perfect for bringing a touch of handmade storytelling to every stitch! 🧶💖✨

🐌 Amigurumi Turtle Riding a Snail – Free Crochet Pattern
Bring whimsical charm to your home with this delightful Amigurumi Turtle Riding a Snail! Featuring a friendly green turtle with a red ladybug shell, perched atop a vibrant spiral snail, this playful duo is sure to spark smiles and imagination. Perfect as a nursery decor piece or a unique handmade gift!
✨ Skill Level
Intermediate – Shaping, color changes, and assembly required.
📏 Finished Size
Approx. 10–12 inches (25–30 cm) tall using DK or worsted weight yarn and a 2.5–3.5 mm hook.
🧶 Materials
- Yarn (DK or Worsted weight):
- Yellow (Snail Body)
- Coral Red (Snail Shell)
- Teal (Shell Spiral and Ruffles)
- Green (Turtle Body)
- White (Turtle Belly)
- Red (Turtle Shell)
- Black (Small details)
- Crochet hook: 2.5–3.5 mm
- Safety eyes (6 mm)
- Tapestry needle
- Stitch markers
- Polyester fiberfill
- Pipe cleaners or floral wire (for antennae and reins, optional)
🧵 Abbreviations (US Terms)
MR – Magic Ring
sc – Single Crochet
inc – Increase (2 sc in one stitch)
dec – Decrease (sc 2 together)
sl st – Slip Stitch
ch – Chain
FO – Fasten Off
BLO – Back Loop Only
🐌 Snail Body
Yellow yarn
- MR, 6 sc (6)
- inc x6 (12)
- (1 sc, inc) x6 (18)
- (2 sc, inc) x6 (24)
- (3 sc, inc) x6 (30)
6–20. sc around (30) - Begin shaping the tail: dec, 26 sc, dec (28)
22–30. sc around (28) - Lightly stuff, continue decreasing until closed.
FO, leave long tail for sewing.
🐌 Snail Antennae (Make 2)
Yellow yarn
- MR, 4 sc (4)
2–6. sc around (4) – about 5 rounds for a nice length
Stuff lightly if desired (or leave unstuffed for more bend)
FO, leave a long tail for sewing.
Sew the antennae securely on top of the snail’s head, evenly spaced.
🌀 Snail Shell (Spiral Shape)
Coral red yarn
- ch 40 (or longer for a larger shell), turn
- In second ch from hook, sc across (39)
- Continue spiraling: work 2 sc in each stitch as you coil the strip into a spiral.
Sew spiral in place as you go or afterward.
Teal Ruffle (optional)
Attach teal yarn to the outer edge of spiral and sc all around, adding occasional increases to form a ruffled look. FO.
🐢 Turtle Body
Green yarn
- MR, 6 sc (6)
- inc x6 (12)
- (1 sc, inc) x6 (18)
- (2 sc, inc) x6 (24)
5–10. sc around (24) - (2 sc, dec) x6 (18)
- (1 sc, dec) x6 (12)
Stuff firmly. - dec x6 (6), FO, close and weave in end.
🐢 Turtle Belly
White yarn
Make a flat oval:
- ch 5, sc in 2nd ch from hook, sc 2, 3 sc in last ch. Continue on other side of chain: sc 2, inc in last stitch (10)
- Work around in oval, increasing at ends.
Sew to front of body.
🐢 Turtle Legs (Make 4)
Green yarn
- MR, 6 sc (6)
2–6. sc around (6)
Stuff lightly. FO, leave tail for sewing.
🐢 Turtle Arms (Make 2 with Red Reins Attached)
Green yarn
- MR, 6 sc (6)
2–5. sc around (6)
Cut two red yarn strands (for reins) and knot to arm tips. FO, leave tail for sewing.
🐢 Turtle Head
Green yarn
- MR, 6 sc (6)
- inc x6 (12)
- (1 sc, inc) x6 (18)
- (2 sc, inc) x6 (24)
5–9. sc around (24)
Insert safety eyes and embroider smile. - (2 sc, dec) x6 (18)
- (1 sc, dec) x6 (12)
Stuff firmly. - dec x6 (6)
FO, close and shape head gently.
🐢 Turtle Antennae (Make 2)
Green yarn
- MR, 4 sc (4)
2–5. sc around (4)
Switch to red yarn for tip: - inc in each stitch (8)
- sc around (8)
FO, stuff lightly, sew to head.
🐢 Turtle Shell (Ladybug Style)
Red yarn
- MR, 6 sc (6)
- inc x6 (12)
- (1 sc, inc) x6 (18)
- (2 sc, inc) x6 (24)
- (3 sc, inc) x6 (30)
6–9. sc around (30) - (3 sc, dec) x6 (24)
- (2 sc, dec) x6 (18)
- (1 sc, dec) x6 (12)
Stuff and FO. Sew to back of turtle.
Ladybug Dots (Black or Teal)
Make 5–7 small circles:
MR, 6 sc, sl st to join. FO and sew onto shell.
🧵 Assembly Instructions
- Sew turtle head to top of body.
- Attach arms and legs securely.
- Position and sew turtle to the center top of the snail’s shell.
- Anchor reins to each side of the snail’s head and the turtle’s hands.
- Add any extra details (embroidered smiles, blush, etc.)
- Gently shape and adjust parts with stuffing.
💡 Customization Ideas
- Swap shell colors for different looks (pastel for spring, neon for fun!)
- Add a flower crown or accessories to the turtle
- Use wire in antennae and reins for posable fun
This adorable turtle-on-snail pair makes a magical toy or display piece, adding playfulness and handmade joy to any room! 🐢💕🐌