Get ready to stitch up a splash of color and charm with the Amigurumi Rainbow Fox—a vibrant twist on a woodland classic! 🦊🌈 With its playful palette and sweet little snout, this fox is anything but ordinary. Each stripe tells a story, making it a joyful celebration of creativity, self-expression, and all things cozy. Whether you’re a seasoned crocheter or just dipping your toes into amigurumi, this cheerful critter is sure to brighten your day and your yarn stash.
From its perky ears to its fluffy tail, the Rainbow Fox is a delightful blend of whimsy and warmth. You can customize the colors to match your mood, your decor, or even your favorite season. Perfect for gifting, decorating, or simply adding a pop of personality to your handmade collection, this fox is more than just a project—it’s a little rainbow of happiness stitched with love. 🧶✨
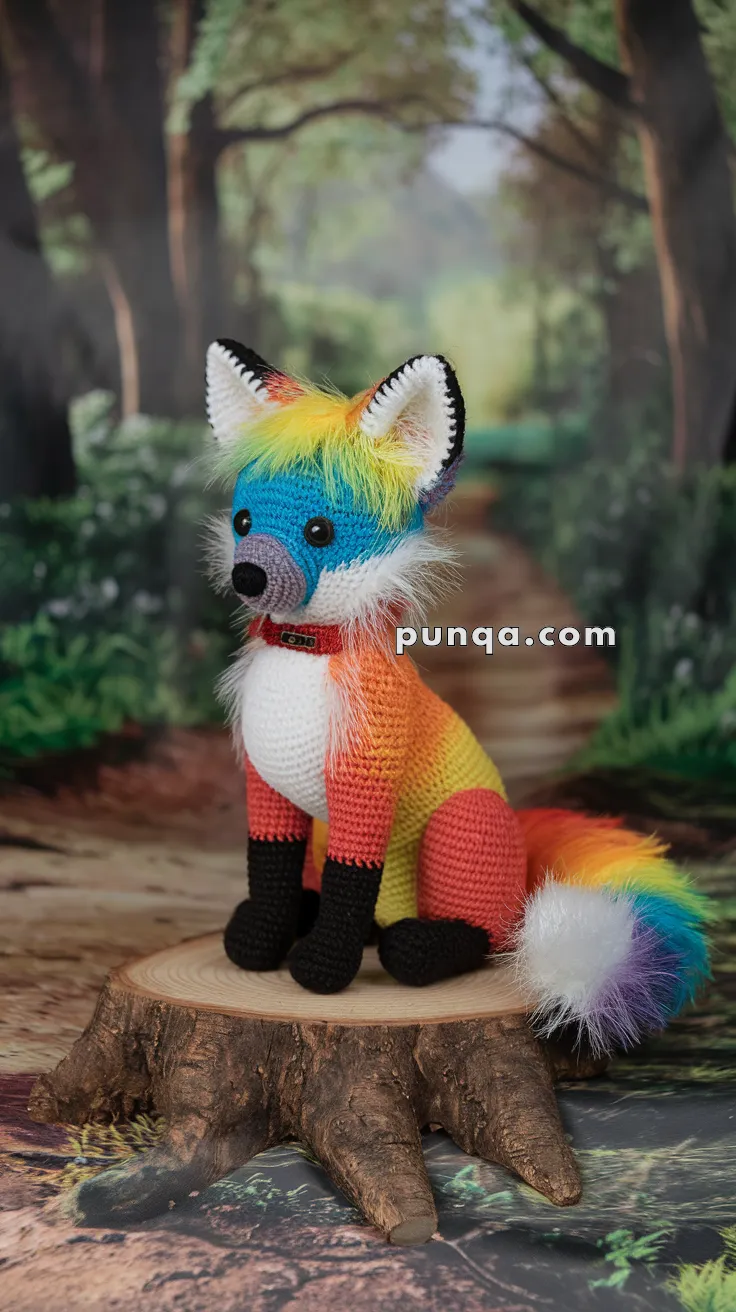
🌈 Rainbow Fox Amigurumi Crochet Pattern
Bring color and charm to your crochet collection with this stunning Rainbow Fox Amigurumi! With its vibrant gradient body, rainbow mane, fluffy white-tipped tail, and sweet little details like the red collar and black-tipped paws, this project is a true showstopper. Perfect for experienced crocheters looking to try color changes and fluff techniques.
✨ Skill Level
Intermediate to Advanced – involves color changes, shaping, and fluff techniques.
📏 Finished Size
Approx. 28–30 cm (11–12 in) tall when seated, using worsted weight yarn and a 3.0 mm hook.
🧶 Materials
-
Yarn (Worsted/Aran weight cotton or acrylic):
-
Blue (head/forehead)
-
Grey (muzzle)
-
White (chest blaze, ears, fluff, tail tip)
-
Black (ears edging, legs, paws, nose)
-
Red, Orange, Yellow (body gradient)
-
Rainbow shades (mane, tail base fluff)
-
Small amount of Dark Red (collar)
-
-
Crochet hook: 3.0 mm
-
Safety eyes: 12 mm black
-
Black embroidery thread (mouth details, collar buckle)
-
Yarn needle
-
Polyester stuffing
-
Pet slicker brush or fine comb (for fluffing)
-
Stitch markers
📝 Abbreviations (US Terms)
MR = Magic Ring
ch = chain
sc = single crochet
inc = increase (2 sc in same st)
dec = decrease (sc two sts together)
sl st = slip stitch
FLO = front loop only
BLO = back loop only
🧵 Pattern Instructions
Head (Blue & Grey)
With grey (muzzle):
-
MR 6
-
inc around (12)
-
(sc, inc) x6 (18)
-
(2 sc, inc) x6 (24)
-
(3 sc, inc) x6 (30)
-
(4 sc, inc) x6 (36)
7–9. sc around (36) -
Switch to blue, (5 sc, inc) x6 (42)
11–16. sc around (42) -
(5 sc, dec) x6 (36)
-
(4 sc, dec) x6 (30)
-
(3 sc, dec) x6 (24)
-
(2 sc, dec) x6 (18)
-
(sc, dec) x6 (12)
-
dec around (6). FO.
📌 Attach safety eyes between rows 10–11, spaced about 7 sts apart, over the grey/blue transition.
📌 Embroider small black smile on grey muzzle.
Ears (Make 2)
Inner Ear (White):
-
MR 6
-
(sc, inc) x3 (9)
-
(2 sc, inc) x3 (12)
-
(3 sc, inc) x3 (15)
FO.
Outer Ear (Black):
Same as inner ear but larger:
-
MR 6
-
(sc, inc) x3 (9)
-
(2 sc, inc) x3 (12)
-
(3 sc, inc) x3 (15)
-
(4 sc, inc) x3 (18)
FO.
📌 Sew inner to outer. Edge entire ear with black sc to give sharp outline. Sew onto head.
Body (Red → Orange → Yellow Gradient)
Start with red:
-
MR 6
-
inc around (12)
-
(sc, inc) x6 (18)
-
(2 sc, inc) x6 (24)
-
(3 sc, inc) x6 (30)
-
(4 sc, inc) x6 (36)
-
(5 sc, inc) x6 (42)
8–12. sc around (42)
Switch to orange:
13–20. sc around (42)
Switch to yellow:
21–28. sc around (42)
29. (5 sc, dec) x6 (36)
30. (4 sc, dec) x6 (30)
31. (3 sc, dec) x6 (24)
32. (2 sc, dec) x6 (18)
33. (sc, dec) x6 (12). Stuff firmly. FO.
Legs (Make 4)
Front Legs (Black → Orange):
With black:
-
MR 6
-
inc around (12)
3–6. sc around (12) -
Switch to orange, sc around (12)
8–18. sc around (12). Stuff lightly. FO.
Back Legs (Black → Orange → Yellow):
With black:
-
MR 6
-
inc around (12)
3–6. sc around (12) -
Switch to orange, sc around (12)
8–12. sc around (12) -
Switch to yellow, sc around (12)
14–18. sc around (12). FO.
Tail (Rainbow → White Fluff)
With rainbow yarn:
-
MR 6
-
inc around (12)
-
(sc, inc) x6 (18)
4–8. sc around (18) -
(2 sc, inc) x6 (24)
10–15. sc around (24) -
Switch to white, sc around (24)
17–22. sc around (24)
FO. Stuff firmly.
📌 Brush white section with a pet slicker brush until fluffy like the photo.
Mane Fluff & Chest Ruffle
-
Use rainbow yarn for the mane tuft between ears. Cut 6–8 cm strands, attach with latch-hook method, then brush out until fluffy.
-
Add white strands around cheeks and chest for the neck ruff.
Collar
With red yarn:
-
Crochet a simple chain to fit around neck.
-
Work 1 row sc across.
-
Sew around fox’s neck.
-
Embroider a tiny black clasp at the front for realism.
🧩 Assembly
-
Sew head to body.
-
Attach legs: front legs to chest, back legs on sides.
-
Sew tail at back base.
-
Attach ears to head, slightly angled.
-
Add mane fluff, chest fluff, and tail fluff.
-
Add red collar with embroidered black clasp.
🎉 Finishing Touches
-
Trim fluff neatly for a natural look.
-
Use your fingers or a slicker brush to shape rainbow mane and tail.
-
Position the fox sitting tall with head slightly forward, as in the photo.
Your Rainbow Fox Amigurumi is complete! With its vibrant rainbow colors, fluffy textures, and bold black-tipped details, it’s a magical piece that will brighten any collection. This fox is perfect as a gift, display piece, or just to enjoy the joy of crocheting something unique.