Oh, the joy of creating amigurumi! 🌟 There’s something truly magical about turning a simple skein of yarn into an adorable little creature, and when it comes to crafting a pelican chick, the charm is undeniable. Amigurumi, the delightful Japanese art of crocheting small, stuffed yarn creatures, is a wonderful way to express creativity and bring a touch of whimsy into the world. The appeal of amigurumi lies not only in the cute and cuddly results but also in the meditative, rhythmic process of crochet itself. Each stitch is like a tiny building block, adding more personality and character to your creation.
Creating a pelican chick amigurumi involves a bit of planning and a whole lot of fun. Starting with a vision of the fluffy, wide-beaked chick in mind, you gather your materials – soft yarn in shades of white, gray, and a bit of yellow or orange for the beak. 🧶 You might begin by sketching out a rough pattern or finding inspiration from existing designs. As you work through the pattern, the pelican chick starts to take shape, with each round bringing it closer to life. The joy multiplies when you add those finishing touches like the eyes and maybe a tuft of fluffy hair on top. The entire process is a delightful journey from imagination to reality, culminating in a charming companion that’s sure to bring smiles all around.

🐦 Amigurumi Pelican – FREE Crochet Pattern
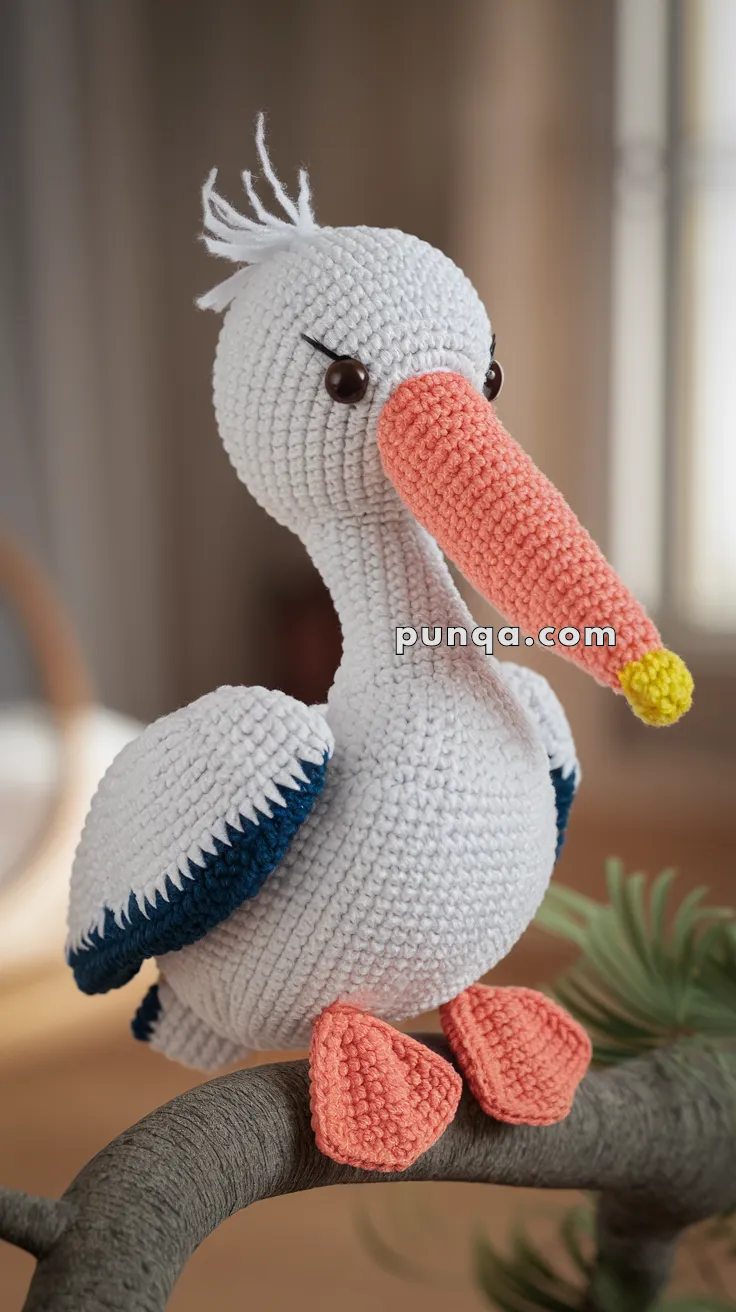
This charming amigurumi pelican is a delightful project for bird lovers and coastal decor fans alike! With its oversized beak, bright webbed feet, and fluffy tuft, this playful waterbird is sure to make a splash on any handmade shelf.
🧶 Materials
-
Yarn in:
-
White (body and wings)
-
Coral or light orange (beak and feet)
-
Yellow (beak tip)
-
Navy blue (wing edge)
-
-
2.5 mm or 3.0 mm crochet hook
-
12 mm safety eyes (black or brown)
-
Fiberfill stuffing
-
Yarn needle
-
Stitch marker
-
Scissors
-
Optional: eyelash yarn or embroidery floss for tuft and lashes
✨ Abbreviations (US Terms)
-
MR – Magic Ring
-
sc – Single Crochet
-
inc – Increase
-
dec – Decrease
-
ch – Chain
-
sl st – Slip Stitch
-
FO – Fasten Off
🧠 Skill Level
Intermediate – Includes shaping, beak construction, color changes, and wing detailing.
🐣 Pattern Instructions
🔹 Head & Neck (White Yarn)
-
MR, sc 6
-
[inc] x6 (12)
-
[sc, inc] x6 (18)
-
[2 sc, inc] x6 (24)
-
Continue increasing to 42 sts
-
Rounds 8–14: sc around for height
-
Start decreasing for neck (over ~5 rounds)
-
Work even 6–8 rounds to create long, narrow neck
-
Lightly stuff and FO
🔸 Body (White Yarn)
-
MR, sc 6
-
[inc] x6 (12)
-
Continue increasing to 54–60 sts
-
Work even for ~15–20 rounds
-
Shape the back with slight decreases
-
Leave a small opening for stuffing
-
Stuff firmly and FO
🟠 Beak (Coral/Orange Yarn)
-
MR, sc 6
-
[inc] x6 (12)
-
[sc, inc] x6 (18)
-
Continue increasing to 24–30 sts
-
Work even for ~10–12 rounds to elongate
-
Switch to yellow for the beak tip (optional):
-
sc 2 rounds in yellow
-
-
Stuff lightly, then FO and sew to face
👁 Eyes & Tuft
-
Attach 12 mm safety eyes evenly on either side of the beak
-
Add embroidered or glued black lashes for character
-
For tuft: attach short lengths of white yarn on top of the head and fluff
🪽 Wings (Make 2 – White & Navy)
-
MR, sc 6 in white
-
Increase evenly to 24–30 sts
-
Work 5–6 rounds in white
-
Switch to navy for edging
-
Crochet 1 round sc or decorative scallop edge
-
Flatten slightly and sew to sides
🦶 Feet (Make 2 – Coral/Orange Yarn)
-
Ch 7, turn, sc in 2nd ch and across (6 sts)
-
Work 3 toes by chaining from each edge and making small triangle shapes
-
FO and sew to bottom of body, toes pointing forward
🧵 Assembly
-
Sew head to body securely at neck base
-
Attach beak firmly in front center
-
Position and sew on wings and feet
-
Add tuft and lashes if desired
-
Weave in all ends
✨ Finishing Touches
-
Lightly stuff the beak if you want a more rounded look
-
Add a crocheted fish or baby bundle for a whimsical storytelling scene
-
Place your pelican on a driftwood base or coastal-themed display


