Step up to the plate with this Amigurumi Baseball Player – FREE Crochet Pattern! Perfect for sports fans and crochet enthusiasts alike, this project captures the spirit of the game in a fun, handmade form. With its classic uniform, cap, and bat, this little player is ready to swing for the fences while adding a playful touch to your crochet collection.
Whether you’re making it as a gift for a baseball lover, a keepsake for a child, or simply as a cheerful addition to your handmade creations, this pattern is both enjoyable and rewarding. Easy-to-follow instructions guide you through each stitch, making it suitable for beginners and experienced crocheters. Grab your yarn and hook—it’s time to crochet your very own baseball star!
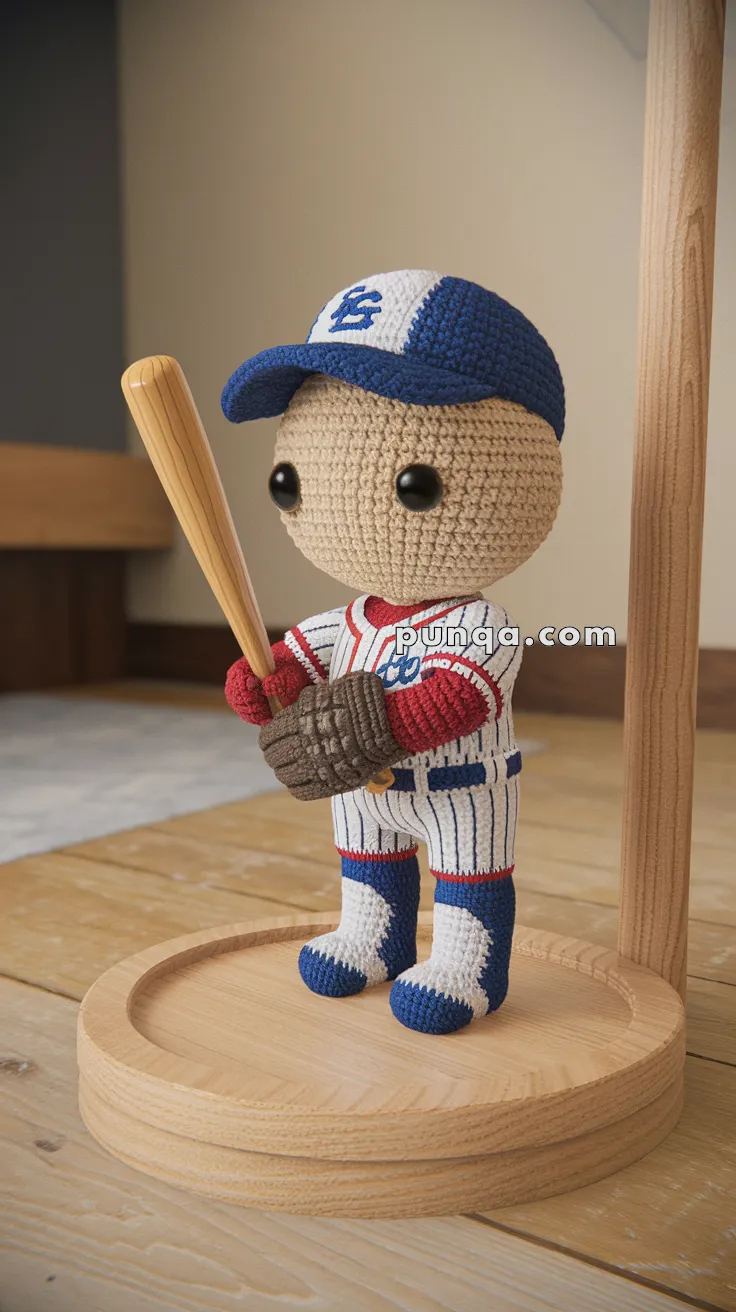
⚾ Amigurumi Baseball Player Crochet Pattern 🧢
Step onto the field with this charming amigurumi baseball player, designed to capture the energy and nostalgia of the game in a soft, handcrafted form. From the neatly stitched pinstripe uniform to the oversized glove and classic cap, every detail brings a sense of movement and personality to the piece. ⚾
This project is especially satisfying because it combines clean shaping with thoughtful details—like the forward batting pose and carefully balanced stance—making the finished doll feel lively and full of character. Whether you’re creating it as a gift for a sports fan, a keepsake for a young player, or a unique display piece, this design turns simple yarn into something truly memorable. 🧶💙
✨ Skill Level
Intermediate
Includes:
- Precise color changes (pinstripes & uniform sections)
- Shaping for standing stability
- Multi-part accessories (cap, glove, bat)
- Surface detailing
📏 Finished Size
Approx. 20–22 cm (8–9 inches) tall
🧶 Yarn Requirements
- Skin tone: 35 g (≈75 m)
- White: 65 g (≈140 m)
- Navy blue: 35 g (≈75 m)
- Red: 25 g (≈55 m)
- Brown: 20 g (≈40 m)
- Light beige (bat): 10 g (≈20 m)
🧵 Materials
- 2.5–3.0 mm crochet hook
- 10–12 mm safety eyes
- Polyester stuffing
- Yarn needle, stitch marker
- Optional: thin wire for arm positioning
🧵 Abbreviations (US Terms)
MR – magic ring
sc – single crochet
inc – increase
dec – invisible decrease
ch – chain
sl st – slip stitch
FO – fasten off
🧍 Head (Large & Smooth)
With skin tone:
R1: MR, 6 (6)
R2: inc ×6 (12)
R3: (1 sc, inc) ×6 (18)
R4: (2 sc, inc) ×6 (24)
R5: (3 sc, inc) ×6 (30)
R6: (4 sc, inc) ×6 (36)
R7–14: sc around (36)
Insert eyes between R10–11 (wide spacing, about 9–10 sts apart for the rounded look)
R15: (4 sc, dec) ×6 (30)
R16: (3 sc, dec) ×6 (24)
Stuff firmly
R17: (2 sc, dec) ×6 (18)
R18: (1 sc, dec) ×6 (12)
R19: dec ×6 (6)
FO.
🧢 Cap (Deep Fit with Curved Brim)
Cap Base (Navy)
R1: MR, 6
R2: inc ×6 (12)
R3: (1 sc, inc) ×6 (18)
R4: (2 sc, inc) ×6 (24)
R5: (3 sc, inc) ×6 (30)
R6: (4 sc, inc) ×6 (36)
R7–10: sc around (36)
FO.
Front Panel (White Section)
Attach white yarn across front 14–16 stitches only:
Work 4 rows of sc back and forth to form a rectangular panel.
Embroider a small blue symbol or letter centered.
Brim (Firm & Slightly Curved)
With navy:
ch 12
Row 1–4: sc across
Slightly curve and sew firmly to front edge.
Attach cap snugly, sitting low on forehead.
🧍 Body (Compact Torso with Jersey Look)
Start with white:
R1: MR, 6
R2: inc ×6 (12)
R3: (1 sc, inc) ×6 (18)
R4: (2 sc, inc) ×6 (24)
R5–11: sc around (24)
Pinstripe Detail
During these rounds:
- Work mostly white
- Insert thin vertical navy stitches every 3–4 stitches
(keep stripes subtle and evenly spaced)
Chest Accent
Add a few red stitches across upper chest to suggest lettering/trim.
R12: (2 sc, dec) ×6 (18)
R13–15: sc around (18)
Stuff firmly
FO.
🦵 Legs (Integrated Pants & Socks) – Make 2
Shoe Base (Blue)
R1: MR, 6
R2: inc ×6 (12)
R3: (1 sc, inc) ×6 (18)
R4–5: sc around (18)
Sock Section (White)
R6–9: sc around (18)
Add one round of red stripe at top edge
Upper Leg
R10: (1 sc, dec) ×6 (12)
R11–14: sc around (12)
Stuff firmly, especially foot.
Flatten slightly for stability.
💪 Arms (Red Sleeves with Forward Pose) – Make 2
Sleeve (Red)
R1: MR, 6
R2: inc ×6 (12)
R3–5: sc around (12)
Lower Arm (Skin)
R6–10: sc around (12)
Hand Shaping
R11: (2 sc, dec) ×3 (9)
R12–13: sc around (9)
Light stuffing.
Shape arms curved inward before attaching.
🧤 Glove (Large, Rounded & Defined)
With brown:
R1: MR, 6
R2: inc ×6 (12)
R3: (1 sc, inc) ×6 (18)
R4–8: sc around (18)
Flatten slightly into oval.
Add surface lines using yarn needle for glove texture.
Attach securely over one hand.
⚾ Bat (Tapered Cylinder)
With light beige:
R1: MR, 6
R2–18: sc around (6)
Lightly stuff or insert thin stick.
Slightly widen handle end by adding a few inc stitches.
🧩 Assembly (Pose Accuracy)
- Attach legs evenly for stable standing
- Sew body centered over legs
- Attach arms forward and slightly inward
- Position hands gripping bat naturally
- Attach glove over front hand
- Secure cap low and slightly angled
✨ Finishing Touches
⚾ Add extra pinstripes with surface embroidery if needed
🧢 Slightly curve brim downward
🧤 Shape glove for realistic bulk
👟 Ensure feet are flat and balanced
🌟 Final Thoughts
With its bold colors, crisp details, and confident stance, this baseball player becomes more than just an amigurumi—it feels like a tiny moment frozen mid-game. The combination of structure and softness gives it that perfect collectible quality while still keeping the warmth of handmade craftsmanship. ✨
Take a moment to admire the small details you’ve created—the curve of the cap, the grip on the bat, the texture of the glove. These are the touches that bring your character to life. Display it proudly, gift it with pride, or let it inspire your next sporty creation. ⚾🧢


LOVE… your patterns