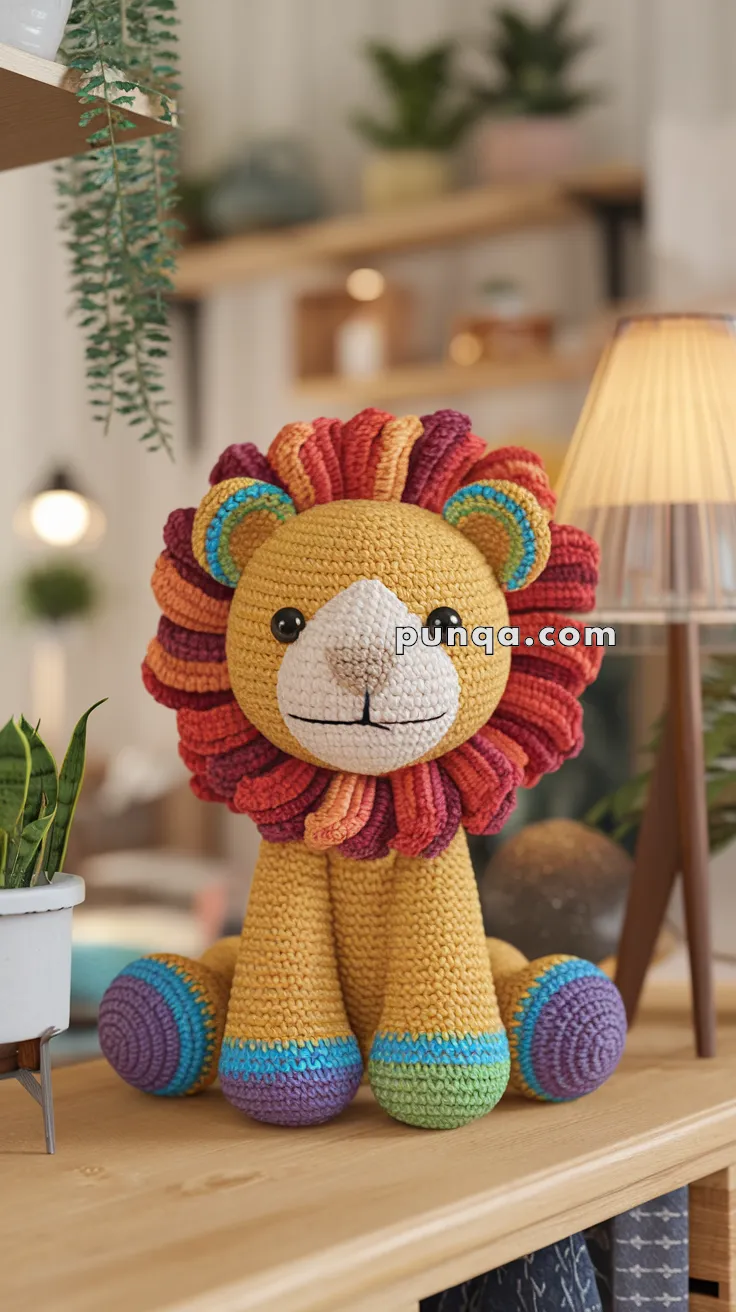
Roar into a world of color with the Amigurumi Rainbow Lion, a vibrant crochet creation that’s bursting with personality and playful charm! 🦁🌈 With its soft body, cheerful face, and dazzling rainbow mane, this lion is anything but fierce—he’s here to brighten your day and add a splash of joy to your handmade collection. Whether perched on a shelf, gifted to a little one, or joining a jungle of other amigurumi animals, this colorful king is sure to steal hearts.
This pattern is perfect for crocheters who love bold hues and whimsical details. You can mix and match yarns to create your own mane masterpiece, add glittery accents, or even stitch up a pride of rainbow lions for extra fun. Whether you’re crafting for playtime, décor, or just indulging in a joyful project, the Rainbow Lion is a delightful way to celebrate creativity—one radiant stitch at a time! 🧶✨
🦁 Rainbow Lion Amigurumi Crochet Pattern
Bring a splash of color to your amigurumi collection with this cheerful Rainbow Lion! With his golden body, striped rainbow paws, bold layered mane, and sweet face with an oval muzzle, he’s full of personality. Perfect for gifting, nursery décor, or as a colorful showpiece.
✨ Skill Level
Intermediate – Includes shaping, color changes, sewing, and dense layered mane attachment.
📏 Finished Size
Approx. 30 cm (12 in) tall when made with DK or worsted yarn and a 3.0–3.5 mm hook.
🧶 Materials
- Yarn (DK / Worsted cotton blend):
- Golden yellow – 80 g (body, head, limbs)
- White – 20 g (muzzle)
- Teal, Aqua, Green, Blue – paw accents + ear rings
- Red, Orange, Burnt Orange, Burgundy, Deep Purple – mane strands
- Black – for embroidery
- Hook: 3.0–3.5 mm
- Safety eyes: 12–14 mm
- Stuffing: Polyfill
- Yarn needle & stitch markers
🔤 Abbreviations (US Terms)
MR – Magic Ring
sc – Single Crochet
inc – Increase (2 sc in same stitch)
dec – Decrease (sc2tog)
sl st – Slip Stitch
hdc – Half Double Crochet
ch – Chain
FO – Fasten Off
🧍 Head (Golden Yellow)
The head in the photo is large and spherical, not flat-topped.
R1: MR, 6 sc (6)
R2: inc ×6 (12)
R3: (sc, inc) ×6 (18)
R4: (2 sc, inc) ×6 (24)
R5: (3 sc, inc) ×6 (30)
R6: (4 sc, inc) ×6 (36)
R7: (5 sc, inc) ×6 (42)
R8–15: sc around (42) — this extra height makes the round, plush head shape.
R16: (5 sc, dec) ×6 (36)
R17: (4 sc, dec) ×6 (30)
R18: (3 sc, dec) ×6 (24)
Stuff very firmly for a smooth sphere. FO, leaving long tail.
🦁 Muzzle (White Oval)
The muzzle in the photo is prominent and slightly protruding with a triangle nose and embroidered smile.
Ch 9
R1: sc 7, 3 sc in last, turn to underside → sc 6, inc in last (18)
R2: inc, sc 6, inc ×3, sc 6, inc ×2 (24)
R3: sc 7, inc, sc 8, inc, sc 7 (26)
R4–6: sc around (26)
Stuff lightly, keeping oval shape. FO.
Assembly:
- Sew muzzle centered between rounds 10–14.
- Insert eyes just above top edge of muzzle (spaced 7–8 sts apart).
- Embroider small triangular nose with black yarn at top of muzzle.
- Add a vertical line from nose down and split slightly into a “Y” smile.
🐾 Ears (Make 2)
The photo shows golden outer ears with inner rainbow rings — teal, aqua, and yellow.
Outer (Golden):
R1: MR, 6 sc (6)
R2: inc ×6 (12)
R3: (sc, inc) ×6 (18)
R4: sc around (18)
Inner (Rainbow Rings):
Round 5 (FLO):
– 1 round teal,
– 1 round aqua,
– 1 round yellow.
Flatten and FO.
Sew at upper sides of head, about 4 rounds down from the top, rainbow side facing forward.
🦁 Mane (Layered and Plush)
The mane in the photo has thick 3D strands that curl slightly forward.
These are hdc curls, not thin loops.
Each strand:
1️⃣ Ch 22–25
2️⃣ Work 2 hdc in each ch back to start (this doubles stitches and makes the strand curl naturally).
3️⃣ FO leaving a long tail.
Make ~35–40 strands total, alternating:
- Burgundy, Red, Orange, Burnt Orange, Deep Purple.
Assembly:
- First ring: Attach around the head, tight around face, right behind the ears.
- Second ring: Attach directly behind first for thickness.
- Each strand should overlap slightly.
This gives the plush, full mane shown in the photo.
🧍 Body (Golden Yellow)
The body is slightly cone-shaped and plump with a round bottom.
R1: MR, 6 sc (6)
R2: inc ×6 (12)
R3: (sc, inc) ×6 (18)
R4: (2 sc, inc) ×6 (24)
R5: (3 sc, inc) ×6 (30)
R6–16: sc around (30)
R17: (3 sc, dec) ×6 (24)
R18–21: sc around (24)
Stuff firmly, making base flatter for stability. FO.
🐾 Legs (Make 4)
Each leg has rainbow paw pads and smooth color transition.
Start with paw color sequence (from center out):
1️⃣ Purple
2️⃣ Blue
3️⃣ Teal
4️⃣ Green
→ then switch to Golden Yellow.
R1: MR, 6 sc (6)
R2: inc ×6 (12)
R3: (sc, inc) ×6 (18)
R4: (2 sc, inc) ×6 (24)
R5–6: sc around (24) in purple
R7–8: sc around (24) in blue
R9: sc around (24) in teal
R10: sc around (24) in green
R11–20: sc around (24) in golden
Stuff firmly and slightly flatten the top. FO.
Assembly:
- Back legs sewn wide apart for sitting.
- Front legs slightly forward for support.
🦁 Tail (Optional)
Ch 20 in golden, sc across. FO.
Add one curled red strand at tip for tuft.
🪡 Assembly Order
1️⃣ Sew head to body securely.
2️⃣ Attach legs — front slightly forward, back wider.
3️⃣ Attach ears and mane.
4️⃣ Sew muzzle.
5️⃣ Insert eyes and embroider details.
6️⃣ Optional: add tail.
✨ Finishing Details
- Add small white stitch to eyes for sparkle.
- Fluff and separate mane strands with your fingers.
- Lightly blush cheeks for warmth.
- Steam the bottom for even sitting balance.
💡 Notes for Best Results
- Yarn texture:
Cotton yarn = dense, sculpted look (like the photo).
Acrylic yarn = softer, fluffier mane but less structure. - Mane fullness: You can double strands per round for a lion with an even bolder mane.
- Color accuracy: Keep paw and ear rainbow hues cooler (teal/blue) to contrast with warm mane tones.
🎉 Final Look
Your Rainbow Lion is complete! 🦁🌈
With his golden body, striped rainbow paws, fluffy multicolored mane, rounded ears with rainbow detail, and oval muzzle, he’s playful and full of color. Perfect as a nursery guardian, a cheerful gift, or the star of your amigurumi collection.