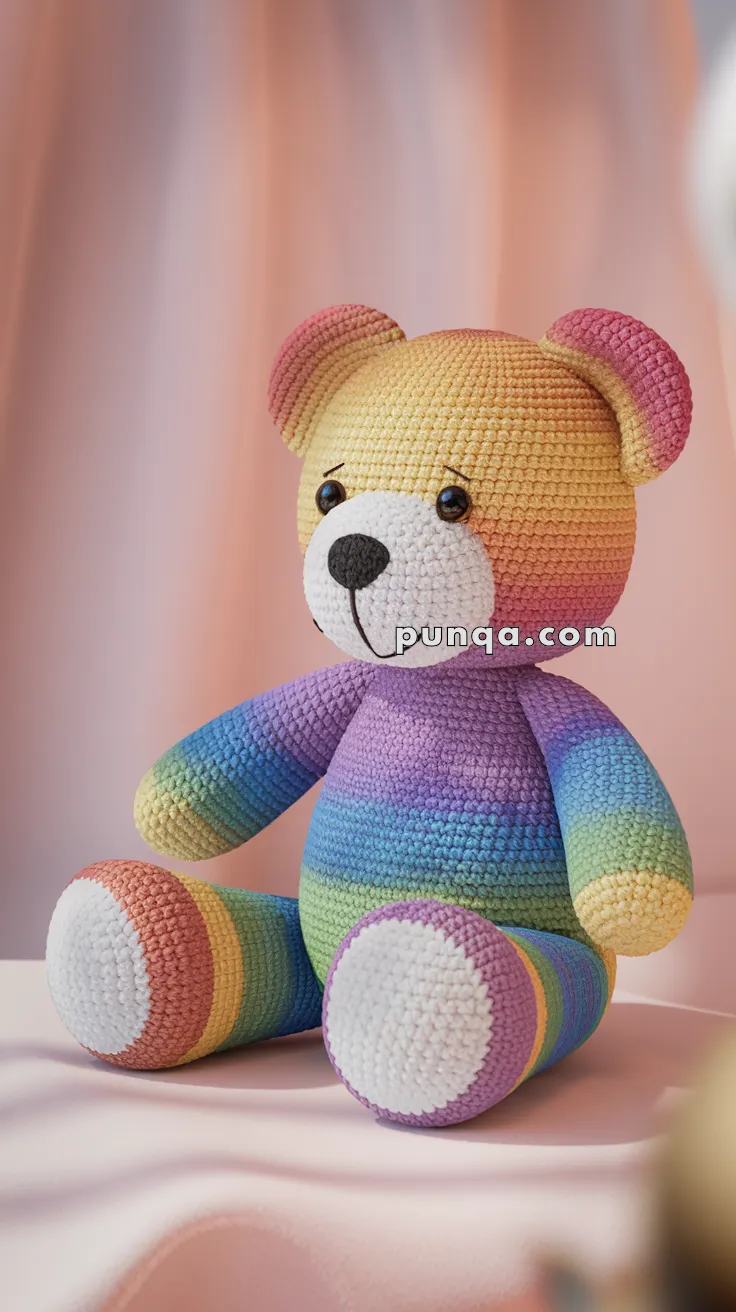
Welcome to the colorful and cuddly world of amigurumi! 🌈🧸 Today, I’m excited to share my free crochet pattern for an Amigurumi Rainbow Teddy Bear—a cheerful and vibrant creation perfect for plush lovers, whimsical décor, or anyone who enjoys crafting expressive and heartwarming designs! 🎨 Whether you love stitching up adorable bears, creating textured and detailed figures, or simply want to add a bright and joyful teddy to your handmade lineup, this pattern will guide you through crafting a beautifully sculpted plush with bold rainbow hues, soft ears, and a touch of cozy charm! 💖
This design embraces vivid colors, rounded shapes, and delightful details to bring a fun and uplifting presence to your crochet projects! 🧶✨ I’ve carefully outlined each step to ensure your Amigurumi Rainbow Teddy Bear turns out just right—ready to brighten up your space or become a treasured handmade gift! 🎁 So grab your hooks, pick out fiery reds, sunny yellows, cool blues, and lush greens, and let’s stitch up a dazzling teddy bear! 🧸
🌈 Rainbow Teddy Bear Crochet Pattern
Bring some joy and color into your crochet world with this adorable Rainbow Teddy Bear! With its cheerful stripes, white paw pads, and soft expression, this bear is the perfect cuddle buddy or gift. Let’s dive into the full step-by-step pattern.
✨ Skill Level
Intermediate – includes color changes and shaping.
📏 Finished Size
Approx. 25–28 cm (10–11 in) tall when using worsted/velvet yarn and a 3.5–4 mm hook.
🧶 Materials
-
Rainbow yarn (yellow, orange, pink, green, blue, purple – or variegated gradient yarn)
-
White yarn (snout + paw pads)
-
Black yarn (nose + mouth embroidery)
-
10 mm safety eyes (or size to preference)
-
Pink yarn (inner ears)
-
Fiberfill stuffing
-
Yarn needle & stitch markers
-
Crochet hook: 3.5–4 mm
📝 Abbreviations (US Terms)
-
MR – Magic Ring
-
sc – Single crochet
-
inc – Increase (2 sc in one stitch)
-
dec – Decrease (sc 2 together)
-
sl st – Slip stitch
-
ch – Chain
-
(…) – Repeat instructions in brackets
-
– Total stitch count
🧸 Head (yellow → orange → pink gradient)
Use yellow, then fade to orange, then soft pink at the top.
-
MR, 6 sc [6]
-
inc in each st [12]
-
(sc, inc) × 6 [18]
-
(2 sc, inc) × 6 [24]
-
(3 sc, inc) × 6 [30]
-
(4 sc, inc) × 6 [36]
-
(5 sc, inc) × 6 [42]
8–14. sc around [42] -
(6 sc, inc) × 6 [48]
16–22. sc around [48] -
(6 sc, dec) × 6 [42]
-
(5 sc, dec) × 6 [36]
-
(4 sc, dec) × 6 [30]
-
(3 sc, dec) × 6 [24]
-
(2 sc, dec) × 6 [18]
Stuff firmly. Finish off.
🐻 Ears (make 2 – pink inside, rainbow outside)
Outer (rainbow):
-
MR, 6 sc [6]
-
inc in each st [12]
-
(sc, inc) × 6 [18]
-
(2 sc, inc) × 6 [24]
Fasten off.
Inner (pink):
Repeat R1–R3 of outer ear [18].
Sew inner onto outer. Fold and stitch to attach to head.
🐽 Snout (white)
-
MR, 6 sc [6]
-
inc in each st [12]
-
(sc, inc) × 6 [18]
-
(2 sc, inc) × 6 [24]
5–6. sc around [24]
Finish off. Embroider oval black nose and a simple vertical + smile line.
👀 Eyes & Face
-
Insert safety eyes 10 stitches apart, just above snout.
-
Embroider thin angled eyebrows in black yarn.
🌈 Body (green → blue → purple gradient)
-
MR, 6 sc [6]
-
inc in each st [12]
-
(sc, inc) × 6 [18]
-
(2 sc, inc) × 6 [24]
-
(3 sc, inc) × 6 [30]
-
(4 sc, inc) × 6 [36]
-
(5 sc, inc) × 6 [42]
8–18. sc around [42] -
(5 sc, dec) × 6 [36]
20–23. sc around [36] -
(4 sc, dec) × 6 [30]
25–28. sc around [30] -
(3 sc, dec) × 6 [24]
Stuff firmly. Leave opening at top to sew to head.
🐾 Arms (make 2 – rainbow striped, no paw pads)
-
MR, 6 sc [6]
-
inc in each st [12]
3–6. sc around [12] -
(2 sc, dec) × 3 [9]
8–16. sc around [9]
Stuff lightly. Sew to body at shoulder.
🦶 Legs (make 2 – rainbow with white paw pads)
Start with white.
-
MR, 6 sc [6]
-
inc in each st [12]
-
(sc, inc) × 6 [18]
-
(2 sc, inc) × 6 [24]
5–6. sc around [24]
Switch to rainbow yarn.
7–16. sc around [24] -
(2 sc, dec) × 6 [18]
18–20. sc around [18]
Stuff firmly. Sew to bottom of body so bear sits upright.
🧵 Assembly
-
Sew head to body securely.
-
Attach ears to top sides of head.
-
Sew arms to upper body.
-
Attach legs to bottom of body.
-
Sew snout on, centered between eyes.
-
Embroider thin mouth line and eyebrows.
🌟 Final Touches
-
Use gradient yarn for smooth striping, or manually change colors for each section.
-
Stuff firmly but shape as you go for an even round teddy look.
-
Add optional blush with a touch of pink yarn or fabric paint.
💡 Tips for a Perfect Rainbow Bear
-
Keep stripes consistent: End color changes at the back so transitions stay hidden.
-
Firm stuffing: Especially in head and body, to hold shape without sagging.
-
Paw pads: Stitch them slightly raised for the soft, rounded look in the photo.
🎀 And there you have it – your very own Rainbow Teddy Bear Amigurumi! This colorful friend will brighten any room and makes a perfect handmade gift. 🌈🐻