Welcome to the dazzling and colorful world of amigurumi! 🐠✨ Today, I’m excited to share my free crochet pattern for an Amigurumi Rainbow Fish—a vibrant and whimsical creation perfect for ocean lovers, storybook enthusiasts, or anyone who enjoys crafting expressive and eye-catching plush designs! 🧶 Whether you love stitching up shimmering scales, experimenting with bold color combinations, or simply want to add a radiant rainbow fish to your handmade lineup, this pattern will guide you through crafting a beautifully sculpted plush with flowing fins, sparkling details, and a touch of underwater magic! 🌊
This design embraces bright hues, textured shaping, and thoughtful details to bring a lively and enchanting presence to your crochet projects! 🧶✨ I’ve carefully outlined each step to ensure your Amigurumi Rainbow Fish turns out just right—ready to swim into your collection or become a treasured handmade gift! 🎁 So grab your hooks, pick out dazzling shades, and let’s stitch up a stunning rainbow fish! 🐠
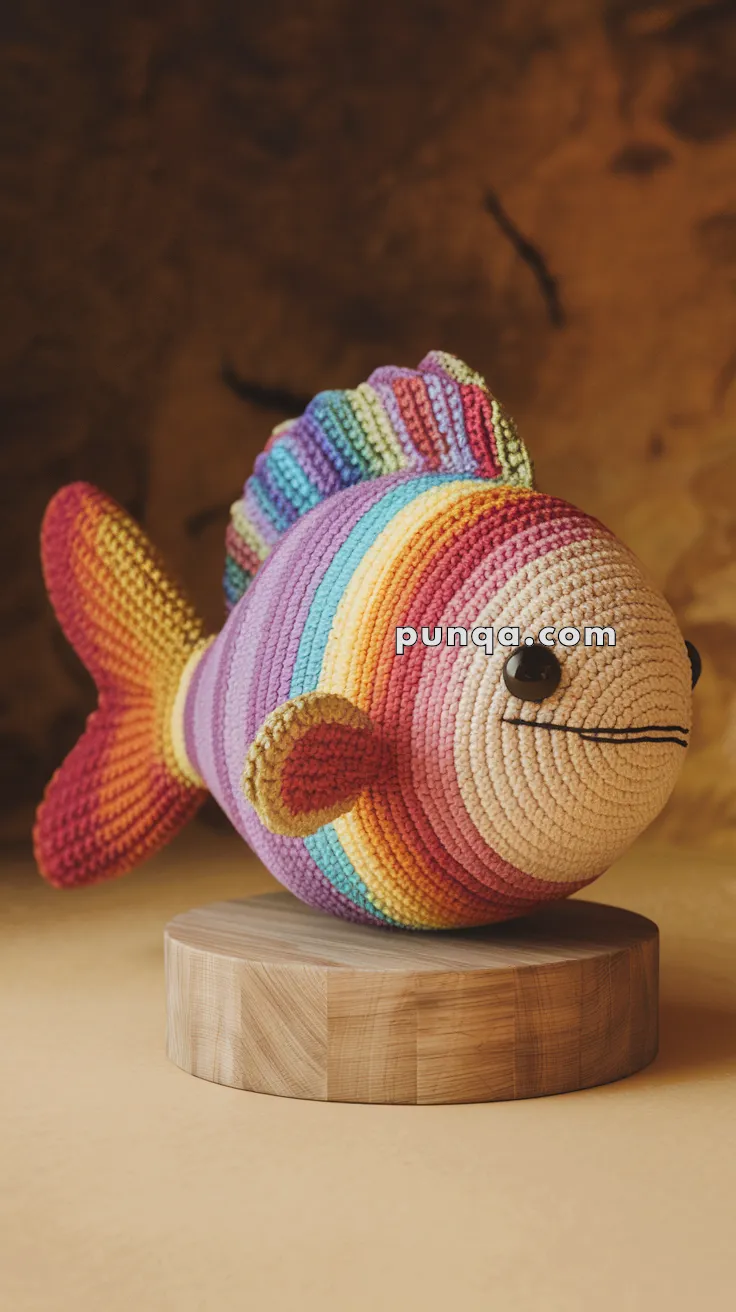
🌈 Amigurumi Rainbow Fish – FREE Crochet Pattern
This vibrant rainbow fish is a splash of color and joy! With a rounded body, bold rainbow stripes, vertical dorsal fin details, and a flared tail worked in the correct orientation, it makes a beautiful display piece or playful toy.
✨ Skill Level
Intermediate – Includes seamless color changes, fin shaping, and proper orientation for striped dorsal and tail construction.
📏 Finished Size
Approx. 10–12 inches (25–30 cm) long using DK or worsted yarn and a 2.5–3.5 mm hook.
🧶 Materials
-
DK or Worsted weight yarn in rainbow colors:
-
Color A: Cream/Peach (face)
-
Color B–G: Pink, Red, Orange, Yellow, Green, Aqua, Blue, Purple (body + fins)
-
Color H: Burgundy/Dark contrast (optional tail/fins edging)
-
-
2.5–3.0 mm crochet hook
-
12 mm safety eyes
-
Black embroidery thread for mouth lines
-
Stuffing
-
Stitch marker
-
Tapestry needle
🧵 Abbreviations (US Terms)
MR – Magic Ring
sc – Single Crochet
inc – Increase
dec – Decrease
sl st – Slip Stitch
ch – Chain
FO – Fasten Off
🐟 Body (Worked in spiral rounds)
Start with Color A (face):
-
MR, 6 sc
-
inc x6 (12)
-
(1 sc, inc) x6 (18)
-
(2 sc, inc) x6 (24)
-
(3 sc, inc) x6 (30)
-
(4 sc, inc) x6 (36)
-
(5 sc, inc) x6 (42)
-
(6 sc, inc) x6 (48)
9–13. sc around (48)
📌 Start changing colors every 2–3 rounds in rainbow order:
-
Rounds 14–15: Pink
-
Rounds 16–17: Red
-
Rounds 18–19: Orange
-
Rounds 20–21: Yellow
-
Rounds 22–23: Green
-
Rounds 24–25: Aqua
-
Rounds 26–27: Blue
-
Rounds 28–30: Purple
-
(6 sc, dec) x6 (42)
-
(5 sc, dec) x6 (36)
-
(4 sc, dec) x6 (30)
-
(3 sc, dec) x6 (24)
-
(2 sc, dec) x6 (18)
Stuff firmly -
(1 sc, dec) x6 (12)
-
dec x6 (6), FO and close
📌 Place safety eyes between Rounds 10–11, approx. 10 sts apart
📌 Embroider three straight horizontal lines for mouth with black thread
🐠 Side Fins (Make 2 – Multicolor Stripes)
-
MR, 6 sc
-
inc x6 (12)
-
(1 sc, inc) x6 (18)
-
sc around
📌 Change color every round for a striped look -
(2 sc, dec) x4, sc x2 (14)
-
sc around
Flatten, FO and sew evenly on each side near Round 17 of the body
🧵 Dorsal Fin (Vertical Stripes – Work in Rows)
Use vertical striping across rows:
-
Ch 9
-
Row 1: sc across (8)
-
Change color every row (Pink → Red → Orange → Yellow → Green → Blue → Purple → Burgundy), work 8 rows total
-
FO, weave in tails
📌 Fold base slightly, sew along top centerline of body, curving slightly backward. Stitches should run vertically to emphasize the stripes.
🎨 Tail Fin (Horizontal Orientation)
-
MR, 6 sc
-
inc x6 (12)
-
(1 sc, inc) x6 (18)
-
(2 sc, inc) x6 (24)
-
(3 sc, inc) x6 (30)
-
(4 sc, inc) x6 (36)
7–9. sc around -
(2 sc, dec) x9 (27)
-
sc around
-
(1 sc, dec) x9 (18)
-
Flatten and shape to a leaf/spade style
FO, flatten, and attach horizontally at the back, matching direction in the photo
📌 Optional: Add dark edge round with sc or crab stitch (reverse sc) around tail and fins
✂️ Finishing Touches
-
Lightly curve dorsal fin while stitching for flow
-
Tail should fan outward horizontally
-
Block or steam-press pieces lightly if curling
💡 Customization Ideas
-
Add glitter yarn for shimmer effect
-
Use gradient yarn for smooth rainbow transition
-
Stitch on scales with embroidery or surface crochet
This delightful rainbow fish is bursting with joy and color – perfect for storytime snuggles, ocean-themed décor, or a cheerful handmade gift! 🌈🐟🧶