✨ Skill Level
Intermediate–Advanced
Techniques included:
- Detailed embroidery
- Sculptural shaping
- Layered clothing panels
- Color transitions
- Surface detailing
- Symmetrical facial work
📏 Finished Size
Approximately:
- 6–7 inches (15–18 cm) tall
Using DK yarn and a 2.5–3 mm crochet hook.
🧶 Materials
Yarn Colors
- Crimson red
- Black
- Light gray
- White
Supplies
- 2.5–3 mm crochet hook
- 14–16 mm safety eyes
- Polyester stuffing
- Yarn needle
- Stitch markers
- Optional felt backing for eyes
🧵 Required Yarn Amounts
- Crimson red: 45–55 g
- Black: 60–75 g
- Light gray: 10–15 g
- White: 5–8 g
- Polyester stuffing: 80–120 g
🔤 Abbreviations
- MR – Magic Ring
- sc – Single Crochet
- inc – Increase
- dec – Invisible Decrease
- sl st – Slip Stitch
- ch – Chain
- BLO – Back Loop Only
- FO – Fasten Off
Work in continuous rounds unless noted.
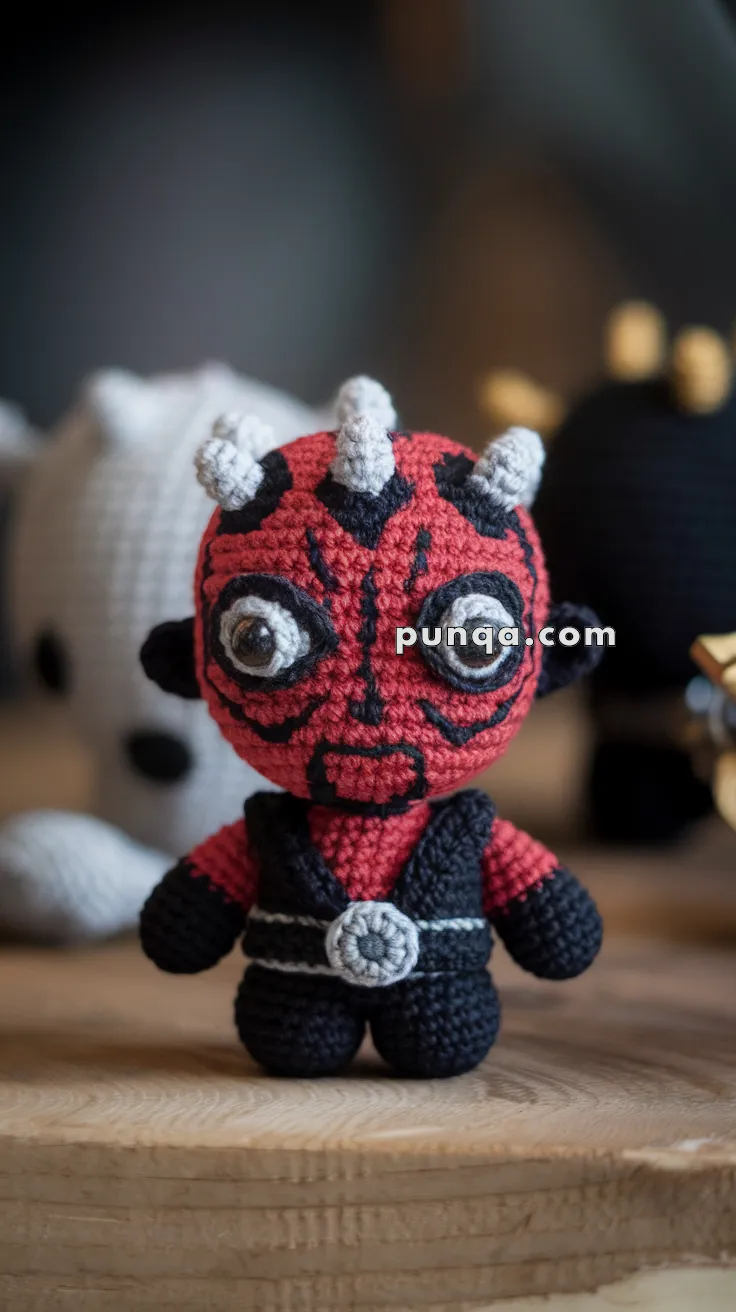
🧠 Head
The head should be vertically elongated instead of perfectly round.
Using crimson red yarn.
Round 1
6 sc in MR (6)
Round 2
inc around (12)
Round 3
(1 sc, inc) ×6 (18)
Round 4
(2 sc, inc) ×6 (24)
Round 5
(3 sc, inc) ×6 (30)
Round 6
(4 sc, inc) ×6 (36)
Round 7
(5 sc, inc) ×6 (42)
Round 8
(6 sc, inc) ×6 (48)
Rounds 9–20
sc around (48)
These extended rounds create the taller face structure.
The head should resemble an oval rather than a sphere.
Round 21
(6 sc, dec) ×6 (42)
Round 22
(5 sc, dec) ×6 (36)
Stuff firmly while shaping vertically with hands.
Push stuffing upward slightly to elongate the face.
Round 23
(4 sc, dec) ×6 (30)
Round 24
(3 sc, dec) ×6 (24)
FO leaving long tail.
The chin area should narrow slightly.
───────────────
👁️ Oversized Eyes (Make 2)
Using light gray yarn.
Round 1
6 sc in MR
Round 2
inc around (12)
Round 3
(1 sc, inc) ×6 (18)
Round 4
(2 sc, inc) ×6 (24)
FO.
Flatten slightly.
Attach large black safety eyes centered inside.
Sew low on face with 7 stitches between eyes.
The eyes should dominate much of the face width.
───────────────
🖤 Facial Tattoo Embroidery
Using black yarn.
The tattoo lines should be bold, thick, and symmetrical.
Forehead
Embroider:
- Central pointed flame shape
- Thick black crown-like markings
- Curved pointed lines extending toward horns
Eye Surrounds
Create large black almond-shaped surrounds around each eye.
Extend pointed shapes:
- Outward toward temples
- Downward toward cheeks
- Upward toward forehead
Nose Area
Embroider:
- Thin vertical center stripe
- Small pointed side markings
Mouth Area
Create:
- Rounded black outline around mouth
- Thick curved lower cheek lines
- Short lower chin marking
The black embroidery should cover much of the face.
───────────────
🦴 Horns (Make 6–8)
Using light gray yarn.
The horns should remain short, thick, and slightly curved.
Round 1
4 sc in MR
Round 2
inc around (8)
Rounds 3–5
sc around (8)
Round 6
(2 sc, dec) ×2 (6)
Stuff lightly.
FO.
Arrange horns evenly around crown.
The center front horn should sit slightly taller.
───────────────
🧥 Body
Using black yarn.
The body should stay compact beneath the oversized head.
Round 1
6 sc in MR
Round 2
inc around (12)
Round 3
(1 sc, inc) ×6 (18)
Round 4
(2 sc, inc) ×6 (24)
Rounds 5–10
sc around (24)
Round 11
(2 sc, dec) ×6 (18)
Stuff firmly.
Round 12
sc around (18)
FO.
───────────────
🖤 Layered Vest & Robe Panels (Make 2)
The robe overlaps slightly in front with thick collar sections.
Using black yarn.
Foundation
Ch 9.
Row 1
sc across (8)
Rows 2–5
ch 1, turn, sc across
Row 6
dec, sc 4, dec (6)
Rows 7–8
sc across
FO.
Sew angled inward onto torso front.
Leave narrow red center chest visible.
The upper edges should form thick folded collar flaps.
───────────────
💪 Arms (Make 2)
Start with crimson red yarn.
Round 1
6 sc in MR
Round 2
(1 sc, inc) ×3 (9)
Rounds 3–4
sc around (9)
The shoulder section remains red.
Switch to Black
Rounds 5–10
sc around (9)
Stuff lightly.
Flatten top slightly.
FO.
The lower section should resemble dark gloves/sleeves.
───────────────
🦿 Legs (Make 2)
Using black yarn.
Round 1
6 sc in MR
Round 2
inc around (12)
Rounds 3–7
sc around (12)
Round 8
(2 sc, dec) ×3 (9)
Rounds 9–10
sc around (9)
Stuff firmly.
FO.
The legs should stay short and rounded.
───────────────
⚪ Belt & Buckle
Belt Strap
Using light gray yarn.
Ch 28.
sc back across chain.
FO.
Wrap around waist.
Buckle
Using light gray yarn.
Round 1
6 sc in MR
Round 2
inc around (12)
Round 3
sc around (12)
FO.
Flatten lightly.
Attach centered on belt.
───────────────
🖤 Side Head Spikes (Optional)
Using black yarn.
Create tiny side spikes:
Ch 4, sl st back down chain.
Attach beside lower head area near ears.
───────────────
🪡 Assembly
🧵 Sew eyes low on face
🧵 Embroider tattoos carefully and symmetrically
🧵 Attach horns evenly around crown
🧵 Sew head securely onto body
🧵 Attach robe panels angled inward
🧵 Sew arms beside collar area
🧵 Attach legs beneath body
🧵 Add belt and buckle around waist
───────────────
✨ Shaping Tips
✨ Keep head taller than wide
✨ Narrow chin slightly while stuffing
✨ Position eyes lower on face
✨ Make tattoo embroidery thick and dramatic
✨ Keep body noticeably smaller than head
✨ Angle robe panels inward like layered armor
🌿 Finishing Touches
✨ Tighten embroidery carefully
✨ Shape forehead slightly upward
✨ Steam robe panels lightly if needed
✨ Adjust horn placement before final stitching
✨ Add tiny white highlights to eyes for extra intensity
Your dark-side inspired crochet villain is now complete! 🔴⚫✨
With its elongated tattooed face, dramatic oversized eyes, sculpted horns, layered robe vest, and compact chibi proportions, this fierce handmade character becomes an eye-catching collectible full of galactic energy and personality.