Creating amigurumi ice cream sandwich patterns is like embarking on a delightful crochet adventure that combines whimsy with a touch of nostalgia. 🍦There’s just something irresistibly charming about crafting these tiny, plushy confections that makes my heart skip a beat. The process is all about transforming ordinary yarn into adorable treats that look good enough to eat. What’s more, they serve as the perfect creative outlet for those who adore both crochet and sweet treats. Whether you’re a seasoned crocheter or a curious newbie, diving into the world of amigurumi ice cream sandwiches promises a fun and rewarding journey filled with creativity and joy.
When I set out to create my very own ice cream sandwich amigurumi, the first step involves choosing the perfect palette of yarn colors to mimic the classic ice cream flavors we all know and love. 🍨 From chocolatey browns to vibrant strawberry pinks, the possibilities are endless. Crafting each component—the smooth, creamy “ice cream” layer and the textured, cookie-like “sandwich” pieces—requires a bit of patience and attention to detail. But with each stitch, the little ice cream sandwich begins to take shape, and the excitement builds! It’s a process that not only hones my crochet skills but also fills me with a sense of accomplishment and pure happiness.
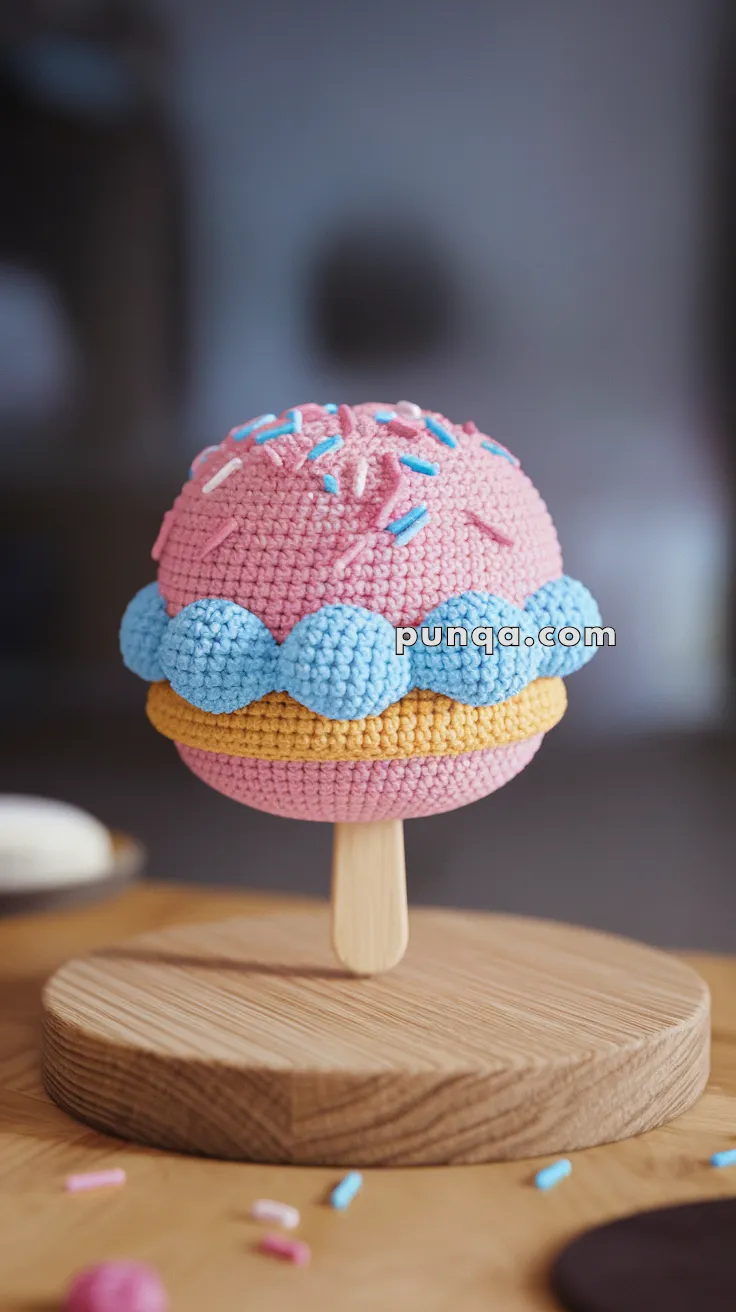
🍦 Amigurumi Ice Cream Sandwich on a Stick Crochet Pattern
A sweet treat without the melt! This whimsical amigurumi ice cream sandwich features a layered look with piped frosting, colorful sprinkles, and a wooden stick for playful display. Perfect for dessert-themed decor or toy collections!
✨ Skill Level
Intermediate – Uses bobble stitch, layering, and surface embroidery.
📏 Finished Size
Approx. 6–7 inches (15–18 cm) tall using DK or worsted weight yarn and a 3.0–3.5 mm hook.
MR – Magic Ring sc – Single Crochet inc – Increase dec – Decrease ch – Chain sl st – Slip Stitch BOB – Bobble Stitch (5 dc in same st, close at top) FO – Fasten Off
🍩 Top and Bottom Cookie Layer (Make 2 – Pink Yarn)
MR, 6 sc
inc x6 (12)
(1 sc, inc) x6 (18)
(2 sc, inc) x6 (24)
(3 sc, inc) x6 (30)
(4 sc, inc) x6 (36) 7–10. sc (36), FO – Do not close top layer yet (for assembly) – Leave long tail on one for sewing
🍯 Middle Wafer Layer (Yellow Yarn)
MR, 6 sc
inc x6 (12)
(1 sc, inc) x6 (18)
(2 sc, inc) x6 (24)
(3 sc, inc) x6 (30)
(4 sc, inc) x6 (36)
sc (36), FO
❄️ Frosting Bobble Trim (Blue Yarn)
Worked in a round or continuous edge.
Join yarn in back loop of R10 of bottom cookie
BOB, sl st in next st repeat around
FO and weave in ends – Repeat for the top cookie’s outer edge if desired
🍭 Sprinkles (Assorted Colors)
Use embroidery thread or yarn:
Make small straight stitches randomly across the top pink layer.
Stitch 10–15 sprinkles in various directions.
🪵 Popsicle Stick (Beige Yarn or Use Real Stick)
If crocheting:
Ch 7
Row 1–20: sc across (6)
FO and roll tightly, sew long edge to form a flat cylinder.
Insert into the center of the bottom cookie when assembling.
🧵 Assembly
Sew the wafer layer to the bottom cookie (R10)
Insert stick into the center and secure with stitches or glue
Stuff the sandwich firmly
Attach the top cookie, sewing around the edge
Embroider or glue sprinkles on the top
Optional: add safety eyes and smile for a kawaii face
💡 Optional Add-ons
Use safety eyes and blush for a cute face
Sew a loop at the top to turn it into a hanging ornament
Add felt or mini beads for candy effects
This plushy popsicle sandwich is sure to delight with its sweet swirls and sprinkles! Perfect for play kitchens, photo props, or simply as a yummy-looking display. 🍧✨