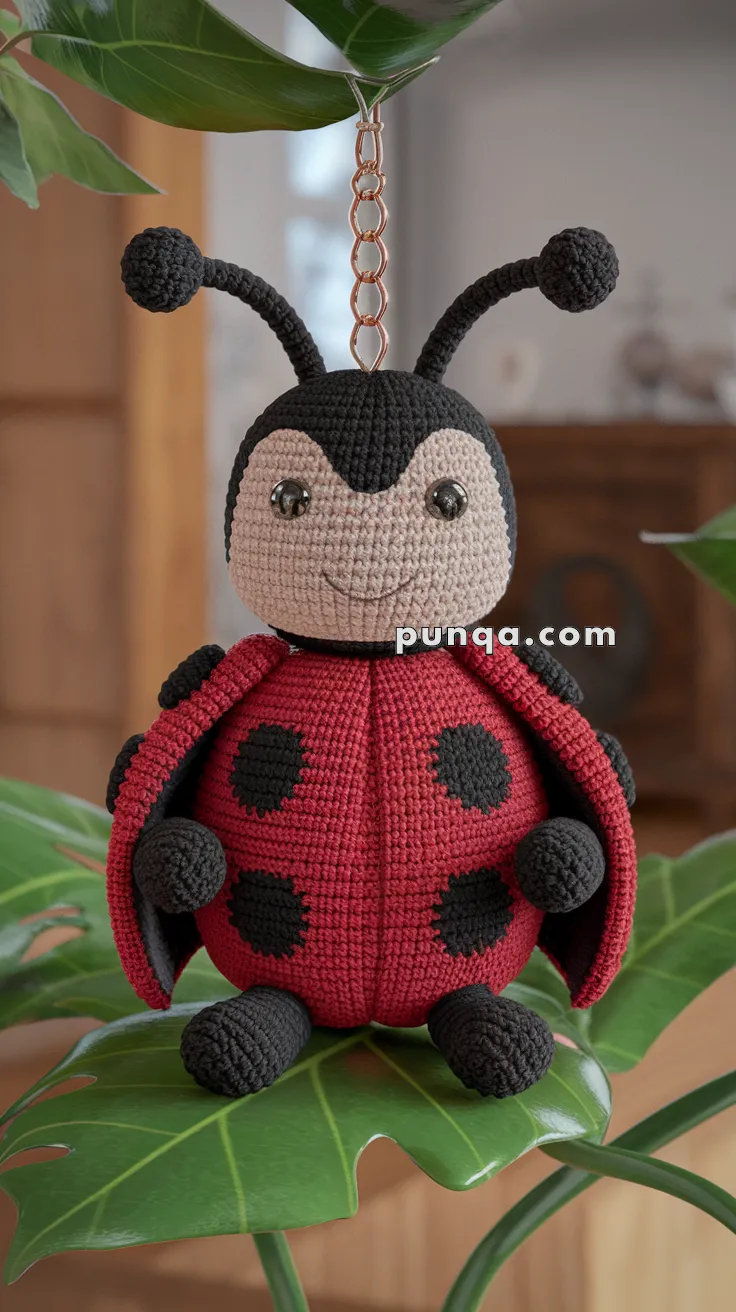
Add a pop of charm to your everyday essentials with the Amigurumi Ladybug Keychain, a tiny crochet project that’s bursting with personality! 🐞🧶 With its classic red shell, black spots, and cheerful little antennae, this mini ladybug is the perfect companion for your keys, bags, or even as a sweet handmade gift. Whether you’re new to amigurumi or just looking for a quick and satisfying make, this pattern is a delightful way to stitch up joy in bite-sized form.
Ideal for crocheters who love portable projects and playful designs, this keychain offers plenty of room for creative flair. Try experimenting with different color combos, add a smiley face, or stitch up a whole swarm for party favors or market goodies. Whether you’re spreading good luck or just celebrating the cuteness of tiny bugs, the Amigurumi Ladybug Keychain is a fun and friendly way to keep your crochet close—one adorable loop at a time! 🧵✨
🐞 Amigurumi Ladybug Crochet Pattern
This cheerful ladybug amigurumi features a plump round body, curved red wings with bold black spots, a soft beige face, and playful antennae with rounded tips. With her gentle smile and cozy shape, she makes a perfect hanging decoration, nursery accent, or handmade gift.
Designed with smooth color transitions and simple shaping, this ladybug is both fun to crochet and delightful to display.
✨ Skill Level
Intermediate
(Includes color changes, wing appliqués, and multiple attachments)
📏 Finished Size
Approx. 18–20 cm (7–8 inches) tall including antennae when using DK yarn and a 2.5–3.0 mm hook.
🧶 Materials
Yarn (DK or sport weight):
-
Red – body and wings
-
Black – head cap, spots, arms, legs, antennae, wing edging
-
Beige / peach – face
Tools:
-
2.5–3.0 mm crochet hook
-
8–10 mm safety eyes
-
Polyester fiberfill
-
Tapestry needle
-
Stitch marker
-
Black embroidery thread (smile)
-
Metal chain or keyring (optional, for hanging)
🧵 Abbreviations (US Terms)
MR – Magic ring
sc – Single crochet
inc – Increase (2 sc in same stitch)
dec – Decrease (sc2tog)
sl st – Slip stitch
ch – Chain
FO – Fasten off
🐞 Head & Body (Worked in One Piece)
Start with beige (face).
R1: MR, 6 sc (6)
R2: inc ×6 (12)
R3: (sc, inc) ×6 (18)
R4: (2 sc, inc) ×6 (24)
R5–6: sc around (24)
Switch to black (head cap)
R7: (3 sc, inc) ×6 (30)
R8: sc around (30)
R9: (4 sc, inc) ×6 (36)
R10–11: sc around (36)
Insert safety eyes between R5–6, about 6–7 sts apart.
Switch to red (body)
R12: (5 sc, inc) ×6 (42)
R13–17: sc around (42)
Begin shaping round belly:
R18: (5 sc, dec) ×6 (36)
R19: (4 sc, dec) ×6 (30)
R20: (3 sc, dec) ×6 (24)
Stuff firmly, shaping into a round ball.
R21: (2 sc, dec) ×6 (18)
R22: (sc, dec) ×6 (12)
R23: dec ×6 (6)
FO and close.
🪽 Wings (Make 2 – Red with Black Edge)
Outer Wing (Red):
R1: MR, 6 sc (6)
R2: inc ×6 (12)
R3: (sc, inc) ×6 (18)
R4: (2 sc, inc) ×6 (24)
R5: (3 sc, inc) ×6 (30)
R6–7: sc around (30)
FO.
Join black yarn and sc evenly around the curved edge only (leave straight edge unworked).
FO leaving long tail for sewing.
Sew wings to the back of the body, meeting at the center line and slightly overlapping at the front.
⚫ Wing Spots (Make 6)
With black yarn:
MR, 6 sc (6)
sl st, FO.
Sew 3 spots on each wing:
-
1 near top
-
1 center
-
1 lower area
Arrange symmetrically like in the photo.
🖤 Arms (Make 2)
R1: MR, 6 sc (6)
R2–4: sc around (6)
Lightly stuff.
FO and sew to sides under wings.
🖤 Legs (Make 2)
R1: MR, 6 sc (6)
R2: (sc, inc) ×3 (9)
R3–5: sc around (9)
Stuff firmly.
FO and sew to lower front of body.
🐜 Antennae (Make 2)
Stem:
R1: MR, 4 sc (4)
R2–7: sc around (4)
Tip (ball):
R8: inc ×4 (8)
R9: sc around (8)
R10: dec ×4 (4)
FO and sew to top of head, slightly angled outward.
😀 Face Embroidery
-
Embroider a small curved smile centered under the eyes
-
Optional tiny cheek stitches under eyes
-
No nose (matches the photo)
🔗 Hanging Chain (Optional)
Attach metal chain or keyring securely through the top center of the head.
Reinforce with several stitches through multiple rounds.
🪡 Assembly Order
-
Sew wings to back
-
Attach black spots
-
Sew arms and legs
-
Attach antennae
-
Embroider smile
-
Add hanging chain (optional)
🌟 Finishing Touches
-
Curve wings gently downward
-
Adjust antennae for playful pose
-
Ensure body stays round and plump
-
Lightly steam if needed (no direct heat)
🐞 Final Thoughts
This sweet ladybug amigurumi is full of warmth and personality with her round red wings, bold black spots, and gentle smile. Whether used as a hanging decoration, shelf companion, or handmade gift, she brings joy and charm to any space.
A tiny friend stitched with love in every loop. 🧶❤️