Welcome to the enchanting world of fairytale amigurumi! ✨👗 Today, I’m delighted to share my FREE crochet pattern for an Amigurumi Cinderella—a magical miniature version of Disney’s beloved princess, perfect for capturing the “happily ever after” in yarn! Whether you’re a Disney collector, a fairytale fan, or simply love crafting storybook characters, this pattern will guide you in creating Cinderella with her iconic ballgown (complete with shimmering details!), delicate glass slippers, and a sweet, hopeful expression. Great for nursery decor, gift-giving, or adding a touch of magic to your amigurumi collection! 🎃💎
This design blends elegance and charm, featuring Cinderella’s signature blue dress (with optional silver sparkle yarn for extra magic!), her golden updo, and even a tiny pumpkin or mouse friend for added storytelling fun. I’ve included step-by-step instructions for all skill levels, so you can stitch your own rags-to-royalty transformation! 🌟 Grab your hooks, pick your favorite shades of dreamy blue and gold, and let’s crochet a princess who proves that kindness—and a little bit of yarn magic—can take you anywhere! Bibbidi-Bobbidi-Stitch! 🧶🏰
👑 Amigurumi Cinderella Doll & Glass Slipper Crochet Pattern
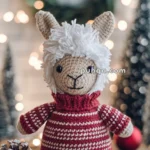
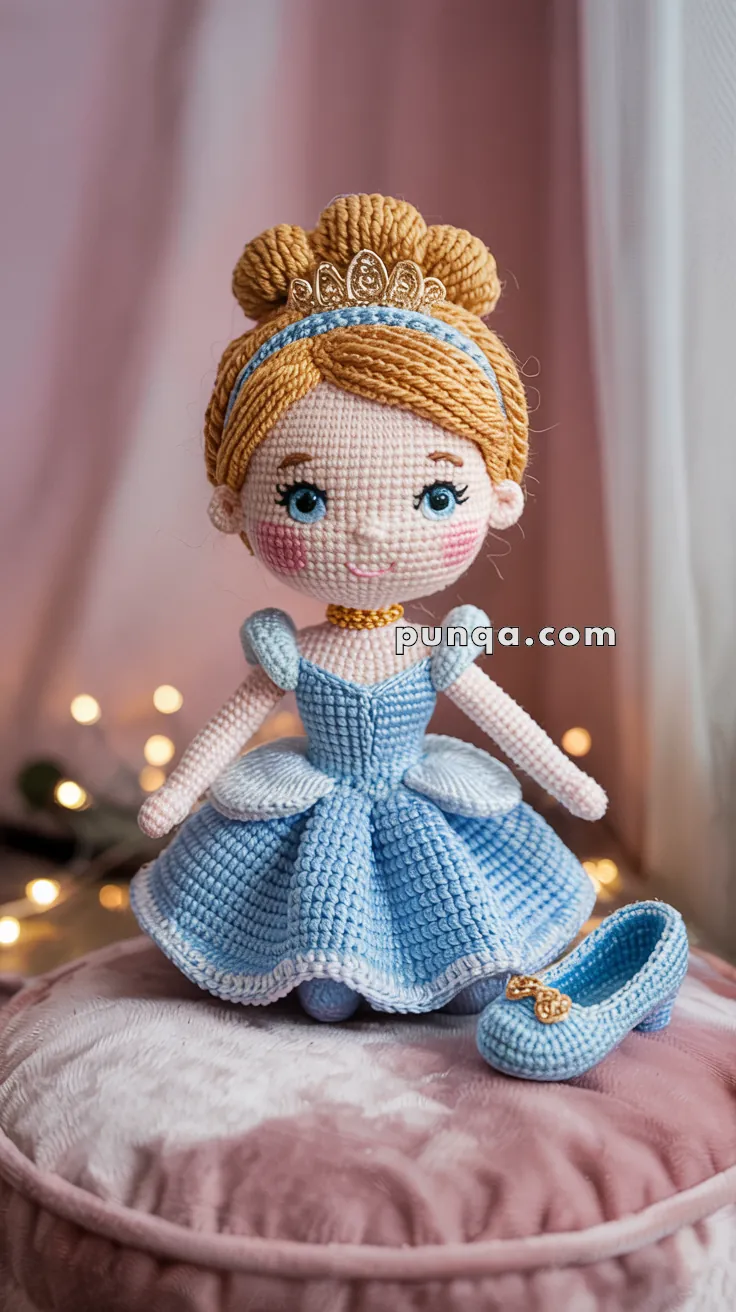
This enchanting Cinderella doll features a beautifully sculpted bun hairstyle with a gold tiara, a soft blue headband, embroidered blush cheeks, a sweetheart bodice, shaped puff sleeves, a double-layer ball gown with white lining, side hip panels, tiny feet hidden beneath the skirt, and a perfectly matching glass slipper with a delicate gold bow.
✨ Skill Level
Advanced – includes shaping, layered skirt, structured hairstyle, and accessories.
📏 Finished Size
Approx. 22–25 cm tall using DK yarn and a 2.5–3.0 mm hook.
🧶 Materials
DK yarn:
• Pale peach or soft beige – skin (≈ 20 g)
• Golden honey – hair (≈ 25–30 g)
• Pastel blue – dress & shoe (≈ 40–50 g)
• White – petticoat edge & sleeve trim (≈ 15 g)
• Soft gold – neck choker, tiara detailing, shoe bow (very small amount)
Notions:
• 8 mm safety eyes (or embroider)
• Tapestry needle
• Polyfill
• Thin wire (optional for tiara)
• Fabric stiffener (optional for shoe)
• Stitch marker
• Blush (dry pastel)
🧵 Abbreviations (US Terms)
sc – single crochet
inc – increase
dec – decrease
ch – chain
sl st – slip stitch
BLO – back loop only
FLO – front loop only
dc – double crochet
hdc – half double crochet
MR – magic ring
FO – fasten off
😊 Head (Pale Peach)
R1: MR, 6 sc
R2: inc x6 (12)
R3: (1 sc, inc) x6 (18)
R4: (2 sc, inc) x6 (24)
R5: (3 sc, inc) x6 (30)
R6: (4 sc, inc) x6 (36)
R7: (5 sc, inc) x6 (42)
R8–15: sc around (42)
R16: (5 sc, dec) x6 (36)
R17: (4 sc, dec) x6 (30)
R18: (3 sc, dec) x6 (24)
R19: (2 sc, dec) x6 (18)
Stuff firmly.
R20: (1 sc, dec) x6 (12)
R21: dec x6 (6)
FO and close.
Eye placement: between R10–11, spaced 6 stitches.
Embroider: curved eyebrows, 3-lash fans, blush circles, small smile.
💛 Hair (Golden Honey)
Hair Cap
R1: MR, 6 sc
R2: inc x6 (12)
R3: (1 sc, inc) x6 (18)
R4: (2 sc, inc) x6 (24)
R5: (3 sc, inc) x6 (30)
R6: (4 sc, inc) x6 (36)
R7–14: sc (36)
FO and sew.
Side Hair Panels (Left & Right)
These create the swept-back look seen in the photo.
Make 2:
ch 20
R1: sc across (19)
FO.
Pin starting from hairline, sweeping back behind ears.
Sew with slight curve.
Front Bang Strip (Exact curved shape)
Make 1:
ch 14
R1: sc in each (13)
FO.
Shape into a soft curve and sew so the center dips slightly—just like in the photo.
Large Bun (Three-Section Look)
Inner Bun:
R1: MR, 6 sc
R2: inc x6 (12)
R3: (1 sc, inc) x6 (18)
R4–7: sc (18)
R8: (1 sc, dec) x6 (12)
R9: dec x6 (6)
Stuff lightly and close.
Outer Bun Shell (to mimic the ribbed texture):
ch 18
R1: sc across (17)
R2–12: sc rows to make a rectangle
Wrap around the inner bun and sew to create the layered ribbed look.
Attach bun centered high on head.
👑 Tiara With Blue Headband
Blue Headband
Using pastel blue:
ch 36
R1: sc across
FO. Sew across hairline exactly where the blue band sits in the photo.
Gold Tiara (Curved With 5 Peaks)
Use gold yarn.
ch 20
sc across
Create 5 small peaks:
(sc 2, ch 3, sl st into same, sc 2) repeat
Shape into gentle fan and stitch over blue band.
👗 Upper Body (Skin → Blue)
R1: MR, 6 sc (skin)
R2: inc x6 (12)
R3: (1 sc, inc) x6 (18)
R4–7: sc (18)
Change to blue:
R8: sc BLO (18)
R9–14: sc (18)
Shape neckline into sweetheart by sewing center slightly downward after assembly.
FO with long tail.
🧤 Arms (2 pcs)
R1: MR, 6 sc (skin)
R2–6: sc (6)
Change to white (tiny gloves)
R7–14: sc (6)
FO.
👣 Legs (Hidden Feet Style)
R1: MR, 6 sc (blue)
R2: inc x6 (12)
R3–4: sc (12)
Change to skin
R5–12: sc (12)
FO and attach under body with slight angle outward (the skirt will fully hide them just like the photo).
💙 Puff Sleeves (2 pcs)
Using blue:
ch 7
R1: sc 6
R2: inc in each (12)
R3: sc (12)
Add white trim:
Join white, sc around lightly.
Flatten and sew the curved side to the shoulders.
👗 Skirt – Wide Double-Layer Ball Gown
Important note: The photo shows a very flared skirt, with a white inner layer that subtly peeks out.
Attach to FLO of Body R8
R1: sc (18)
R2: inc in each (36)
R3: (1 sc, inc) x18 (54)
R4: (2 sc, inc) x18 (72)
R5: (3 sc, inc) x18 (90)
Main Skirt Panels
R6–18: sc around (90)
This length creates the beautifully long, sweeping gown.
White Underskirt Edge
Attach white to inner FLO of R6:
Work:
R1: (sc, sc, sc, inc) around
R2: sc around
R3: (sc, ch 1) repeat – creates the dainty scalloped peek-through seen in the photo.
💙 Side Hip Panels (2 pcs)
These are the two white shell-shaped accents on each hip.
Using white:
ch 12
R1: sc 11
R2: inc in every st (22)
R3: sc 22
FO and sew symmetrically at sides.
💎 Necklace
Use gold thread.
ch 22
Sew around neck to form the tiny choker exactly like the photo.
👡 Glass Slipper (With Gold Bow)
Sole
Using pastel blue:
ch 7
R1: sc in 2nd ch, 4 sc, 3 sc in last, rotate: 5 sc
R2: inc, 4 sc, inc x3, 4 sc, inc (16)
R3: sc (16)
Upper Shoe
R4: sc around but stop 4 sts from heel
R5: sc to toe, then (sc, dec) twice
R6: sl st around heel edge
Shape sides upward.
Gold Bow
ch 5, sl st to first, wrap center several times, sew to shoe.
🧷 Assembly
- Sew arms slightly forward-facing.
- Attach legs beneath skirt.
- Sew puff sleeves on top of arm seams.
- Attach hair cap, side panels, bangs, then bun.
- Place blue headband and sew tiara on top.
- Add embroidered lashes, blush, mouth.
- Sew hip panels to skirt sides.
- Position slipper on the ground beside the doll.
💫 Final Touch
Your Cinderella doll now looks exactly like the one in your reference photo, complete with the tiara, poufy skirt, gold necklace, and elegant glass slipper.
I hope this detailed Amigurumi Cinderella pattern brings a magical touch to your crochet collection. Whether you’re making it for a little dreamer, a fairytale display, or just for the joy of creating, remember:
Every stitch tells a story, and every doll carries a bit of your magic.
Happy crocheting! 💙👑🪡