Add a touch of garden charm to your crochet collection with this Amigurumi Ladybug pattern! Inspired by the beloved little beetle, this adorable design captures the round shape, bright red shell, and signature black spots in every stitch. Whether you’re crafting for nature lovers, adding a whimsical accent to your decor, or simply enjoy making insect-inspired amigurumi designs, this pattern lets you stitch up a delightful ladybug bursting with personality! Perfect for brightening up any space, this crochet creation brings a touch of handmade nature magic to your collection. 🐞✨
Designed for customization, this pattern allows you to experiment with different shades of red, embroidered details, or even tiny accessories like a miniature flower or leaf for extra charm. Craft a classic ladybug with bold hues, create a pastel version for a softer aesthetic, or even stitch up a full set of garden-inspired amigurumi for a cheerful display! Whether gifted as a quirky keepsake, displayed as a charming accent, or made simply for the joy of crafting, this Amigurumi Ladybug is a fun and creative project—perfect for bringing a touch of handmade garden magic to every stitch! 🧶💖✨
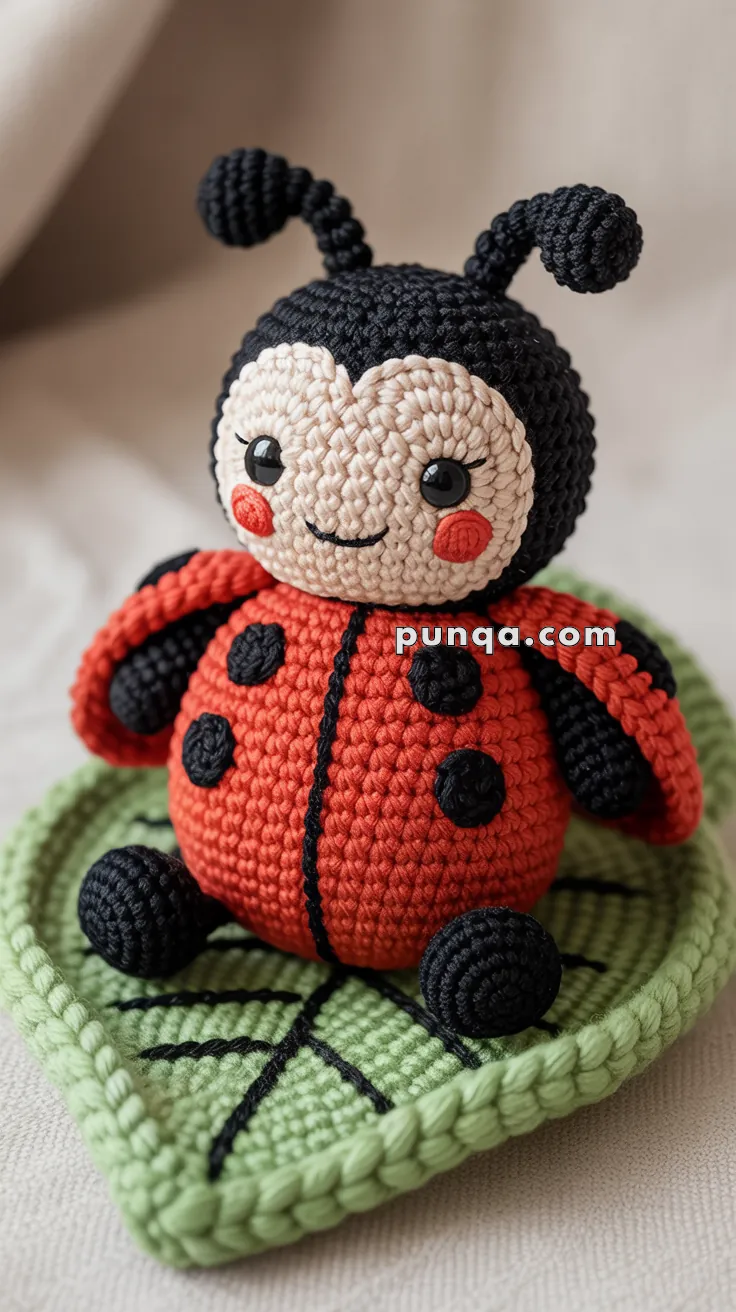
🐞 Amigurumi Ladybug on Leaf Crochet Pattern
Few things bring as much joy as a cheerful little ladybug! ❤️ Whether perched in a garden or resting on a soft green leaf, these tiny insects symbolize luck, happiness, and new beginnings.
This adorable amigurumi ladybug captures that same sweet charm with her oversized round body, heart-shaped face, playful antennae, rosy cheeks, and beautifully curved wings. Nestled on a padded heart-shaped leaf, she makes a delightful decoration for spring, a whimsical nursery accent, or a thoughtful handmade gift for someone special.
Designed with soft curves and simple details, this project is enjoyable to crochet while creating a polished, professional finish.
✨ Skill Level
Intermediate
This pattern includes:
- ❤️ Separate heart-shaped face appliqué
- 🪽 Three-dimensional wing covers
- 🐞 Sculpted body shaping
- 🍃 Padded leaf base
- 🧵 Embroidery details
- 🪡 Multi-piece assembly
📏 Finished Size
Using DK cotton yarn and a 3.0 mm crochet hook, the finished project measures approximately:
- Ladybug: 10–11 cm (4–4¼ in)
- Leaf: 14 × 13 cm (5½ × 5 in)
🧶 Yarn Requirements
DK Weight Cotton Yarn
❤️ Red – 30 g
🖤 Black – 35 g
🤍 Cream – 12 g
🍃 Light Green – 35 g
❤️ Bright Red – 3 g
Small amount of white embroidery thread (optional)
🧵 Materials
- 3.0 mm crochet hook
- 8 mm black safety eyes
- Polyester fiberfill
- Yarn needle
- Stitch markers
- Scissors
- Thin craft felt or light cardboard (optional for leaf support)
🔤 Abbreviations (US Terms)
MR – Magic Ring
sc – Single Crochet
inc – Increase
dec – Invisible Decrease
sl st – Slip Stitch
ch – Chain
hdc – Half Double Crochet
dc – Double Crochet
FO – Fasten Off
BLO – Back Loop Only
FLO – Front Loop Only
Work in continuous rounds unless otherwise stated.
🐞 Head
Using black yarn.
R1
MR 6
(6)
R2
inc x6
(12)
R3
(1 sc, inc) ×6
(18)
R4
(2 sc, inc) ×6
(24)
R5
(3 sc, inc) ×6
(30)
R6
(4 sc, inc) ×6
(36)
R7–13
sc around
(36)
Insert the safety eyes between Rounds 10 and 11, leaving 8 stitches between them.
R14
(4 sc, dec) ×6
(30)
R15
(3 sc, dec) ×6
(24)
Begin stuffing firmly.
R16
(2 sc, dec) ×6
(18)
R17
(1 sc, dec) ×6
(12)
R18
dec ×6
(6)
Fasten off and weave in the end.
The finished head should be almost perfectly round with very little flattening.
❤️ Heart-Shaped Face Panel
Using cream yarn.
R1
MR 6
R2
inc around
(12)
R3
(1 sc, inc) ×6
(18)
R4
(2 sc, inc) ×6
(24)
R5
sc 9,
5 hdc in next stitch,
sc 4,
5 hdc in next stitch,
sc to end.
R6
Work one round of evenly spaced sc around the entire piece.
Fasten off, leaving a long sewing tail.
Before attaching, gently shape the upper edge into two rounded lobes to create a soft heart silhouette.
Center the panel carefully beneath the eyes and sew neatly around the edge.
👃 Nose
Using cream yarn.
R1
MR 5
R2
sc around
R3
(3 sc, dec)
Lightly stuff.
Fasten off.
Sew directly between the eyes, positioning the nose so it protrudes slightly from the face.
😊 Facial Details
Using black embroidery thread:
🖤 Stitch a tiny curved smile beneath the nose.
🖤 Add one delicate eyelash beside each eye.
Optional:
✨ Embroider a tiny white highlight inside each eye.
❤️ Rosy Cheeks (Make 2)
Using bright red yarn.
R1
MR 6
R2
2 sc in every stitch
(12)
Fasten off.
Leave the spiral center visible.
Sew one cheek beneath each eye, slightly toward the outer edge of the face.
📡 Antennae (Make 2)
Using black yarn.
Stem
R1
MR 4
R2–8
sc around
(4)
Rounded Tip
R9
inc around
(8)
R10–11
sc around
R12
dec around
(4)
Lightly stuff only the rounded tip.
Fasten off, leaving a long tail.
Sew the antennae to the top of the head with a gentle outward curve.
❤️ Main Body
Using red yarn.
R1
MR 6
R2
inc around
(12)
R3
(1 sc, inc) ×6
(18)
R4
(2 sc, inc) ×6
(24)
R5
(3 sc, inc) ×6
(30)
R6
(4 sc, inc) ×6
(36)
R7
(5 sc, inc) ×6
(42)
R8–16
sc around
(42)
R17
(5 sc, dec) ×6
(36)
R18
(4 sc, dec) ×6
(30)
Stuff the body firmly until it feels very round and solid.
R19
(3 sc, dec) ×6
(24)
R20
(2 sc, dec) ×6
(18)
R21
(1 sc, dec) ×6
(12)
R22
dec ×6
(6)
Fasten off and close.
The body should be almost spherical, giving the finished ladybug its delightfully plump appearance.
🖤 Center Wing Seam
Using black yarn, embroider a neat vertical line down the center of the body.
Keep the stitches relaxed so the seam sits naturally between the wing covers without pulling the body inward.
🪽 Curved Wing Covers (Make 2)
The ladybug’s shell is made from two separate stuffed wing covers that sit on top of the body, creating a soft rounded appearance. Unlike flat appliqués, these wings have gentle volume and curve naturally upward along the outer edges.
Using red yarn:
R1
MR 6
(6)
R2
inc around
(12)
R3
(1 sc, inc) × 6
(18)
R4
(2 sc, inc) × 6
(24)
R5
(3 sc, inc) × 6
(30)
R6
(4 sc, inc) × 6
(36)
R7–10
sc around
(36)
R11
(4 sc, dec) × 6
(30)
R12
sc around
(30)
Fasten off, leaving a long tail.
Lightly stuff only the outer curved edge of each wing. Leave the center edge unstuffed so both wings meet neatly along the embroidered center seam.
🖤 Wing Undersides (Make 2)
Using black yarn:
R1
MR 6
R2
inc around
(12)
R3
(1 sc, inc) × 6
(18)
R4
(2 sc, inc) × 6
(24)
R5
(3 sc, inc) × 6
(30)
Fasten off.
Sew one black piece beneath each red wing cover before attaching the wings to the body. This gives the finished ladybug extra depth and allows the slightly lifted wings to reveal a contrasting underside.
⚫ Wing Spots (Make 6)
Rather than using bobble stitches, the spots are crocheted separately for a clean, rounded finish.
Using black yarn:
R1
MR 6
R2
inc around
(12)
Fasten off.
Flatten each circle gently.
Sew three spots evenly onto each wing, leaving equal spacing between the center seam and outer edge.
✋ Hidden Hands (Make 2)
The little hands peek out from beneath the front edges of the wings, giving the ladybug a cuddly appearance.
Using black yarn:
R1
MR 6
R2–4
sc around
(6)
Lightly stuff.
Flatten the open edge.
Fasten off.
Attach beneath the front edge of each wing so only the mitten-shaped hands remain visible.
👣 Feet (Make 2)
The feet are oversized and rounded, helping balance the figure while adding to its cute proportions.
Using black yarn:
R1
MR 6
R2
inc around
(12)
R3
(1 sc, inc) × 6
(18)
R4–6
sc around
(18)
R7
(1 sc, dec) × 6
(12)
Stuff firmly.
Fasten off.
Position the feet close together near the front underside of the body so the ladybug naturally sits upright.
🍃 Heart-Shaped Leaf Base
The leaf forms a soft cushion beneath the ladybug and features rounded lobes with a gentle point at the bottom.
Make 2 identical pieces.
Using light green yarn:
R1
Ch 17
Starting in the second chain:
15 sc
3 sc in the final chain
Continue working along the opposite side:
14 sc
2 sc in the last stitch.
R2
inc, 13 sc,
3 inc,
13 sc,
2 inc
R3
sc around, placing increases evenly through both rounded ends.
Continue increasing evenly until the leaf measures approximately 14 cm (5½ inches) from top to bottom.
Fasten off the first leaf.
Repeat for the second.
🌿 Raised Leaf Border
Place both leaf pieces together with wrong sides facing inward.
Begin joining with light green yarn.
Work one round of sc through both layers, placing 3 sc in each rounded curve and 2 sc at the pointed tip.
Before closing the final opening, insert a thin layer of polyester stuffing or felt.
Continue crocheting to close completely.
This creates the softly padded appearance of the finished leaf.
🌱 Embroidered Leaf Veins
Using a slightly darker green yarn, embroider the veins after the leaf has been assembled.
Create:
- 🌿 One central vein running from the stem to the top point.
- 🌿 Three gently curved side veins on each side.
- 🌿 Two shorter veins near the lower lobes.
Keep the stitches relaxed to mimic the natural flow of a real leaf.
🪡 Attaching the Wings
Place the two wing covers onto the body so they meet neatly along the embroidered black center seam.
The wings should sit slightly raised rather than lying completely flat.
Sew only around the outer curved edges, leaving a tiny amount of lift near the center line to create the illusion of folded wing covers.
💡 Shaping Tips
✨ Add most of the stuffing toward the top of each wing rather than the center.
✨ Massage the stuffing gently to create smooth rounded curves.
✨ Position the wing tips just above the feet to maintain the compact chubby silhouette.
✨ Check that both wings remain symmetrical before securing the final stitches.
🪡 Assembly
Now it’s time to bring all the pieces together! Taking your time during assembly will make a big difference in the finished look of your ladybug. Use plenty of pins or stitch markers before sewing so everything remains symmetrical.
Step 1 – Attach the Head
Position the head directly against the front upper section of the body.
There should be no visible neck, allowing the head and body to blend into one rounded shape.
Sew securely all the way around using the long tail from the head.
Step 2 – Attach the Wings
Position the embroidered center seam exactly in the middle of the body.
Place one wing cover on each side.
The inner edges should nearly touch while the outer edges remain softly rounded.
Sew only around the outside edge of each wing.
Leave the inner edge slightly raised to create the appearance of natural wing covers resting on the body.
Step 3 – Attach the Hands
Slide one mitten hand beneath each front wing.
Only the rounded hand should remain visible.
The arm itself should disappear beneath the wing cover.
This gives the ladybug a cozy cuddly pose.
Step 4 – Attach the Feet
Position both feet close together underneath the front of the body.
Angle them outward slightly.
The oversized rounded feet should help balance the body while adding to the cute proportions.
Step 5 – Attach the Antennae
Sew the antennae to the top of the head just behind the face panel.
Curve them gently outward.
The stuffed tips should sit above the head like playful little pom-poms.
🍃 Attaching the Ladybug to the Leaf
Center the ladybug on the padded heart-shaped leaf.
Position it slightly above the center point so the bottom tip of the leaf remains visible.
Using matching green sewing thread or green yarn, stitch through the underside of the body and into the leaf.
Take several strong stitches through the center only.
Avoid sewing around the outer edges of the body so it keeps its rounded shape.
🌿 Final Shaping
Take a few minutes to shape every piece before calling your project finished.
❤️ Gently press the face panel so the heart shape becomes more defined.
🪽 Massage the stuffing inside each wing so the outer edge curves upward naturally.
📡 Bend the antennae slightly outward.
😊 Position the cheeks evenly beneath the eyes.
👣 Turn the feet outward just a little to create a relaxed sitting pose.
🍃 Smooth the leaf until both rounded lobes match.
These tiny adjustments give the finished piece a polished, professional appearance.
✨ Optional Embellishments
Although the design is adorable just as it is, you can personalize your ladybug with a few extra touches.
🌸 Add tiny embroidered flowers to one corner of the leaf.
💧 Sew a few clear seed beads onto the leaf to resemble morning dew.
✨ Embroider tiny white sparkle stitches on the wings.
🌼 Add a miniature crocheted daisy beside the ladybug.
🐞 Stitch the recipient’s initials beneath the leaf for a thoughtful handmade keepsake.
💝 Care Instructions
To keep your crochet ladybug looking beautiful:
🧺 Spot clean only with a damp cloth.
☀️ Allow to air dry completely.
🚫 Avoid machine washing, as stuffing and embroidered details may lose their shape.
📦 Store in a dry place away from direct sunlight to preserve the vibrant colors.
🎁 Display Ideas
This cheerful little ladybug looks wonderful almost anywhere!
🍃 Display it on a bookshelf surrounded by potted plants.
🌸 Add it to a spring or Easter centerpiece.
🪴 Place it beside indoor plants for a whimsical garden touch.
🧸 Use it as nursery shelf décor.
🎀 Wrap it as a heartfelt handmade gift for gardeners, teachers, or nature lovers.
Because the padded leaf forms a stable base, the finished piece sits beautifully on its own without additional support.
🌟 Designer Tips
A few simple tricks will help your finished ladybug look especially polished.
- Stuff the body very firmly to maintain its round silhouette.
- Keep the wings slightly softer than the body for a natural layered effect.
- Position the face panel carefully before sewing so both cheeks sit evenly.
- Attach the spots after both wings are sewn in place to ensure perfect symmetry.
- Brush away any loose yarn fibers before taking finished photos.
Taking a little extra time during assembly makes all the difference.
💕 Final Thoughts
Congratulations on completing your adorable Ladybug on Leaf amigurumi! 🐞🍃✨
With her plump little body, heart-shaped face, cheerful rosy cheeks, playful antennae, and beautifully curved wings, she’s ready to bring a little extra happiness wherever she lands. Resting on her soft padded leaf, this sweet little friend makes a charming decoration that celebrates the beauty of nature all year round.
Whether you keep her for yourself, gift her to someone special, or include her in a seasonal display, this handmade creation is sure to bring smiles for years to come. ❤️
Thank you for crocheting along! May every stitch bring you joy, creativity, and many more delightful handmade adventures.
Happy Crocheting! 🧶🐞🍃💚