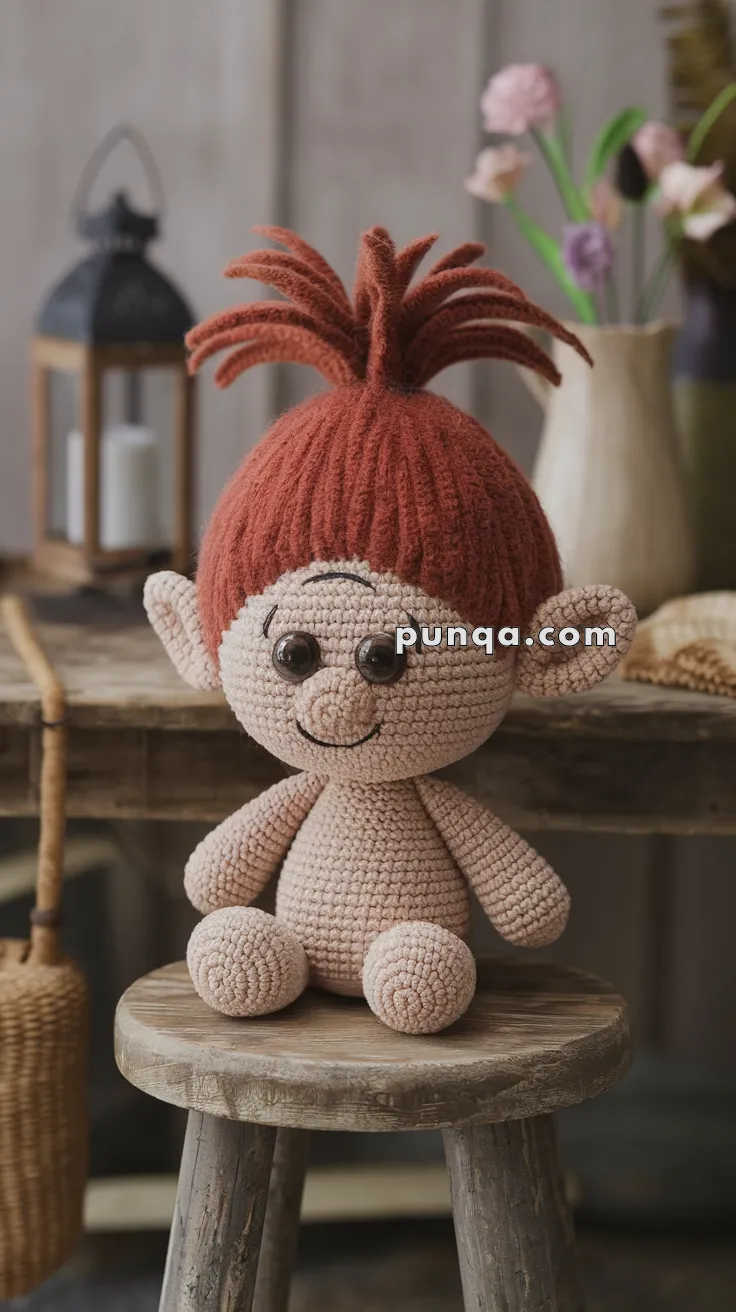
Step into a world of whimsy with the Amigurumi Troll, a quirky crochet companion full of personality and charm! 🧶✨ With its wild hair, stubby limbs, and mischievous grin, this little troll is perfect for fantasy lovers, playful décor, or anyone who enjoys crafting magical creatures. Whether you’re stitching up a forest-dwelling friend or adding a touch of folklore to your amigurumi collection, this pattern is sure to spark smiles and storytelling.
Ideal for crocheters who love imaginative designs and expressive details, this pattern invites you to play with bold colors, textured yarns, and fun accessories like tiny satchels or leafy crowns. Make one troll or a whole tribe—each with its own unique flair! The Amigurumi Troll is a delightful way to stitch up enchantment, one mischievous loop at a time! 🌿🧵
🧶 Amigurumi Troll Doll Crochet Pattern
This whimsical troll doll, with its oversized ears, button nose, and iconic spiky hair, is a delightful mix of nostalgia and handmade charm. The pattern is beginner-friendly, with simple shaping and fun hair styling that really brings the troll’s personality to life.
✨ Skill Level
Beginner to Intermediate
Basic shaping, simple embroidery, and looped hair technique.
📏 Finished Size
Approx. 20–22 cm (8–9 in) tall when seated
(using worsted yarn and a 3.0 mm hook)
🧶 Materials
Yarn (Worsted weight)
- Skin tone (beige / peach) – body, head, limbs, ears, nose
- Reddish brown – hair
Tools & Notions
- 3.0 mm crochet hook
- 10–12 mm safety eyes
- Polyester fiberfill
- Yarn needle
- Stitch marker
- Scissors
- Black embroidery floss (mouth & eyebrows)
🧵 Abbreviations (US Terms)
MR = Magic Ring
sc = single crochet
inc = increase (2 sc in one stitch)
dec = decrease (sc 2 together)
sl st = slip stitch
ch = chain
FO = fasten off
st(s) = stitches
😊 Head (Skin Tone)
R1: MR 6 (6)
R2: inc x6 (12)
R3: (sc, inc) x6 (18)
R4: (2 sc, inc) x6 (24)
R5: (3 sc, inc) x6 (30)
R6: (4 sc, inc) x6 (36)
R7–15: sc around (36)
Insert safety eyes between R9–10, about 7 sts apart.
R16: (4 sc, dec) x6 (30)
R17: (3 sc, dec) x6 (24)
R18: (2 sc, dec) x6 (18)
Stuff firmly
R19: (sc, dec) x6 (12)
R20: dec x6 (6)
FO and close.
👃 Nose (Bulbous – Skin Tone)
R1: MR 6 (6)
R2: inc x6 (12)
R3–4: sc around (12)
FO, leave long tail.
Sew centered between the eyes.
👂 Ears (Make 2 – Large & Flat)
R1: MR 6 (6)
R2: (sc, inc) x3 (9)
R3: (2 sc, inc) x3 (12)
R4–5: sc around (12)
Flatten slightly, FO.
Sew to sides of head slightly below eye level so they stick outward.
🧍 Body (Short & Round – Skin Tone)
R1: MR 6 (6)
R2: inc x6 (12)
R3: (sc, inc) x6 (18)
R4: (2 sc, inc) x6 (24)
R5: (3 sc, inc) x6 (30)
R6–9: sc around (30)
R10: (3 sc, dec) x6 (24)
R11: (2 sc, dec) x6 (18)
R12–13: sc around (18)
Stuff firmly
FO and close.
Sew head to body.
💪 Arms (Make 2 – Short & Chubby)
R1: MR 6 (6)
R2: inc x6 (12)
R3–6: sc around (12)
R7: (2 sc, dec) x3 (9)
R8–9: sc around (9)
Stuff lightly
FO
Sew to sides of body just below head.
🦵 Legs / Feet (Make 2 – Round Seated Shape)
R1: MR 6 (6)
R2: inc x6 (12)
R3: (sc, inc) x6 (18)
R4–5: sc around (18)
R6: (2 sc, dec) x4, sc 2 (14)
R7: (2 sc, dec) x3, sc 2 (11)
R8–9: sc around (11)
Stuff firmly
FO
Flatten slightly and sew to bottom front of body for seated pose.
🧢 Hair Cap (Reddish Brown)
R1: MR 6 (6)
R2: inc x6 (12)
R3: (sc, inc) x6 (18)
R4: (2 sc, inc) x6 (24)
R5: (3 sc, inc) x6 (30)
R6–10: sc around (30)
FO
Sew to top of head.
🌰 Hair Tufts (Spiky Crown Style)
Cut 20–25 strands of reddish-brown yarn, each about 12–15 cm long.
Attach using latch-hook method through stitches of the hair cap (mostly at the crown).
Group into thick tufts and tie upward.
Trim ends to create upright spiky hair clustered at the top (not all over the head).
The sides remain smooth, just like in the photo.
😄 Face Embroidery
With black embroidery floss:
- Stitch a gentle curved smile under the nose
- Add two small curved eyebrows above the eyes
Keep expression soft and friendly.
🪡 Final Assembly & Shaping
- Sew head to body
- Attach ears, arms, and legs
- Add nose
- Sew hair cap
- Insert hair tufts and trim
- Embroider face
Shape gently with your hands so the troll sits naturally.
✨ Optional Details
- Lightly brush hair tips for softer texture
- Add blush to cheeks with pastel chalk
- Add tiny flower or bow if desired
🎉 Final Result
Your finished troll will match the photo with:
🧌 Big sideways ears
😊 Round nose and sweet smile
🌰 Spiky reddish-brown crown hair
🪑 Seated chubby body
💗 Soft nostalgic look
Perfect for:
- Nursery décor
- Handmade gifts
- Classic troll collections
- Cozy shelf display
🧶 Your photo-accurate Amigurumi Troll Doll is complete — full of charm, warmth, and personality!
Happy crocheting! ✨