Add a touch of mischievous charm to your crochet collection with this Amigurumi Devil pattern! 🔥😈 With its tiny horns, playful grin, and fiery red body, this design brings a fun and spooky twist to amigurumi creations. Whether you’re crafting for Halloween décor, a themed gift, or simply love character-inspired crochet, this FREE pattern is a fantastic addition to your lineup.
Designed for beginners and intermediate crocheters, this pattern allows for customization in facial details, horn shapes, and even tiny accessories like a pitchfork or cape to enhance its personality. Choose classic reds and blacks for a traditional devilish look or experiment with bold hues for a unique twist! Whether displayed as part of a spooky setup or gifted to a fellow crochet enthusiast, this amigurumi devil is sure to bring smiles. Grab your hook, select your favorite yarn, and let’s bring this fiery little character to life—one stitch at a time! 🧶✨
😈 Little Devil Amigurumi Crochet Pattern
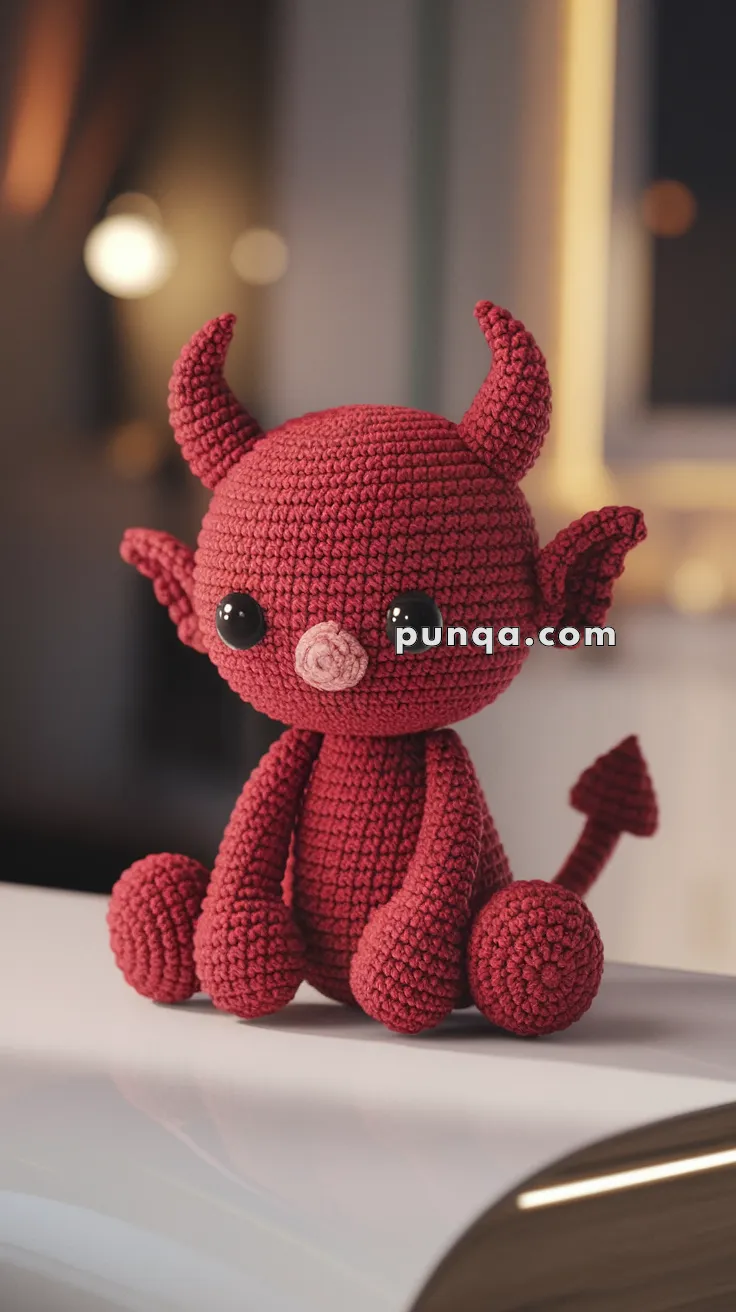
This mischievous little devil is the perfect balance of spooky and cute! With oversized glossy eyes, a tiny round snout, tall curved horns, pointy bat-like ears, long limbs with big feet, and a sharp spade tail, this pattern makes a fun companion for Halloween or for anyone who loves playful fantasy creatures.
⭐ Skill Level
🧶 Intermediate – requires working in the round, shaping, multiple parts, and assembly.
📏 Finished Size
Approx. 18–20 cm (7–8 in) tall when seated.
🧶 Materials
-
Dark red worsted-weight yarn (body, head, limbs, horns, ears, tail)
-
Light pink yarn (snout)
-
14–16 mm glossy black safety eyes
-
Crochet hook: 3.0–3.5 mm (C–E)
-
Fiberfill stuffing
-
Yarn needle & scissors
-
Stitch markers
📝 Abbreviations (US Terms)
MR = Magic Ring
sc = single crochet
inc = increase (2 sc in same st)
dec = decrease (sc2tog)
sl st = slip stitch
ch = chain
FO = fasten off
🪡 Pattern Instructions
🔴 Head (red)
-
MR, 6 sc (6).
-
R2: inc × 6 (12).
-
R3: (sc, inc) × 6 (18).
-
R4: (2 sc, inc) × 6 (24).
-
R5: (3 sc, inc) × 6 (30).
-
R6: (4 sc, inc) × 6 (36).
-
R7–15: sc around (36).
👉 Place 14–16 mm safety eyes between R11–12, spaced ~14–15 sts apart. -
R16: (4 sc, dec) × 6 (30).
-
R17: (3 sc, dec) × 6 (24).
-
R18: (2 sc, dec) × 6 (18).
👉 Stuff firmly. -
R19: (sc, dec) × 6 (12).
-
R20: dec × 6 (6). FO, weave shut.
🩷 Snout (pink)
-
MR, 6 sc (6).
-
R2: inc × 6 (12).
-
R3: sc around (12). FO, leaving tail.
👉 Lightly stuff and sew between the eyes, slightly protruding.
🔥 Horns (make 2, red, tall & curved)
-
MR, 4 sc (4).
-
R2: sc around (4).
-
R3: (sc, inc) × 2 (6).
-
R4–6: sc around (6).
-
R7: (2 sc, inc) × 2 (8).
-
R8–12: sc around (8).
👉 To create a curve, add 1–2 extra increases on one side only in R10–12.
FO, stuff lightly, sew to head top far apart.
🧝 Ears (make 2, red, pointy bat-shape)
-
Ch 8.
-
Row 1: sc in 2nd ch, hdc in next, dc in next 3, hdc, sc (7).
-
Row 2: ch 1, sc across. FO.
👉 Pinch base to shape. Sew to sides of head, angled outward.
🔴 Body (red, smaller than head)
-
MR, 6 sc (6).
-
R2: inc × 6 (12).
-
R3: (sc, inc) × 6 (18).
-
R4: (2 sc, inc) × 6 (24).
-
R5–9: sc around (24).
-
R10: (2 sc, dec) × 6 (18).
-
R11–13: sc around (18).
-
R14: (sc, dec) × 6 (12).
👉 Stuff firmly. FO, leave tail for sewing.
🦵 Arms (make 2, red, skinny with round hands)
Hand:
-
MR, 6 sc (6).
-
R2: (sc, inc) × 3 (9).
-
R3: sc around (9).
👉 Lightly stuff.
Arm:
4. R4–10: sc around (6).
👉 Do not stuff arm, keep floppy. FO, leaving tail.
🦵 Legs (make 2, red, long with big feet)
Foot:
-
MR, 6 sc (6).
-
R2: inc × 6 (12).
-
R3: (sc, inc) × 6 (18).
-
R4–5: sc around (18).
-
R6: (sc, dec) × 6 (12).
👉 Stuff foot firmly.
Leg:
6. R7–13: sc around (8).
👉 Lightly stuff top part. FO, leaving tail.
🏹 Tail (red with sharp spade tip)
Tail Cord:
-
Ch 22, sc back across (22). FO.
Spade Tip (triangle):
-
Ch 6.
-
Row 1: sc in 2nd ch, hdc, dc in next 2, tr in last (5).
-
Row 2: ch 1, sc across. FO.
👉 Sew triangle to tail end, shaping into a sharp spade.
🧵 Assembly Order
-
Attach head to body.
-
Sew arms to shoulders.
-
Attach legs to body base, seated position.
-
Sew ears to head sides.
-
Attach horns far apart on head top.
-
Sew snout between eyes.
-
Attach tail to body back.
🎀 Finishing Touches
-
Add tiny embroidered nostrils to snout if desired.
-
Bend horns slightly for a natural curve.
-
For extra spooky flair, embroider small fangs under the snout.
😈 Final Result
Your Little Devil Amigurumi is complete! With oversized glossy eyes, a round pink snout, tall curved horns, pointy ears, big feet, and a sharp spade tail, this mischievous cutie looks exactly like the one in the photo and is perfect for Halloween or fantasy lovers.


Thank you so much 💕