Welcome to the edgy and enchanting world of amigurumi! 🎸🦇 Today, I’m excited to share my free crochet pattern for an Amigurumi Marceline The Vampire Queen—a bold and stylish creation perfect for Adventure Time fans, fantasy lovers, or anyone who enjoys crafting expressive and character-driven plush designs! 🧶 Whether you love stitching up iconic figures, creating textured and lifelike details, or simply want to add the coolest vampire queen to your handmade lineup, this pattern will guide you through crafting a beautifully sculpted plush with Marceline’s signature long black hair, red bass guitar, and mischievous charm! 🖤
This design embraces deep colors, dynamic shaping, and playful details to bring a rebellious and magical presence to your crochet projects! 🧶✨ I’ve carefully outlined each step to ensure your Amigurumi Marceline The Vampire Queen turns out just right—ready to rock your collection or become a treasured handmade gift! 🎁 So grab your hooks, pick out dark grays, rich reds, and moody blues, and let’s stitch up a legendary Marceline! 🎸
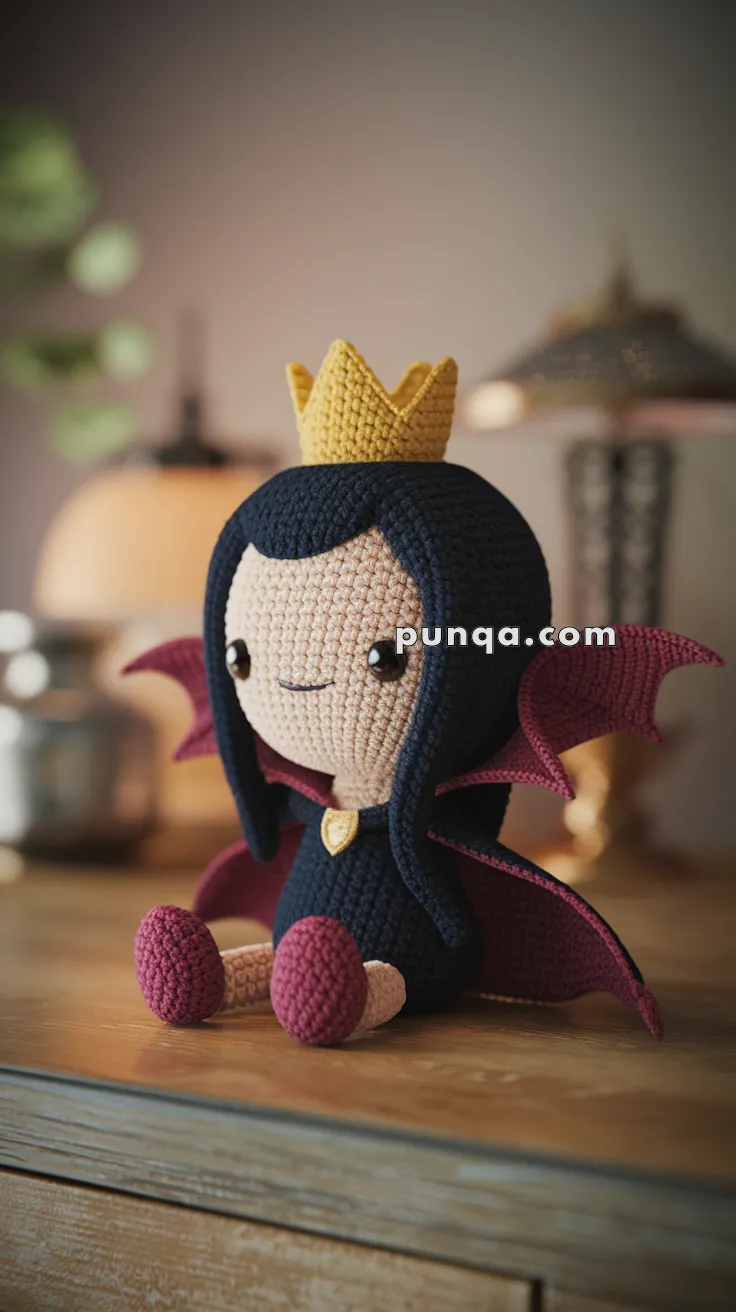
🦇 Amigurumi Marceline the Vampire Queen Crochet Pattern
Bring the coolest vampire from the Land of Ooo into your yarn collection! This adorable Amigurumi Marceline features her iconic gold crown, flowing black hair, burgundy cape with bat wings, and that perfectly mischievous smile. She’s ready to rock her bass axe and steal your heart! 🖤👑
✨ Skill Level
Intermediate – This pattern includes color changes, hair construction, and accessories like wings, crown, and cape.
📏 Finished Size
Approximately 20–23 cm (8–9 inches) tall using worsted weight yarn and a 3.0 mm hook.
🧶 Materials You’ll Need
Yarn
Worsted Weight Yarn (approx. amounts):
- Pale Beige/Skin Tone: 25g (50m/55yds)
- Black: 60g (120m/130yds)
- Burgundy/Deep Red: 30g (60m/65yds)
- Gold/Yellow: 5g (10m/11yds)
Other Supplies
- 3.0 mm crochet hook
- Black safety eyes 8mm OR black embroidery thread for eyes
- Polyester fiberfill stuffing
- Stitch markers
- Tapestry needle
- Scissors
- Pins for assembly
- Optional: small amount of floral wire for stiffening wings
🧵 Abbreviations (US Terms)
- MR – Magic Ring
- sc – Single Crochet
- inc – Increase (2 sc in same stitch)
- dec – Invisible Decrease
- sl st – Slip Stitch
- ch – Chain
- dc – Double Crochet
- FO – Fasten Off
- BLO – Back Loop Only
- FLO – Front Loop Only
- (…) x# – Repeat instructions in parentheses # times
👩 Head (Pale Beige)
Round 1: MR, 6 sc (6)
Round 2: inc x6 (12)
Round 3: (1 sc, inc) x6 (18)
Round 4: (2 sc, inc) x6 (24)
Round 5: (3 sc, inc) x6 (30)
Round 6: (4 sc, inc) x6 (36)
Round 7: (5 sc, inc) x6 (42)
Rounds 8–18: sc around (42)
- Insert safety eyes between Rounds 13–14, about 7–8 stitches apart
- Embroider small curved smile with black thread between Rounds 15–16
- Add tiny white highlights to eyes with white thread
Round 19: (5 sc, dec) x6 (36)
Round 20: (4 sc, dec) x6 (30)
Round 21: (3 sc, dec) x6 (24)
- Stuff head firmly
Round 22: (2 sc, dec) x6 (18)
Round 23: (1 sc, dec) x6 (12)
Round 24: dec x6 (6)
FO, leaving long tail for sewing. Weave through final stitches and close.
🖤 Hair Base Cap (Black)
Round 1: MR, 6 sc (6)
Round 2: inc x6 (12)
Round 3: (1 sc, inc) x6 (18)
Round 4: (2 sc, inc) x6 (24)
Round 5: (3 sc, inc) x6 (30)
Round 6: (4 sc, inc) x6 (36)
Round 7: (5 sc, inc) x6 (42)
Rounds 8–16: sc around (42)
FO, leaving long tail for sewing.
Pin the hair cap onto the head, covering approximately the top 2/3 of the head. Leave the lower face exposed. Sew securely in place.
💇♀️ Long Hair Strands (Black)
For Back Hair (Make 25–30 strands):
- Ch 24–30 (varying lengths for natural look)
- Starting in 2nd ch from hook, sl st back down the chain
- FO, leaving a tail for attaching
For Side Hair (Make 10–12 strands per side):
- Ch 20–24
- Starting in 2nd ch from hook, sl st back down the chain
- FO, leaving a tail for attaching
For Bangs (Make 6–8 shorter strands):
- Ch 8–12 (varying lengths)
- Starting in 2nd ch from hook, sl st back down the chain
- FO, leaving a tail for attaching
Assembly: Using the yarn tails, sew strands directly onto the hair cap in rows. Start from the bottom back and work upward, slightly overlapping each row. Attach side strands along the sides of the head. Place bangs across the forehead, keeping them swept slightly to one side for Marceline’s signature look.
Tip: Brush strands gently with a wire pet brush for a smoother appearance, or leave textured for a more yarn-like finish.
👗 Body/Dress (Black)
Round 1: MR, 6 sc (6)
Round 2: inc x6 (12)
Round 3: (1 sc, inc) x6 (18)
Round 4: (2 sc, inc) x6 (24)
Round 5: (3 sc, inc) x6 (30)
Round 6: BLO: (4 sc, inc) x6 (36)
Rounds 7–9: sc around (36)
Round 10: (4 sc, dec) x6 (30)
Rounds 11–12: sc around (30)
Round 13: Change to pale beige for neck
Rounds 13–14: sc around (30)
Round 15: (3 sc, dec) x6 (24)
Rounds 16–17: sc around (24)
FO, leaving long tail for sewing to head.
Stuff firmly and sew to the bottom of the head.
🦵 Legs (Make 2)
Shoe Portion (Burgundy)
Round 1: MR, 6 sc (6)
Round 2: inc x6 (12)
Round 3: (1 sc, inc) x6 (18)
Round 4: BLO: sc around (18)
Rounds 5–6: sc around (18)
Round 7: 4 sc, dec x5, 4 sc (13)
Round 8: 4 sc, dec x2, 3 sc (11)
Leg Portion (Pale Beige)
Round 9: Change to pale beige: sc around (11)
Rounds 10–14: sc around (11)
FO, leaving long tail. Stuff lightly (shoes more firmly than legs).
Sew legs to the bottom front of the body.
💪 Arms (Make 2)
Hand Portion (Pale Beige)
Round 1: MR, 6 sc (6)
Round 2: inc x6 (12)
Rounds 3–5: sc around (12)
Round 6: dec x2, 8 sc (10)
Sleeve Portion (Black)
Round 7: Change to black: sc around (10)
Rounds 8–13: sc around (10)
FO, leaving long tail. Stuff lightly.
Sew arms to sides of body at shoulder level (around Rounds 15–16 of body).
👑 Crown (Gold)
Foundation: Ch 22, sl st to first ch to form ring (be careful not to twist)
Round 1: sc in each ch around (22)
Round 2: sc around (22)
Round 3 (Crown Points):
- Skip 1 st, (sl st, ch 3, 3 dc, ch 3, sl st) in next st, skip 1 st, sl st in next st – repeat around to create 5 peaks FO, leaving long tail.
Weave in ends and shape crown into circular form. Sew securely to the top center of the head, positioning it at a slight angle if desired.
🧥 Cape Outer Layer (Black)
Row 1: Ch 26, sc in 2nd ch from hook and across (25)
Rows 2–6: Ch 1, turn, sc across (25)
Row 7: Ch 1, turn, dec, sc across to last 2 sts, dec (23)
Row 8: Ch 1, turn, sc across (23)
Row 9: Ch 1, turn, dec, sc across to last 2 sts, dec (21)
Row 10: Ch 1, turn, sc across (21)
Row 11: Ch 1, turn, dec, sc across to last 2 sts, dec (19)
Row 12: Ch 1, turn, sc across (19)
Row 13: Ch 1, turn, dec, sc across to last 2 sts, dec (17)
Row 14: Ch 1, turn, sc across (17)
FO, leaving long tail.
🧥 Cape Inner Lining (Burgundy)
Repeat the exact same instructions as the outer layer using burgundy yarn.
🧥 Cape Assembly
Place the black outer layer and burgundy lining with wrong sides together. Using burgundy yarn, sc around all edges to join the two layers together, working through both layers at once. This creates a finished edge.
Neck Attachment: At the top narrow edge, sew the cape directly to the back of the neck and shoulders, allowing it to drape naturally down the back.
🦇 Bat Wings (Make 2 – Burgundy)
Foundation: Ch 2
Row 1: 3 sc in 2nd ch from hook, turn (3)
Row 2: Ch 1, inc, 1 sc, inc, turn (5)
Row 3: Ch 1, inc, 3 sc, inc, turn (7)
Row 4: Ch 1, sc across, turn (7)
First Wing Point: Row 5a: Ch 1, sc in first 3 sts only, turn (3)
Row 6a: Ch 1, dec, 1 sc, turn (2)
Row 7a: Ch 1, dec (1)
FO first point.
Rejoin yarn to the 4th stitch of Row 4.
Middle Wing Point: Row 5b: Sc in next 2 sts, turn (2)
Row 6b: Ch 1, dec (1)
FO middle point.
Rejoin yarn to the 6th stitch of Row 4.
Third Wing Point: Row 5c: Sc in last 2 sts, turn (2)
Row 6c: Ch 1, dec (1)
FO third point.
Edging (Optional): Rejoin yarn at the base and sc around the entire wing edge for a more defined look. If desired, insert thin floral wire along the wing edge before closing for shape support.
Make a second wing identically.
✨ Necklace Gem (Gold – Optional)
Round 1: MR, 6 sc (6)
FO, leaving long tail.
Flatten into a small circle and sew to the neck area at the center front, just below the chin.
🎀 Final Assembly
- Head & Body: Ensure head is securely sewn to body
- Limbs: Attach arms and legs, checking positioning
- Hair: Make sure all hair strands are attached and styled
- Crown: Secure crown at top of head
- Cape: Attach cape around neck and shoulders, allowing it to drape down the back
- Wings: Sew wings to the upper back, positioned behind the shoulders and pointing outward/upward
- Gem: Add necklace gem if using
- Final Details:
- Shape wings by gently bending into bat wing position
- Arrange hair strands
- Embroider two small fangs at smile corners if desired
- Add subtle pink cheek blush with makeup or colored pencil (optional)
💡 Tips & Tricks
- Hair Smoothing: Gently brush the hair strands with a wire pet brush or even a clean toothbrush for a sleeker look
- Wing Structure: Insert thin wire along the wing edges before finishing for wings that hold their shape
- Eye Placement: Position eyes slightly closer together for a cuter expression
- Posing: Marceline can sit up on her own thanks to her sturdy legs and body construction
- Variations: Make her bass guitar as a separate accessory using black, red, and brown yarn!
Happy Crocheting! Mathematical! 🖤👑🦇