Bring a touch of winter magic to your crochet collection with this Amigurumi Olaf pattern! Inspired by the lovable snowman from Disney’s Frozen, this adorable amigurumi captures his cheerful personality, twig-like arms, and signature carrot nose in every stitch. With his bright smile and playful charm, this crochet Olaf is perfect for adding a bit of whimsy to your handmade creations. Whether you’re crafting for Frozen fans, decorating a cozy winter-themed space, or simply enjoy making character-inspired amigurumi designs, this pattern lets you stitch up a miniature Olaf bursting with personality! ❄️⛄✨
Designed for customization, this pattern allows you to experiment with different shades of white, embroidered details, or even tiny accessories like a miniature snowflake or scarf for extra charm. Craft a classic Olaf with his signature snowy look, create a pastel version for a dreamy aesthetic, or even stitch up a full set of Frozen-inspired amigurumi for a magical display! Whether gifted as a cherished keepsake, displayed as a playful accent, or made simply for the joy of crafting, this Amigurumi Olaf is a fun and creative project—perfect for bringing a touch of handmade winter wonder to every stitch! 🧶💖
☃️ Olaf Amigurumi Crochet Pattern
Nothing says “warm hugs” like Olaf — the lovable snowman who dreams of summer! With his bright carrot nose, wide grin, twig arms, and cheerful personality, this crochet Olaf brings cozy Frozen magic into your home. ❄️
✨ Skill Level
Intermediate – includes shaping, color changes, small facial features, and assembly.
📏 Finished Size
Approx. 26–30 cm (10–12 in) tall
(using DK cotton yarn and a 2.75 mm hook)
🧶 Materials
- White yarn (DK cotton) – ~70 g
- Orange yarn – ~10 g (nose)
- Blue yarn – small amount (mouth interior)
- Black yarn – ~15 g (buttons, pupils, mouth outline)
- Brown yarn – ~20 g (arms, brows, twig hair)
- Light gray or white – small amount (teeth)
Tools
- 2.5–3.0 mm crochet hook
- 8 mm safety eyes
- Polyfill stuffing
- Yarn needle
- Stitch markers
- Scissors
🪡 Abbreviations (US Terms)
- MR – magic ring
- sc – single crochet
- inc – increase (2 sc in same stitch)
- dec – decrease (sc2tog)
- sl st – slip stitch
- ch – chain
- FO – fasten off
🧠 Head (White)
Large and dominant, as in photo.
R1: MR 6 (6)
R2: inc ×6 (12)
R3: (sc, inc) ×6 (18)
R4: (2 sc, inc) ×6 (24)
R5: (3 sc, inc) ×6 (30)
R6: (4 sc, inc) ×6 (36)
R7–14: sc around (36)
Insert safety eyes between R10–R11, 7 sts apart.
R15: (4 sc, dec) ×6 (30)
R16: (3 sc, dec) ×6 (24)
R17: (2 sc, dec) ×6 (18)
Stuff firmly.
R18: (sc, dec) ×6 (12)
R19: dec ×6 (6)
FO and close.
😄 Mouth & Teeth
Mouth Base (Blue)
R1: MR 6 (6)
R2: inc ×6 (12)
R3: (sc, inc) ×6 (18)
Ch 1, turn, sc in next 14 sts to form a wide oval.
FO, leave long tail.
Teeth (Make 2 – White)
Ch 4
sc in 2nd ch and next 2 sts (3)
FO.
Sew teeth side-by-side along the top inner edge of mouth.
Mouth Outline
With black yarn, embroider a wide upward curve following the oval edge.
Sew mouth low and wide, matching the photo’s joyful grin.
🥕 Nose (Orange)
Long, slim, slightly upward-tilted.
R1: MR 4 (4)
R2: (sc, inc) ×2 (6)
R3–5: sc around (6)
R6: (2 sc, inc) ×2 (8)
R7–9: sc around (8)
Lightly stuff.
Sew centered between eyes, angled upward.
👀 Brows (Brown – Make 2)
Ch 9
sl st back along chain
Curve gently and sew above eyes with slight inward tilt.
🌿 Twig Hair (Brown – Make 3)
Each twig:
Ch 12, sl st back.
For branching:
Attach yarn near center, ch 6, sl st back.
Sew all three twigs clustered slightly forward on head top.
⛄ Body (Three Snowballs)
Upper Body (Smallest)
R1: MR 6 (6)
R2: inc ×6 (12)
R3: (sc, inc) ×6 (18)
R4–R6: sc around (18)
R7: (sc, dec) ×6 (12)
Stuff lightly.
FO.
Middle Body
R1: MR 6 (6)
R2: inc ×6 (12)
R3: (sc, inc) ×6 (18)
R4–R7: sc around (18)
Stuff firmly.
FO.
Bottom Body (Largest)
R1: MR 6 (6)
R2: inc ×6 (12)
R3: (sc, inc) ×6 (18)
R4: (2 sc, inc) ×6 (24)
R5–R9: sc around (24)
Stuff firmly for seated stability.
FO.
🔘 Buttons (Black – Make 3)
R1: MR 6 (6)
R2: inc ×6 (12)
sl st, FO
Sew vertically down front, evenly spaced.
💪 Arms (Brown – Make 2)
Arm Base
R1: MR 5 (5)
R2–R13: sc around (5)
Do not stuff.
FO.
Fingers (3 per arm)
Attach yarn at arm end:
Ch 6, sl st back.
Repeat twice.
Sew arms just below head, angled forward.
🦶 Feet (White – Make 2)
Short and rounded for seated pose.
R1: MR 6 (6)
R2: inc ×6 (12)
R3–R4: sc around (12)
Stuff firmly, flatten slightly.
FO.
Sew to front underside of bottom body, spaced apart.
🧩 Assembly
- Sew middle body to bottom body
- Attach upper body
- Sew head firmly on top
- Attach arms and feet
- Add buttons, brows, mouth, and nose
- Shape gently by hand
❄️ Finishing Touches
Weave in all ends securely.
Lightly shape the head and body by hand.
Optional: add tiny white eye highlights or display Olaf with crocheted snowflakes or a “Let It Go” sign.
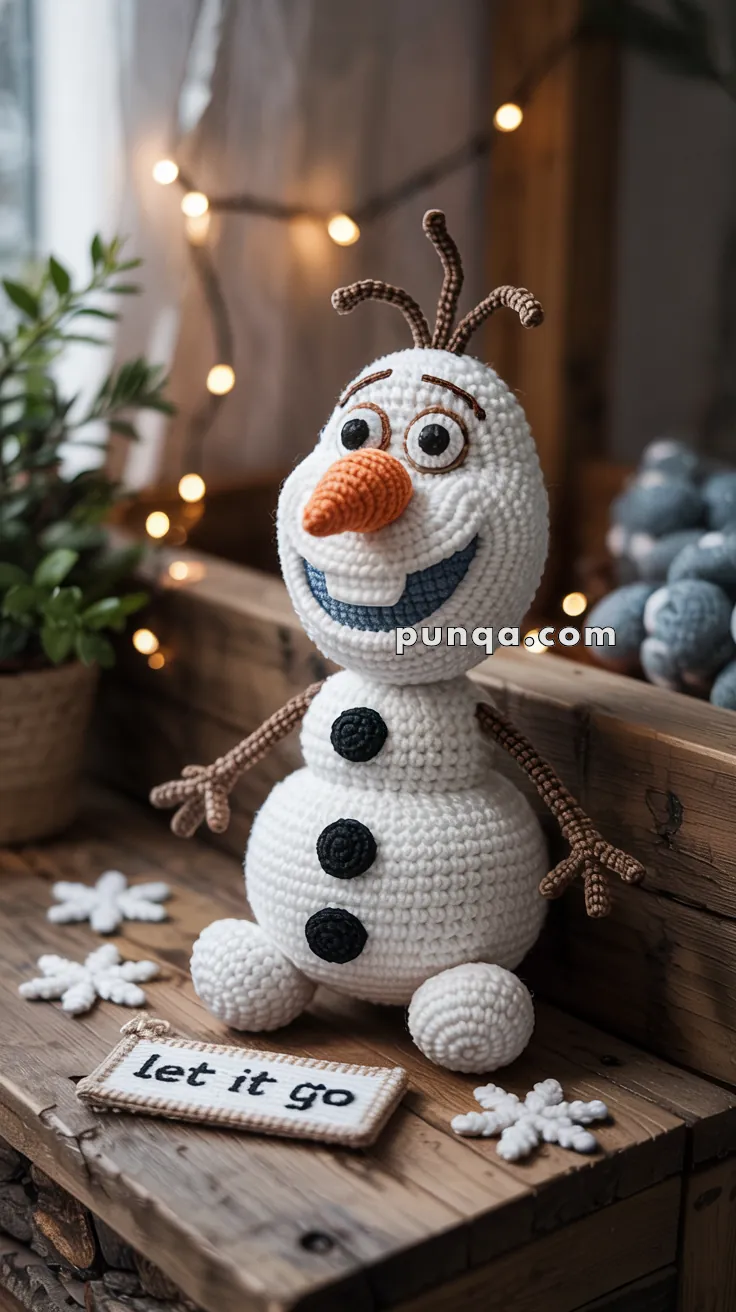
☃️ Your Finished Olaf
And there he is — your own smiling, squishy Olaf ready to melt hearts all winter long! With his expressive face, twig arms, and joyful personality, he’s the perfect handmade decoration or heartfelt gift for Frozen fans of all ages.
Display him on a holiday shelf, next to fairy lights, or beside a “Let It Go” sign just like in the picture — because sometimes, even snowmen need to chill out! 💙☃️