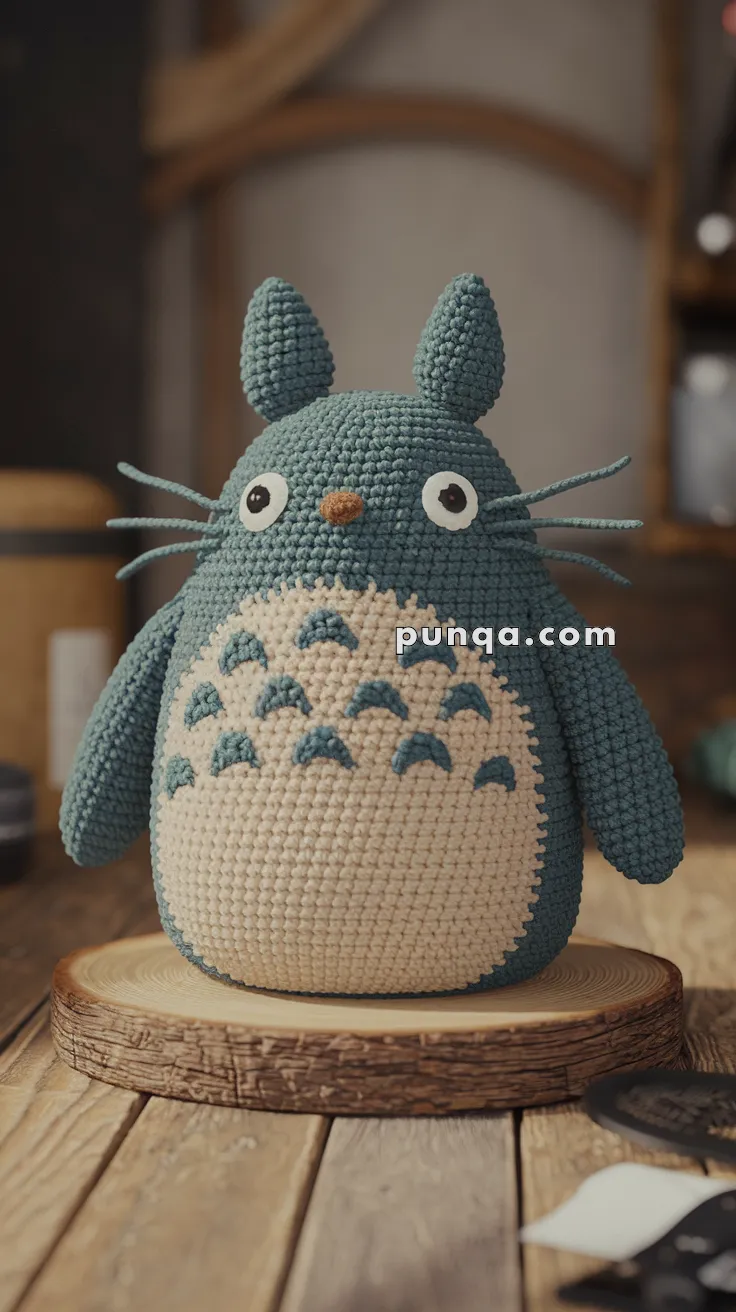
🌿 Amigurumi Totoro Crochet Pattern
Create a soft, peaceful forest companion with this beautifully shaped amigurumi Totoro. Designed with a wide grounded base, a tall gently curved body, and a softly tapered head, this version captures a calm and balanced silhouette that feels both cozy and expressive. The large cream belly and delicate markings bring warmth and character, making this piece perfect for display, gifting, or simply adding a touch of handmade magic to your space. 🧶✨
✨ Skill Level
Intermediate – includes shaping, color transitions, and precise proportions.
📏 Finished Size
Approx. 24–26 cm (9.5–10.5 inches) tall
🧶 Materials & Yarn Amount
- Blue-grey (body, ears, arms, markings): 100 g
- Cream (belly): 50 g
- White (eyes): 8 g
- Brown (nose): 3 g
- Black (pupils & whiskers): small amount
Supplies:
- 3.0–3.5 mm crochet hook
- 10–12 mm safety eyes
- Polyester stuffing (~300 g)
- Yarn needle, stitch marker
🧵 Abbreviations
MR – magic ring
sc – single crochet
inc – increase
dec – invisible decrease
FO – fasten off
ch – chain
🐾 Body & Head (One Piece)
🔽 Base (Wide & Stable)
R1: MR, 6 (6)
R2: inc ×6 (12)
R3: (1 sc, inc) ×6 (18)
R4: (2 sc, inc) ×6 (24)
R5: (3 sc, inc) ×6 (30)
R6: (4 sc, inc) ×6 (36)
R7: (5 sc, inc) ×6 (42)
R8: (6 sc, inc) ×6 (48)
R9: (7 sc, inc) ×6 (54)
R10: (8 sc, inc) ×6 (60)
R11–22: sc around (60)
This creates the broad, slightly flattened base.
🍃 Belly Panel (Tall & Dominant)
R23–41 (19 rounds total):
- 30 sc cream (front)
- 30 sc blue-grey (back)
Keep edges aligned with markers.
✔ This extended section is key — it creates the long torso seen in the figure.
🔼 Upper Body (Before Head Taper)
R42–52: sc around (60)
✔ Extra height here ensures the top does not shrink too early.
🔽 Head Shaping (Smooth & Correct)
R53: (8 sc, dec) ×6 → 54
R54–55: sc around (54)
R56: (7 sc, dec) ×6 → 48
R57–58: sc around (48)
R59: (6 sc, dec) ×6 → 42
R60–62: sc around (42)
R63: (5 sc, dec) ×6 → 36
R64–66: sc around (36)
R67: (4 sc, dec) ×6 → 30
R68: sc around (30)
R69: (3 sc, dec) ×6 → 24
Start stuffing firmly (dense base, softer top).
R70: (2 sc, dec) ×6 → 18
R71: (1 sc, dec) ×6 → 12
R72: dec ×6 → 6
FO and close.
✔ This creates a gentle oval taper, not a round head.
👀 Eyes
White:
R1: MR, 6
R2: inc ×6 (12)
R3: (1 sc, inc) ×6 (18)
Flatten slightly.
Add pupils and attach just above belly panel line.
👃 Nose
R1: MR, 5
R2–3: sc around
FO and sew centered between eyes.
🌿 Belly Markings (Make 7)
Each:
ch 4 → sc, hdc, sc
Arrange:
- Top row: 2
- Middle row: 3
- Bottom row: 2
Follow belly curve naturally.
🐱 Ears (Make 2)
R1: MR, 4
R2: inc ×4 (8)
R3: (1 sc, inc) ×4 (12)
R4: (2 sc, inc) ×4 (16)
R5–8: sc around (16)
R9: (2 sc, dec) ×4 (12)
R10–11: sc around (12)
Lightly stuff base and attach upright.
💪 Arms (Make 2)
R1: MR, 6
R2: (1 sc, inc) ×3 (9)
R3–11: sc around (9)
R12: (1 sc, dec) ×3 (6)
Lightly stuff and attach at mid-body.
🧵 Whiskers
Insert 3 strands per side.
Trim evenly so they extend straight outward.
🧩 Final Shaping
- Keep base firm and slightly flat
- Maintain vertical oval silhouette
- Avoid overstuffing top
- Ensure belly remains centered and smooth
🌟 Final Thoughts
This Totoro design captures a soft, grounded presence through its balanced proportions and gentle shaping. The tall body, rounded base, and subtle facial features create a peaceful character that feels both simple and expressive.
Whether placed on a shelf, gifted to someone special, or kept as part of a handmade collection, this plush brings a quiet, comforting charm that makes every stitch feel worthwhile. 🌿💚