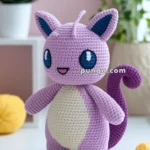
Capture the playful charm of a tiny ferret with this Amigurumi Ferret Baby crochet pattern! 🦦✨ With its soft, rounded body, curious expression, and tiny paws, this design brings the adorable energy of a baby ferret to life in yarn form. Whether you’re crafting for a wildlife-inspired décor piece, a heartfelt gift, or simply love animal-themed amigurumi, this FREE pattern is a delightful addition to your collection.
Designed for intermediate crocheters, this pattern allows for customization in fur textures, facial details, and even tiny accessories like a miniature blanket or a cozy nest to enhance its personality. Choose classic browns and creams for a realistic look or experiment with pastel hues for a whimsical twist! Whether displayed as part of a nature-inspired setup or gifted to a fellow crochet enthusiast, this amigurumi ferret baby is sure to bring smiles. Grab your hook, select your favorite yarn, and let’s bring this adorable little creature to life—one stitch at a time! 🧶✨

🐾 Amigurumi Ferret Baby Crochet Pattern
Meet this charming Amigurumi Ferret Baby – a cuddly woodland critter with an adorable face, curved paws, and sweet white markings. With realistic shaping and minimal embroidery, this pattern is perfect for anyone who loves ferrets or is looking for a cute handmade pet!
✨ Skill Level
Intermediate – requires shaping, color changes, proportional placement, and clean finishing.
📏 Finished Size
Approx. 18–20 cm (7–8 in) using DK yarn and a 2.75–3.25 mm hook.
🧶 Materials
-
Brown DK yarn – main body
-
White DK yarn – face, muzzle, belly
-
Pink yarn – nose & subtle ear blush
-
2.75–3.25 mm crochet hook
-
10 mm glossy black safety eyes
-
Polyfill stuffing
-
Black sewing thread – optional whiskers
-
Tapestry needle
-
Stitch marker
🧵 Abbreviations (US Terms) — one per line
MR – Magic ring
sc – Single crochet
inc – Increase
dec – Decrease
sl st – Slip stitch
ch – Chain
FO – Fasten off
🐭 Head (photo-accurate face markings)
Use brown.
R1: MR, 6
R2: inc ×6 → 12
R3: (1 sc, inc) ×6 → 18
R4: (2 sc, inc) ×6 → 24
R5: (3 sc, inc) ×6 → 30
R6–7: sc (30)
Begin creating the realistic ferret mask with white.
R8: white 12 sts, brown 18 sts → 30
R9: white 14 sts, brown 16 sts → 30
R10: white 12 sts, brown 18 sts → 30
Add brown cheek-stripe shaping (as in photo):
R11: brown 8, white 8, brown 14 → 30
R12: brown 10, white 6, brown 14 → 30
Insert 10 mm eyes between R7–R8, spaced 9 stitches apart, matching the wide-set look.
Continue shaping:
R13: (3 sc, dec) ×6 → 24
R14: (2 sc, dec) ×6 → 18
Switch to white for lower muzzle:
R15: (1 sc, dec) ×6 → 12
R16: sc (12)
Stuff firmly.
FO, leaving tail.
🐽 Nose (pink gradient style)
With pink:
R1: MR, 5 sc
R2: sc (5)
FO.
Sew to the center of the white muzzle, then lightly embroider a pink gradient under the nose to match the photo’s blended muzzle.
👂 Ears (Make 2)
Outer ear (white):
R1: MR, 6
R2: (1 sc, inc) ×3 → 9
FO.
Inner ear:
Use pink yarn to lightly surface-embroider a soft oval center (the photo shows a subtle pink center, not a solid crochet circle).
Flatten and sew ears slightly angled outward on the top-sides of the head.
🧍 Body (long narrow shape + crocheted white belly)
Start with white:
R1: MR, 6
R2: inc ×6 → 12
R3: (1 sc, inc) ×6 → 18
R4–6: sc (18)
Switch to brown, but maintain the white belly by switching yarn within rows:
R7–12: brown 10, white 8 → 18
R13–17: brown 12, white 6 → 18
Decrease:
R18: (2 sc, dec) ×6 → 12
R19: (1 sc, dec) ×6 → 6
FO and close.
Stuff firmly.
This produces the exact belly length and width shown in the reference image.
✋ Arms (Make 2 – long & curved)
Use brown:
R1: MR, 6
R2: (1 sc, inc) ×3 → 9
R3–13: sc (9)
Lightly stuff the upper half only.
Curve slightly by shaping with your fingers.
Sew arms very high on the body, almost under the chin, with palms facing inward—just like the photo.
🐾 Legs / Feet (Make 2 – round with tiny white pads)
Use brown:
R1: MR, 6
R2: inc ×6 → 12
R3: (1 sc, inc) ×6 → 18
R4: sc (18)
R5: (1 sc, dec) ×6 → 12
R6–7: sc (12)
Stuff firmly.
FO.
Footpad (small white center)
With white:
R1: MR, 4 sc
FO.
Sew to the center of each foot, matching the tiny white pad in the photo.
Attach legs so the ferret sits upright.
🌀 Belly & Chest Finish
Since the belly is crocheted into the body, lightly surface-stitch white yarn only to smooth the edge if necessary.
🐾 Final Assembly
-
Sew head to body; angle slightly forward.
-
Attach arms in hugging pose.
-
Attach legs in sitting position.
-
Add thin black thread whiskers from the brown cheek-stripe area.
-
Add soft pink blush under nose if desired.
This Amigurumi Ferret Baby brings playful personality and woodland charm—perfect for animal lovers and cozy handmade collections! 🦦✨