Hey there! Have you ever stumbled upon those adorable, tiny crocheted creatures and wondered how they come to life? Let me tell you, creating an amigurumi fox baby is an absolute joy! 🦊 There’s something incredibly satisfying about turning a simple ball of yarn into a charming little fox with a personality all its own. The appeal lies not only in the cuteness of the finished product but also in the soothing, meditative process of crocheting. Whether you’re a seasoned pro or just starting out, each stitch feels like a step toward bringing a delightful fox into the world, each with its own quirks and charms.
Now, let’s chat about the process. First up, choosing the right yarn is crucial. I love selecting soft, vibrant colors that bring the fox to life. Once I’ve gathered my materials, it’s all about following the pattern, which acts like a roadmap guiding my hands. The magic happens as I work through each section—starting with the head, moving on to those perky little ears, and finally crafting the bushy tail that adds so much character. 🧶 It’s a bit like sculpting with yarn, and the best part is witnessing the fox slowly take shape, stitch by stitch. The entire journey is a creative adventure, leaving me with not just a cute fox but also a sense of accomplishment and joy.
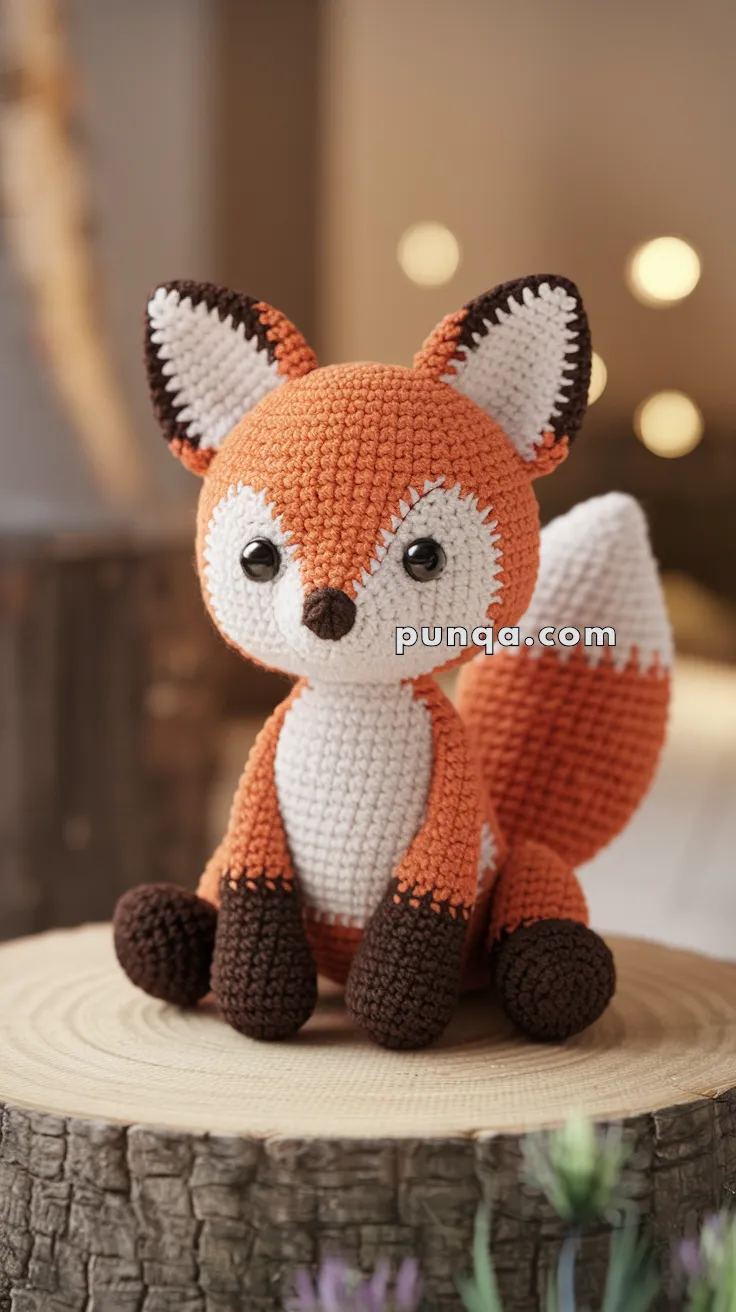
🦊 Baby Fox Amigurumi – Free Crochet Pattern
Create this sweet baby fox featuring a white-tipped muzzle, tummy, tail, and contrasting brown paws and ears. Perfect for woodland nursery themes or gifts!
✨ Skill Level
Intermediate – Requires clean color changes and shaping.
📏 Finished Size
Approx. 7–9 inches (18–23 cm) tall using DK or worsted weight yarn and a 2.5–3.0 mm crochet hook.
🧶 Materials
-
Worsted/DK cotton yarn:
-
Orange – body
-
White – face, belly, ear/tail tips
-
Brown – paws, ears, nose
-
-
8 mm safety eyes
-
Fiberfill stuffing
-
Tapestry needle
-
Stitch marker
-
Scissors
🧵 Abbreviations (US Terms)
MR – Magic Ring
sc – Single Crochet
inc – Increase
dec – Decrease
sl st – Slip Stitch
ch – Chain
st – Stitch
FO – Fasten Off
BLO – Back Loop Only
FLO – Front Loop Only
🐱 Head (with face color shaping)
Color: Start with White, transition to Orange
-
With White: MR, 6 sc
-
inc x6 (12)
-
(1 sc, inc) x6 (18)
-
(2 sc, inc) x6 (24)
-
(3 sc, inc) x6 (30)
-
(4 sc, inc) x6 (36)
7–8. sc around (36)
🔸 Color Change for Face
Use tapestry method: When switching color, do the last yarn-over of the previous stitch in the new color. Carry unused yarn inside the stitches.
-
sc 12 in White, switch to Orange for next 24 sts
-
sc 10 in White, sc 26 in Orange
-
sc 8 in White, sc 28 in Orange
-
sc 6 in White, sc 30 in Orange
-
sc 4 in White, sc 32 in Orange
-
sc all in Orange (36)
-
(4 sc, dec) x6 (30)
-
(3 sc, dec) x6 (24)
-
(2 sc, dec) x6 (18)
Insert safety eyes between R10–11, approx. 8 sts apart -
(1 sc, dec) x6 (12)
-
dec x6 (6)
FO and close.
🐾 Body
Color: Start with White for belly patch → Orange
-
With White: MR, 6 sc
-
inc x6 (12)
-
(1 sc, inc) x6 (18)
-
(2 sc, inc) x6 (24)
-
(3 sc, inc) x6 (30)
6–8. sc around (30)
Switch to Orange gradually:
9. sc 8 White, 22 Orange
10. sc 4 White, 26 Orange
11–18. All Orange
19. (3 sc, dec) x6 (24)
20. (2 sc, dec) x6 (18)
21. (1 sc, dec) x6 (12)
FO and stuff well.
🐾 Arms (Make 2)
Color: Start with Brown → Orange
-
With Brown: MR, 6 sc
-
inc x6 (12)
3–4. sc around (12)
Switch to Orange
5–9. sc around (12) -
dec x6 (6)
FO and leave a tail for sewing.
🐾 Legs (Make 2)
Color: Start with Brown → Orange
-
With Brown: MR, 6 sc
-
inc x6 (12)
3–4. sc around
Switch to Orange
5–7. sc around -
dec x6 (6)
FO and stuff lightly.
🦊 Tail
Color: Start with White → Orange
-
With White: MR, 6 sc
-
inc x6 (12)
-
(1 sc, inc) x6 (18)
4–5. sc around
Switch to Orange
6–14. sc around -
dec x6 (12)
-
sc around
FO, stuff lightly and curve into shape before sewing to body.
👂 Ears (Make 2)
Color: Start with White → Brown (outer edge)
-
With White: MR, 6 sc
-
(1 sc, inc) x3 (9)
-
sc around
Switch to Brown -
(2 sc, inc) x3 (12)
-
sc around
FO, fold in half and sew to top of head.
🐽 Nose
Color: Brown
-
MR, 6 sc
-
inc x6 (12)
FO, sew centered between eyes, just above color transition.
🧵 Color Change Tips
-
For face: Decrease white gradually across multiple rounds (like R9–13) for a rounded look.
-
For paws/ears/tail: Always change on the final yarn-over of the last stitch in the previous color. Use tight tension and consider carrying yarn through the back.
🧷 Assembly
-
Sew head to body.
-
Attach arms and legs symmetrically.
-
Attach tail slightly curved upward.
-
Sew ears and nose.
-
Embroider eyebrows or mouth if desired.
Your baby fox is now complete! 🦊💕 The pattern uses clean, gradual color changes to give a soft, blended face and body for a professional finish. Let me know if you’d like a printable PDF version or additional animal variations!