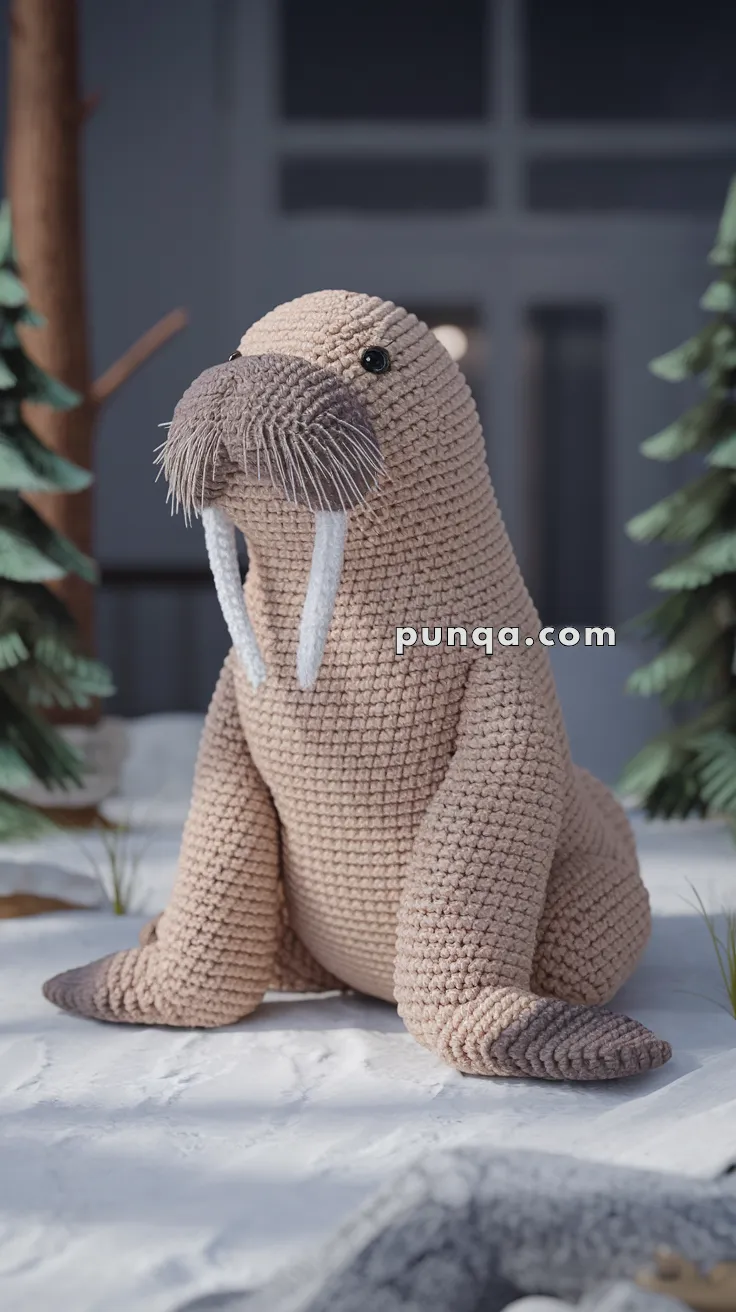
Snuggle up with the Amigurumi Walrus Calf, a lovable crochet project that brings arctic charm and cuddly cuteness to your handmade collection! 🧶🐾 With its round body, tiny flippers, and sweet little tusks, this baby walrus is ready to waddle into your heart. Whether you’re crafting for a sea-themed nursery, a wintery gift, or just adding to your amigurumi zoo, this gentle calf is sure to make a splash.
Perfect for crocheters who enjoy soft shaping and expressive features, this pattern invites you to explore cozy textures, playful details, and a touch of polar whimsy. Customize your walrus with a scarf, a little hat, or keep it classic with natural tones. The Amigurumi Walrus Calf is a delightful way to stitch up warmth, personality, and a pinch of frosty fun—one loop at a time! 🧵❄️
🦭 Amigurumi Walrus Calf Crochet Pattern
Bring the magic of the Arctic into your hands with this cuddly walrus calf! With its chunky body, floppy flippers, long white tusks, and whiskery snout, this amigurumi is as cozy as it is realistic. Perfect for ocean lovers, winter décor, or anyone who wants to crochet an adorable sea buddy.
✨ Skill Level
Intermediate – requires shaping, assembly, and working with chenille/velvet yarn.
📏 Finished Size
Approx. 28 cm (11 in) tall when made with velvet yarn and a 4.0 mm hook.
🧶 Materials
- Yarn: Velvet/Chenille (or worsted if you prefer smaller size):
- Beige/tan – body & head
- Dark brown – snout and flipper tips
- White – tusks
- Crochet hook: 4.0 mm
- Safety eyes: 10–12 mm
- Polyester fiberfill stuffing
- White embroidery thread or nylon whisker thread
- Stitch marker, scissors, tapestry needle
🪡 Abbreviations (US Terms)
- MR = Magic Ring
- sc = single crochet
- inc = increase (2 sc in same st)
- dec = decrease (sc 2 together)
- ch = chain
- sl st = slip stitch
- FO = fasten off
🧵 Pattern Instructions
🐾 Head & Body (worked in one piece) – Tan
- MR, 6 sc [6]
- inc ×6 [12]
- (sc, inc) ×6 [18]
- (2 sc, inc) ×6 [24]
- (3 sc, inc) ×6 [30]
- (4 sc, inc) ×6 [36]
7–18. sc around [36] → make the head rounder & bigger - (4 sc, dec) ×6 [30]
- (3 sc, dec) ×6 [24]
👉 Insert safety eyes between Rnds 11–12, ~7 sts apart. - (2 sc, dec) ×6 [18]
- (sc, dec) ×6 [12]
- sc around [12]
- (sc, inc) ×6 [18]
- (2 sc, inc) ×6 [24]
- (3 sc, inc) ×6 [30]
27–34. sc around [30] - (3 sc, dec) ×6 [24]
- (2 sc, dec) ×6 [18]
- (sc, dec) ×6 [12]
Stuff firmly, FO.
🐽 Snout – Dark Brown
- MR, 6 sc [6]
- inc ×6 [12]
- (sc, inc) ×6 [18]
4–6. sc around [18] - (sc, dec) ×6 [12]
Stuff lightly. FO, leaving long tail for sewing.
👉 Add dense whiskers by threading white embroidery thread or nylon bristles through stitches.
🦷 Tusks (Make 2) – White
- MR, 4 sc [4]
2–12. sc around [4] → longer tusks to reach below flippers
FO, leave tail. Do not stuff. Sew under snout, spaced evenly.
👋 Front Flippers (Make 2) – Tan with Dark Brown Tips
- With brown: MR, 6 sc [6]
- inc ×6 [12]
- (sc, inc) ×6 [18] → wider base for flat flippers
4–5. sc around [18] - Switch to tan: sc around [18]
7–12. sc around [18] - (2 sc, dec) ×4 + 2 sc [14]
14–16. sc around [14]
Flatten, stuff lightly, and sew to body sides at Rnd 25.
👣 Back Flippers (Make 2) – Tan with Dark Brown Tips
- With brown: MR, 6 sc [6]
- inc ×6 [12]
- (sc, inc) ×6 [18]
4–5. sc around [18] - (2 sc, dec) ×4 + 2 sc [14]
7–10. sc around [14]
Flatten and sew to lower body, angled outward.
🧷 Assembly
- Sew snout to head, centered under eyes.
- Attach tusks under snout, pointing slightly outward.
- Add whiskers generously across the snout.
- Sew front flippers near the chest, slightly forward.
- Attach back flippers at lower sides.
- Shape folds with a couple of surface stitches under chin for realism.
🌟 Finishing Touches
- Use a brush to fluff the whiskers slightly.
- Curve tusks outward with steam blocking if needed.
- Add gentle shading with brown fabric paint or blush for depth.
💙 Final Thoughts
This cuddly walrus calf is a true Arctic cutie — with a big whiskery snout, long white tusks, and a cozy sitting pose. Whether for a winter display, a gift for sea-life lovers, or simply a snuggly handmade companion, this crochet walrus is sure to warm hearts even in the coldest climates.