Bring a touch of reptilian charm to your crochet collection with this Amigurumi Gecko pattern! With its adorable wide eyes, tiny toes, and playful personality, this little gecko is ready to scamper into your heart. Whether you’re crafting for nature lovers, adding a whimsical accent to your decor, or simply enjoy making unique amigurumi designs, this pattern lets you stitch up a delightful lizard bursting with character! Perfect for gifting, decorating, or just keeping as a cheerful companion, this crochet creation brings a touch of handmade jungle magic to every stitch. 🦎✨
Designed for customization, this pattern allows you to experiment with different shades of green, embroidered details, or even tiny accessories like a miniature leaf or bug for extra charm. Craft a classic gecko with bold, natural hues, create a pastel version for a softer aesthetic, or even stitch up a full set of reptile-inspired amigurumi for a lively display! Whether gifted as a thoughtful keepsake, displayed as a charming accent, or made simply for the joy of crafting, this Amigurumi Gecko is a fun and creative project—perfect for bringing a touch of handmade nature magic to every stitch! 🧶💖✨
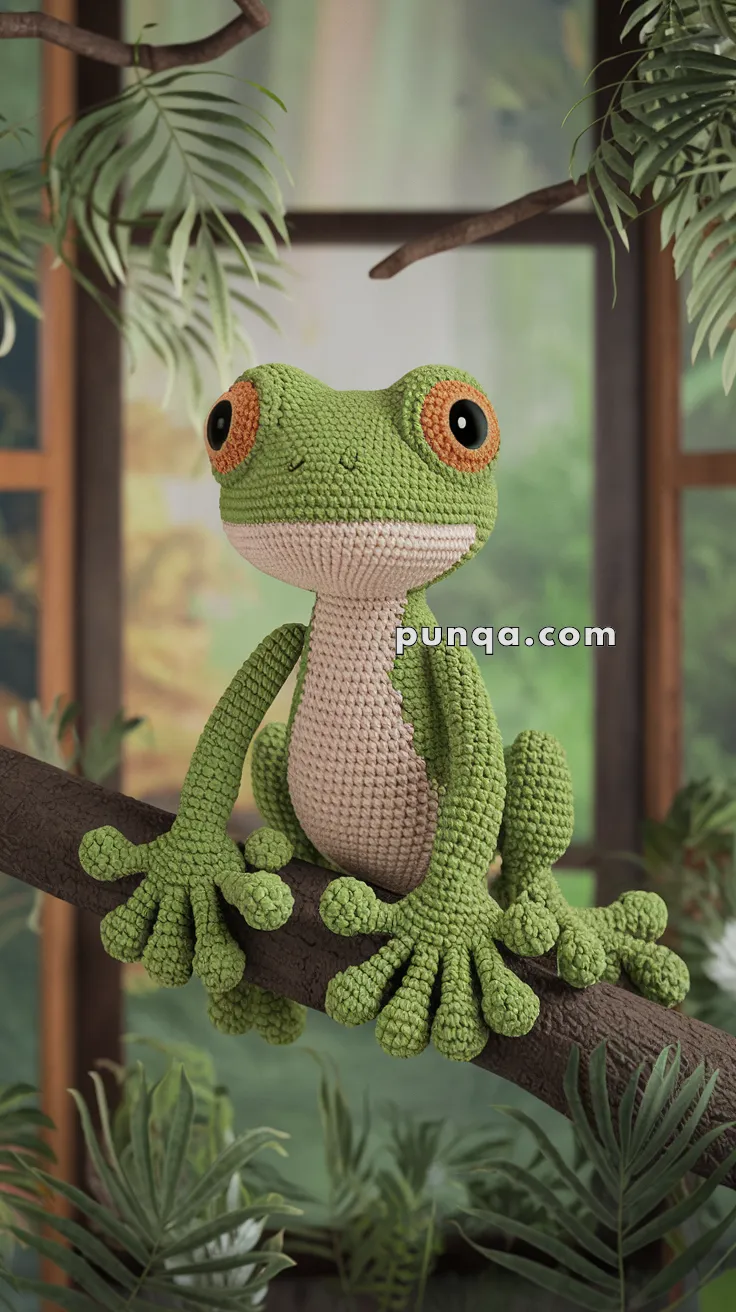
🦎 Amigurumi Gecko Crochet Pattern
Bring this adorable tree-dwelling amigurumi gecko to life! This realistic frog-style gecko features wide orange eyes, a pale underbelly, long fingers crocheted with the limbs, and a beautifully sculpted neck for a seated pose—perfect for jungle-themed decor, plush toys, or playful gifts!
✨ Skill Level:
Advanced Beginner to Intermediate – Includes seamless fingers, basic shaping, and color changes.
📏 Finished Size:
Approx. 10–12 inches (25–30 cm) tall using DK or worsted weight yarn and a 2.5–3.5 mm hook.
🧶 Materials:
-
Yarn (DK or Worsted weight):
-
Green – body, arms, legs, head, and fingers
-
Beige – belly and lower jaw
-
Orange – eye outline
-
Black – pupils or safety eyes
-
-
Crochet hook: 2.5–3.5 mm
-
Tapestry needle
-
Safety eyes (10–12 mm) or black yarn for pupils
-
Stitch marker
-
Polyfill stuffing
-
Optional: Wire (for finger/limb shaping)
🧵 Abbreviations (US Terms):
-
MR – Magic Ring
-
sc – Single Crochet
-
inc – Increase (2 sc in one stitch)
-
dec – Decrease (sc 2 together)
-
ch – Chain
-
sl st – Slip Stitch
-
FO – Fasten Off
-
FLO – Front Loop Only
🐸 Color Change Tips:
To change from beige (belly) to green (sides/back):
On the last yarn-over of the stitch before the color switch, pull through the new color. Continue working in new color. This will make clean transitions.
🧠 Head (Start with Beige → Switch to Green)
-
With beige: MR, 6 sc
-
inc x6 (12)
-
(1 sc, inc) x6 (18)
-
(2 sc, inc) x6 (24)
5–6. sc around (24) -
Switch to green – sc around (24)
8–12. sc around -
(2 sc, dec) x6 (18)
-
sc around
-
(1 sc, dec) x6 (12)
Stuff firmly -
dec x6 (6)
FO, leave long tail for sewing.
👁 Eyes (Make 2)
Eyeball Base – Orange
-
MR, 6 sc
-
inc x6 (12)
-
sc around
-
FO, leave long tail
Pupil – Black Felt or Safety Eye
-
Use 10–12 mm safety eye or stitch small circle using black yarn.
-
Sew centered into orange circle.
Attach to each side of head with slight outward tilt.
🦎 Neck Shaping (Belly Extension)
To create the gecko’s signature neck curve and belly:
-
After attaching head, crochet the body in beige (underbelly) first.
-
Then switch to green and crochet around entire round (including the sides and back).
-
Add a few short rows in the front only using beige to give depth under chin before moving into full body rounds.
🐊 Body (Start Beige → Switch to Green)
-
MR, 6 sc
-
inc x6 (12)
-
(1 sc, inc) x6 (18)
-
(2 sc, inc) x6 (24)
5–8. sc around in beige -
Switch to green, sc around (24)
10–15. sc around -
(2 sc, dec) x6 (18)
-
(1 sc, dec) x6 (12)
Stuff firmly -
dec x6 (6)
FO and close.
💪 Arms with Fingers (Make 2 – Do Not Sew Fingers Separately)
Fingers (Make 3 directly into base)
-
Start with green yarn: ch 5
-
sc in 2nd ch, 2 sc, inc (4)
-
sc around finger for 3 rounds
-
Sl st and FO first finger.
Repeat twice more WITHOUT fastening off after 3rd finger.
Join Fingers:
-
Join 3 fingers with 3 sc between each
-
Then work around entire hand base (~15 sc)
-
Continue up forearm for ~12–14 rounds
-
Slightly stuff
-
Flatten and sew to upper body sides with curve
🦶 Legs with Toes (Same method as arms, but longer)
Toes (Make 3 directly into foot base)
-
Same as fingers, but 4 rounds per toe
Join Toes + Work Upward:
-
Join toes into base
-
Crochet in round up to thigh
-
Shape slightly longer than arms
-
Stuff and sew to lower body
✂️ Final Assembly:
-
Sew head to top of neck with slight tilt forward
-
Attach limbs so the gecko can sit/cling naturally
-
Optional: Stitch small nostrils and a line smile
-
Add wire for finger or toe pose-ability (optional but fun)
💡 Customization Ideas:
-
Add red or blue for tropical frog style
-
Stitch tiny suction cup pads with FLO bobbles on fingers
-
Create a hanging gecko pose for wall or window display
This cheerful amigurumi gecko is a lovable leafy climber that’s just begging to chill on your shoulder—or tree branch! 🌿🦎