Add a touch of Disney magic to your bookshelf with the Amigurumi Minnie & Mickey Mouse Bookends, a crochet project that’s as fun as it is functional! 🧶🐭 Featuring the beloved duo in soft, handmade form, these bookends combine playful charm with practical use. With Minnie’s sweet bow and Mickey’s classic look, they’re perfect for keeping your favorite stories neatly in place while adding a cheerful splash of character.
Ideal as a gift for Disney fans, a whimsical décor piece, or a unique addition to your handmade collection, these bookends are sure to bring smiles every time you see them. Fun to stitch and delightful to display, the Amigurumi Minnie & Mickey Mouse Bookends are a joyful way to crochet nostalgia, creativity, and a sprinkle of handmade magic—one loop at a time! ✨📚🧵
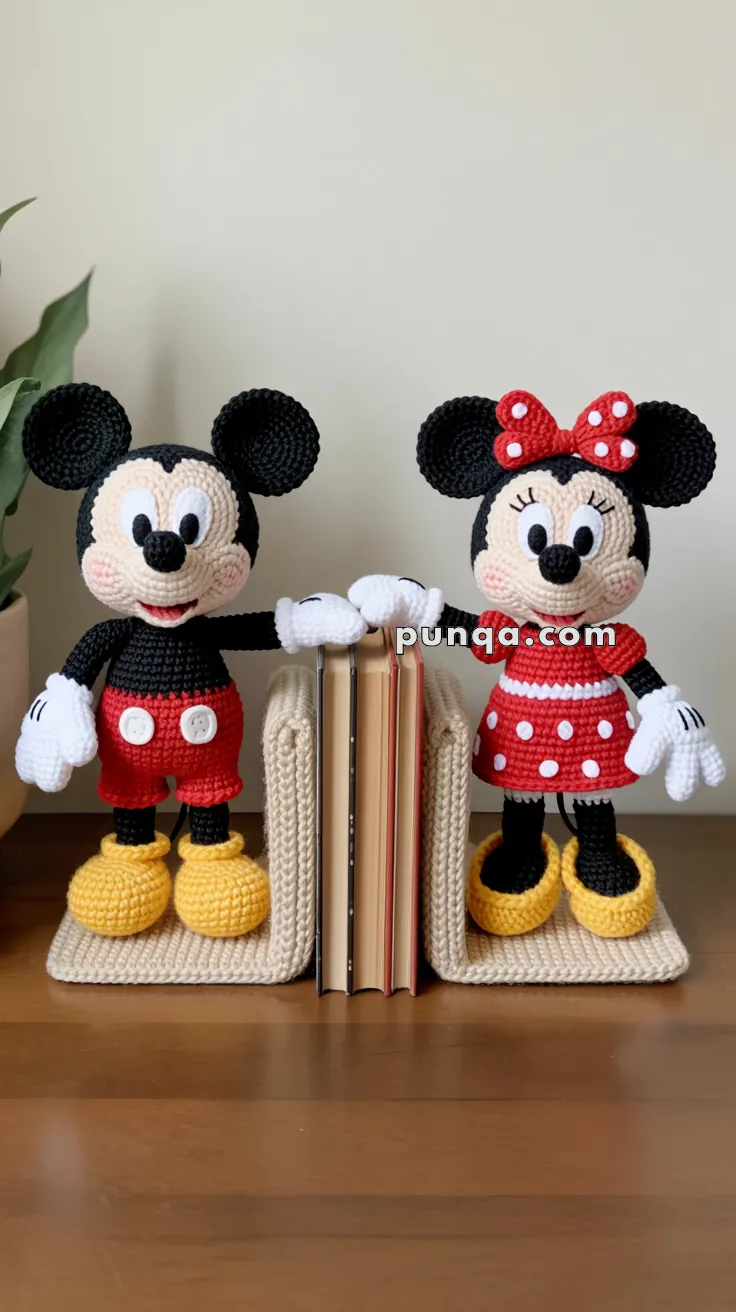
Crochet Minnie & Mickey Mouse Bookends Pattern
These charming standing mouse dolls are designed as sturdy bookends, each holding books gently in place with an outstretched arm and flat rectangular base. With rounded ears, expressive faces, classic outfits, and soft yet structured bodies, this pattern creates a balanced pair perfect for shelves, desks, or children’s rooms.
🪡 Skill Level
Intermediate – includes shaping, color changes, appliqué dots, bow, and firm assembly for stability.
📏 Finished Size
- Height (including base): approx. 22–24 cm (8.5–9.5 in)
- Base: approx. 10 × 8 cm (4 × 3 in)
🧵 Materials
Yarn (DK or light worsted):
- 🖤 Black – head, ears, arms, legs
- 🧁 Skin tone (light beige/peach) – face
- ❤️ Red – shorts, dress, bow
- 🤍 White – gloves, buttons, polka dots
- 💛 Yellow – shoes
- 🌾 Beige/Cream – bases
Small amounts:
- 🌸 Pink – cheeks
- 🖊️ Black embroidery thread – mouth, brows, eyelashes
Other supplies:
- 👀 8–10 mm safety eyes
- ☁️ Fiberfill stuffing
- 🪡 Tapestry needle
- 📍 Stitch marker
- 📐 Thin cardboard or plastic canvas (for base stiffener)
✂️ Abbreviations (US Terms)
MR – Magic Ring
sc – Single Crochet
inc – Increase
dec – Invisible Decrease
sl st – Slip Stitch
ch – Chain
FO – Fasten Off
BLO – Back Loop Only
➡️ Work in continuous rounds unless stated.
🧠 Construction Overview
Each doll includes:
- 🟤 Head
- 👂 Ears
- 👕 Body
- 🧤 Arms with gloves
- 🦵 Legs with shoes
- 👗 Clothing (shorts or dress)
- 🎀 Bow (girl)
- ⬛ Rectangular base
One arm per doll is sewn forward to touch the books.
🧸 Head (Make 2)
With black yarn:
R1: MR 6 (6)
R2: inc ×6 (12)
R3: (sc, inc) ×6 (18)
R4: (2 sc, inc) ×6 (24)
R5: (3 sc, inc) ×6 (30)
R6–11: sc around (30)
Switch to skin tone:
R12–14: sc around (30)
Insert safety eyes between R8–9, about 7 stitches apart 👀
R15: (3 sc, dec) ×6 (24)
R16: (2 sc, dec) ×6 (18)
Stuff firmly ☁️
R17: (sc, dec) ×6 (12)
R18: dec ×6 (6)
FO and close.
👂 Ears (Make 4)
With black yarn:
R1: MR 6
R2: inc ×6 (12)
R3: (sc, inc) ×6 (18)
R4: sc around (18)
FO and flatten slightly.
Sew two ears high and wide on each head 🐭
😊 Face Details
- 🖤 Embroider curved smile
- ⚫ Add small oval nose
- ✏️ Stitch light eyebrows
- 🌸 Add pink cheek circles
- 👧 Girl doll: embroider 3 eyelashes per eye
👕 Body (Make 2)
With black yarn:
R1: MR 6
R2: inc ×6 (12)
R3: (sc, inc) ×6 (18)
R4: (2 sc, inc) ×6 (24)
R5–9: sc around (24)
Stuff firmly and shape round 💪
🧤 Arms with Gloves (Make 4)
With white yarn:
R1: MR 6
R2: inc ×6 (12)
R3–4: sc around (12)
Switch to black yarn:
R5–13: sc around (12)
Stuff lightly
FO and flatten top.
Embroider two short black lines on each glove for finger detail ✋
🦵 Legs (Make 4)
With black yarn:
R1: MR 6
R2: inc ×6 (12)
R3–9: sc around (12)
Stuff lightly
FO.
👟 Shoes (Make 4)
With yellow yarn:
R1: MR 6
R2: inc ×6 (12)
R3: (sc, inc) ×6 (18)
R4–6: sc around (18)
Stuff firmly and attach to legs 💛
👖 Boy Shorts (Red)
Attach red yarn at waist:
R1–4: sc around (24)
Make two small white circles (MR 6, sl st) and sew as buttons on front ⚪⚪
👗 Girl Dress (Red)
Attach red yarn at waist:
R1–5: sc around (24)
R6: (2 sc, inc) ×8 (32)
R7: sc around (32)
Make small white circles (MR 6) and sew evenly as polka dots ⚪⚪⚪
🎀 Bow (Girl)
With red yarn:
Ch 8
Row 1–3: sc across
Wrap center tightly with yarn to form bow shape
Sew small white dots and attach between ears ❤️
⬛ Base Platform (Make 2)
With beige yarn:
Ch 16
Row 1: sc across (15)
Row 2–18: ch1, turn, sc across (15)
Insert cardboard stiffener before closing final row 📐
Sew feet firmly to base for stability.
👉 Arm Positioning
Sew one arm forward so glove rests against book spines 📚
The other arm hangs naturally at the side.
🧩 Assembly Order
- Sew ears to head
- Embroider face
- Attach head to body
- Sew legs and shoes
- Attach arms (one forward)
- Add clothing
- Attach bow (girl)
- Sew doll securely to base
✨ Finishing Touches
- Lightly steam to smooth stitches
- Shape gloves and arms forward
- Ensure base sits flat
- Secure all parts tightly
💬 Final Notes
These standing mouse bookends combine decorative charm with practical structure. The rounded ears, stitched polka dots, glove finger lines, and solid bases closely match the reference design while staying fully achievable with classic crochet techniques. Perfect for nurseries, libraries, or handmade gifts 🎁🐭📚
Happy crocheting and happy reading! 🧶💛


Bendiciones muy hermoso tengo que hacerlo gracias
Muchas gracias al compartir sus hermosos trabajos bendiciones
grand merci à vous