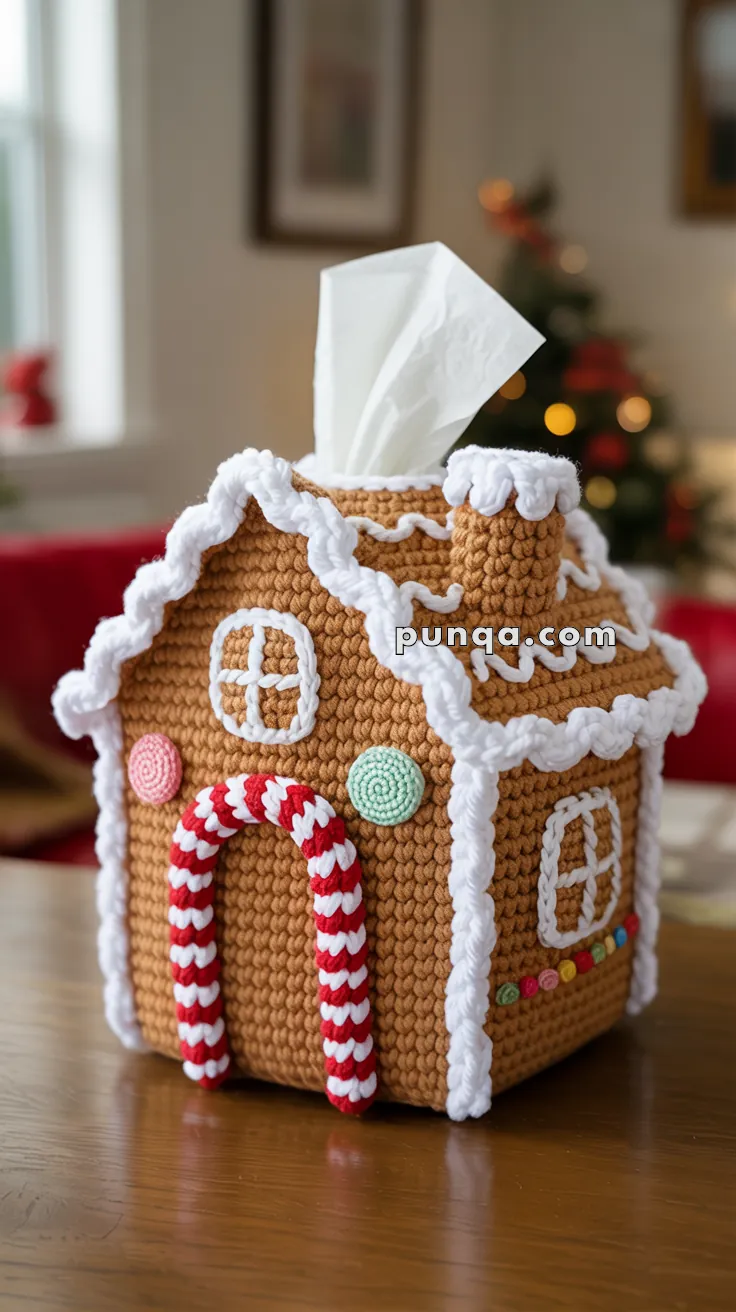
Transform an everyday essential into a festive centerpiece with the Gingerbread House Tissue Box Cover, a crochet project that’s as sweet as it is practical! 🏠🍬🧶 Featuring a candy-striped doorway, spiral candies, piped-icing appliqué, and a snow-trimmed roof, this decorative cover slips neatly over a standard square tissue box. With tissues popping out from the top like a magical puff of snow, it’s the perfect way to add holiday cheer to any room.
Built with sturdy panels, textured stitches, and dimensional appliqués, this design captures the irresistibly realistic look of a gingerbread house. Whether displayed on a table, gifted to a loved one, or used as a playful accent during the holidays, the Gingerbread House Tissue Box Cover is a joyful way to crochet coziness, celebration, and a sprinkle of handmade magic—one loop at a time! 🎄✨🧵
🍬 Gingerbread House Tissue Box Cover – Crochet Pattern
Turn an ordinary tissue box into a delightful holiday centerpiece with this charming crochet gingerbread house cover. Rich gingerbread walls, snowy icing trims, candy cane accents, pastel gumdrops, and sugary swirl candies come together to create a cozy, festive look straight out of a storybook bakery. Designed to fit a standard cube tissue box, this project blends playful decoration with everyday function and adds instant warmth and whimsy to your seasonal décor. 🎄✨
🧶 Skill Level
Intermediate
Includes shaped panels, surface decoration, and structured assembly.
📏 Finished Size
Fits a standard cube tissue box
Approx. 12–13 cm (5 in) per side
🎁 Materials
Yarn (Worsted Weight)
- Gingerbread brown: 120–140 g
- White (icing): 60–80 g
- Red: 15 g
- Mint green: 5 g
- Pink: 5 g
- Yellow: 5 g
Tools
- 4.0 mm crochet hook
- Yarn needle
- Scissors
- Stitch markers
- Standard cube tissue box (for shaping)
🔤 Abbreviations (US Terms)
- sc – single crochet
- inc – increase
- dec – decrease
- sl st – slip stitch
- ch – chain
- FO – fasten off
🧱 HOUSE PANELS
🏠 Front & Back Walls (Make 2 – Peaked Gable Shape)
With gingerbread brown:
Base Rectangle
Ch 31
Row 1: sc in 2nd ch from hook and across (30)
Rows 2–22: ch 1, turn, sc across (30)
Roof Peak Shaping (Low, Wide Peak)
Row 23: dec, sc 26, dec (28)
Row 24: dec, sc 24, dec (26)
Row 25: dec, sc 22, dec (24)
Row 26: dec, sc 20, dec (22)
Row 27: dec, sc 18, dec (20)
Row 28: dec, sc 16, dec (18)
Row 29: dec, sc 14, dec (16)
Row 30: dec, sc 12, dec (14)
Row 31: dec, sc 10, dec (12)
Row 32: dec, sc 8, dec (10)
FO.
🧱 Side Walls (Make 2 – Rectangular)
With gingerbread brown:
Ch 31
Row 1: sc in 2nd ch from hook and across (30)
Rows 2–22: ch 1, turn, sc across (30)
FO.
🏗 House Assembly (Body)
- Sew one side wall to the left edge of the front wall
- Sew the second side wall to the right edge of the front wall
- Attach the back wall to close the structure
- Insert the tissue box to confirm fit and alignment
🏠 ROOF PANELS (Make 2)
With gingerbread brown:
Ch 36
Row 1: sc in 2nd ch from hook and across (35)
Rows 2–28: ch 1, turn, sc across (35)
🧻 Tissue Slot (On ONE Roof Panel Only)
Row 14: sc 10, ch 15, skip 15 sts, sc to end
Row 15: sc across (35)
Continue remaining rows normally.
FO.
❄️ Roof Icing Edge (Snowy Scallops)
With white yarn, work along the lower long edge of each roof panel:
(sl st, 3 hdc, sl st) repeat across
Creates tight, snowy scallops along the roof edge.
🍯 Roof Icing Lattice
With white yarn:
Surface crochet diagonal lines slanting upward across each roof panel, spacing lines 3–4 stitches apart.
Add diagonal lines in the opposite direction to form a light lattice pattern.
🏠 Roof Assembly
- Sew the two roof panels together along the top ridge
- Center the roof over the house so it rests on the slanted gable edges
- Stitch the roof only along the slanted edges, leaving a slight overhang on all sides
🧱 Chimney
With gingerbread brown:
Front & Back Panels (Make 2)
Ch 9
Row 1: sc in 2nd ch from hook and across (8)
Rows 2–7: ch 1, turn, sc across (8)
FO.
Side Panels (Make 2)
Ch 7
Row 1: sc in 2nd ch from hook and across (6)
Rows 2–7: ch 1, turn, sc across (6)
FO.
Chimney Assembly
- Sew one side panel to each side of a front panel
- Attach the back panel to form a small rectangular chimney
- Leave the bottom edge open
❄️ Chimney Icing
With white yarn:
Attach yarn at any top corner.
Work (ch 3, sl st) evenly around the top edge only, allowing slight variation for a natural dripping effect.
FO.
Chimney Placement
- Position chimney on one roof panel only, near the back slope
- Place it slightly off-center
- Stitch securely through the top roof panel only
🚪 Candy Cane Door Frame
With red and white yarn held together:
Ch 70
Sl st back along the chain
Shape into a rounded arch.
🚪 Door
With dark brown:
Ch 13
Row 1: sc across (12)
Rows 2–12: sc across
Arch Shaping
Row 13: dec, sc 8, dec (10)
Row 14: dec, sc 6, dec (8)
Row 15: dec, sc 4, dec (6)
Row 16: dec, sc 2, dec (4)
FO.
Sew the door slightly lower than center on the front wall. Attach the candy cane frame around it.
🍬 Front Candies
Spiral Candies (Pink & Mint)
Ch 60
sc across
Coil tightly into flat spirals and stitch above the door.
Round Candy (Yellow)
MR 6
inc ×6 (12)
(sc 1, inc) ×6 (18)
Flatten slightly and sew below the spiral candies.
🪟 Windows
Surface crochet small square windows approximately 6 stitches wide × 6 rows tall.
Add one vertical and one horizontal bar for panes.
Place one window on the front wall above the door and one on a side wall.
🍬 Gumdrops
With pastel colors:
MR 6
inc ×6 (12)
sc around
Lightly stuff and flatten
Attach in a row 1–2 rows above the bottom edge on one side wall.
❄️ Icing Details
Vertical Icing Trim
With white yarn:
Ch 70
sl st back along the chain
Sew down both vertical front edges of the house.
Bottom Icing Drips
With white yarn, work around the base:
(ch 3, sl st) repeat around
✨ Finishing Touches
Your gingerbread house tissue box cover is now complete—full of cheerful colors, cozy textures, and sweet details that bring the holiday spirit to life. 🎄🍬 Display it on a table, counter, or desk and enjoy its festive charm year after year. Add extra candies, tiny wreaths, or embroidered sprinkles to make your house uniquely yours. 💛✨