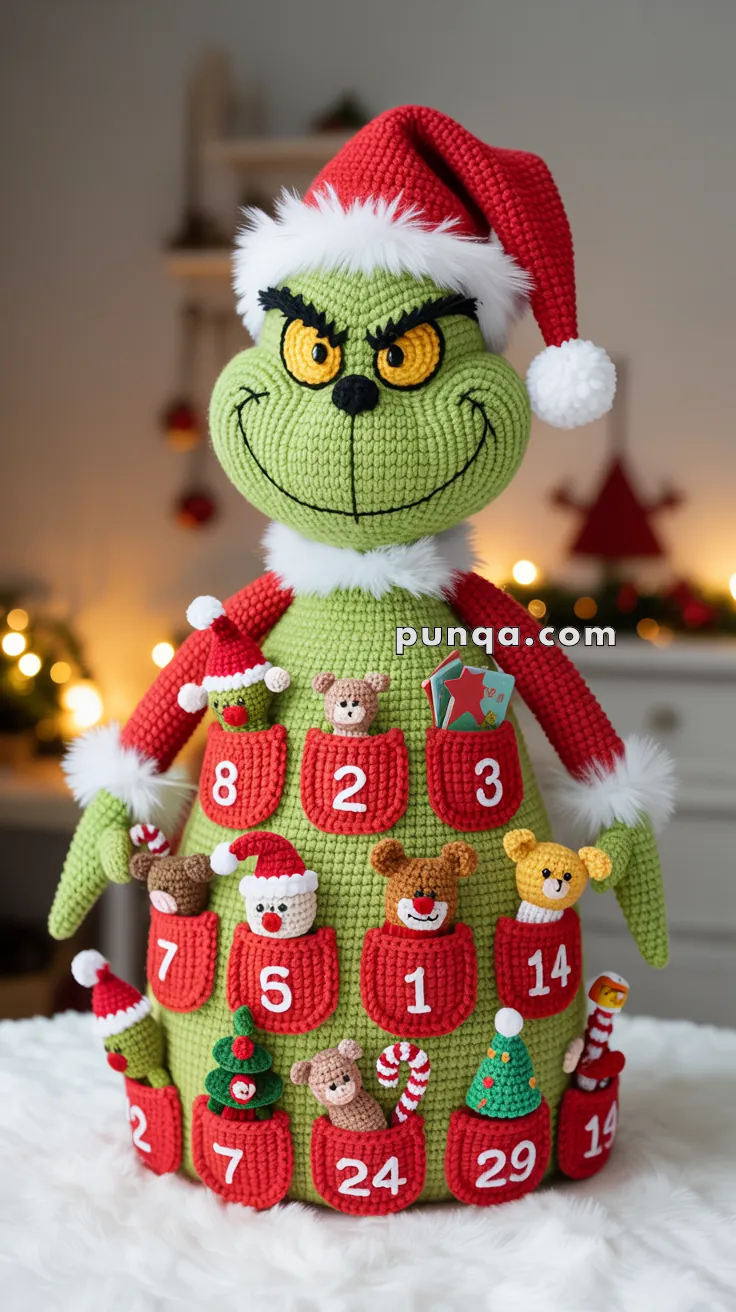
Add a mischievous twist to your holiday countdown with the Amigurumi Grinch Advent Calendar, a crochet project that’s as whimsical as it is festive! 💚🎄🧶 Standing tall with a sculpted face, bushy eyebrows, furry hat trim, and long expressive arms, this Grinch is ready to hold twenty-four pockets filled with tiny toys and treats. His fully rounded cone-shaped body and reinforced base ensure stability, making him a sturdy and eye-catching centerpiece for your seasonal décor.
With optional wire armature for poseable arms and a stable upright head, this advent calendar is both playful and practical. Whether displayed on a mantel, entryway table, or used as part of a cherished Christmas countdown tradition, the Amigurumi Grinch Advent Calendar is a joyful way to crochet laughter, holiday spirit, and a sprinkle of handmade magic—one loop at a time! 🎅✨🧵
💚 Amigurumi Grinch Advent Calendar Crochet Pattern
Bring a bold and playful holiday character to life with this large-scale amigurumi advent design. Featuring a sculpted face, fluffy trims, expressive eyes, and a full set of numbered pockets, this project blends character building with festive functionality. The rounded cheeks, dramatic eyebrows, and wide grin create a striking personality, while the structured cone body keeps everything stable and display-ready.
✨ Skill Level
Advanced
This pattern includes:
- Sculpted shaping for facial features
- Faux-fur finishing techniques
- Large amigurumi structure
- Multiple sewn components
- Optional internal support
📏 Finished Size
Using super bulky chenille yarn and a 6.5–7.0 mm hook:
- Height: approx. 48–55 cm (19–22 inches)
- Base diameter: approx. 30–34 cm (12–13.5 inches)
🧶 Yarn Requirements
Main yarn (chenille / super bulky):
- Light green: 480–520 g
- Red: 180–220 g
- White faux-fur: 80–100 g
Detail yarn (DK cotton):
- Red (pockets): 70–90 g
- Yellow (eyes): 10 g
- Black (details): 10 g
- White (numbers/details): 10 g
- Mixed colors for mini toys: 45–55 g total
🧵 Materials
- 6.5–7.0 mm hook (main body)
- 3.0 mm hook (details)
- Fiberfill stuffing
- Yarn needle
- Stitch markers
- Scissors
- Optional: wire for structure
- Optional: cardboard/plastic base insert
🧵 Abbreviations (US Terms)
MR – magic ring
sc – single crochet
inc – increase
dec – invisible decrease
hdc – half double crochet
sl st – slip stitch
ch – chain
BLO – back loop only
FLO – front loop only
🟩 Head
With light green:
R1: MR 6
R2: inc x6 (12)
R3: (sc, inc) x6 (18)
R4: (2 sc, inc) x6 (24)
R5: (3 sc, inc) x6 (30)
R6: (4 sc, inc) x6 (36)
R7: (5 sc, inc) x6 (42)
R8: (6 sc, inc) x6 (48)
R9–13: sc around (48)
R14: (7 sc, inc) x6 (54)
R15–16: sc around (54)
R17: (7 sc, dec) x6 (48)
R18: sc around (48)
R19: (6 sc, dec) x6 (42)
R20: (5 sc, dec) x6 (36)
Stuff firmly, shaping forehead rounded.
R21: (4 sc, dec) x6 (30)
R22: (3 sc, dec) x6 (24)
R23: (2 sc, dec) x6 (18)
R24: (sc, dec) x6 (12)
R25: dec x6 (6)
FO.
😊 Cheeks (Key Feature – Make 2)
With light green:
R1: MR 6
R2: inc x6 (12)
R3: (sc, inc) x6 (18)
R4: (2 sc, inc) x6 (24)
R5–6: sc around (24)
R7: (2 sc, dec) x6 (18)
Lightly stuff.
FO with long tail.
Placement
Sew each cheek on the lower front of the head:
- Positioned wide apart
- Slightly below eye line
- Inner edges close but not touching
Angle them slightly upward toward the outer sides to create the lifted grin shape. Keep them full and rounded.
👃 Nose
With black:
R1: MR 5
R2: inc x5 (10)
R3–4: sc around (10)
Lightly stuff.
Sew centered between cheeks, slightly above their midpoint.
🟨 Eyes (Make 2)
With yellow:
R1: MR 6
R2: inc x6 (12)
R3: (sc, inc) x6 (18)
R4: (2 sc, inc) x6 (24)
FO.
Embroider black vertical pupils slightly angled inward.
Sew above cheeks, tilted slightly toward center.
🖤 Eyebrows (Make 2)
With black:
Ch 11
Row 1: sc across
FO.
Sew in a strong downward angle toward center and lift outer ends upward for dramatic expression.
😈 Mouth
With black embroidery:
- Stitch a vertical line from nose downward
- Add a wide curved smile across both cheeks
- Slightly curve ends upward
Keep the line bold and smooth.
🎅 Santa Hat
With red:
R1: MR 4
R2: sc around
R3: (sc, inc) x2 (6)
R4: sc
R5: (2 sc, inc) x2 (8)
R6: sc
Continue increasing gradually to ~40 sts, then work 10–12 rounds straight.
FO.
Trim
Attach white faux-fur:
- 2–3 rounds hdc
- Brush lightly
Add pom-pom at tip.
🧣 Neck Ruff
With white faux-fur:
Ch 38–42
Row 1: hdc across
Wrap around neck seam and sew in place.
🟥 Arms (Make 2)
Sleeve (Red)
MR 6
inc x6 (12)
R3–10: sc around
Hand (Green)
R11: sc around
R12: (2 sc, inc) x4 (16)
R13: sc around
Fingers
Create 3 fingers and thumb using chains and slip stitches.
Lightly stuff.
Add faux-fur cuff at wrist.
🟩 Advent Body (Cone Shape)
With green:
R1: MR 6
R2: inc x6 (12)
R3: (sc, inc) x6 (18)
R4: (2 sc, inc) x6 (24)
R5: (3 sc, inc) x6 (30)
R6: (4 sc, inc) x6 (36)
R7: (5 sc, inc) x6 (42)
R8: (6 sc, inc) x6 (48)
R9: (7 sc, inc) x6 (54)
R10: (8 sc, inc) x6 (60)
R11: (9 sc, inc) x6 (66)
R12: (10 sc, inc) x6 (72)
R13–26: sc around (72)
R27: (5 sc, inc) x12 (84)
R28: (6 sc, inc) x12 (96)
R29–36: sc around (96)
Stuff firmly.
🛠 Base Reinforcement
Insert circular base.
R37: BLO sc around
R38–40: sc around
FO.
🟥 Advent Pockets (Make 24)
With red DK:
Ch 12
Row 1: sc across
Rows 2–11: sc across
Top edge: sl st, sc, sl st
FO.
Attach evenly across body.
🧸 Mini Accessories
Create small festive items:
- teddy bears
- Santa faces
- candy canes
- trees
- gifts
Keep simple and lightweight.
🧩 Assembly
- Attach head securely to body
- Cover seam with neck ruff
- Sew cheeks first, then nose
- Add eyes and eyebrows
- Embroider mouth last
- Attach arms high on body
- Position hat slightly tilted
- Attach all pockets and numbers
✨ Finishing Touches
- Shape cheeks evenly and firmly
- Adjust eyebrow angles for expression
- Brush faux-fur lightly
- Ensure base sits flat
- Slightly compress cheeks inward for smile depth
🎄 Final Thoughts
This festive design combines bold character shaping with playful holiday function. The rounded cheeks, expressive eyes, and fluffy trims create a lively personality, while the advent pockets add charm and interactivity. With careful shaping and attention to facial placement, the finished piece becomes a standout seasonal decoration full of warmth and character 💚🎄✨