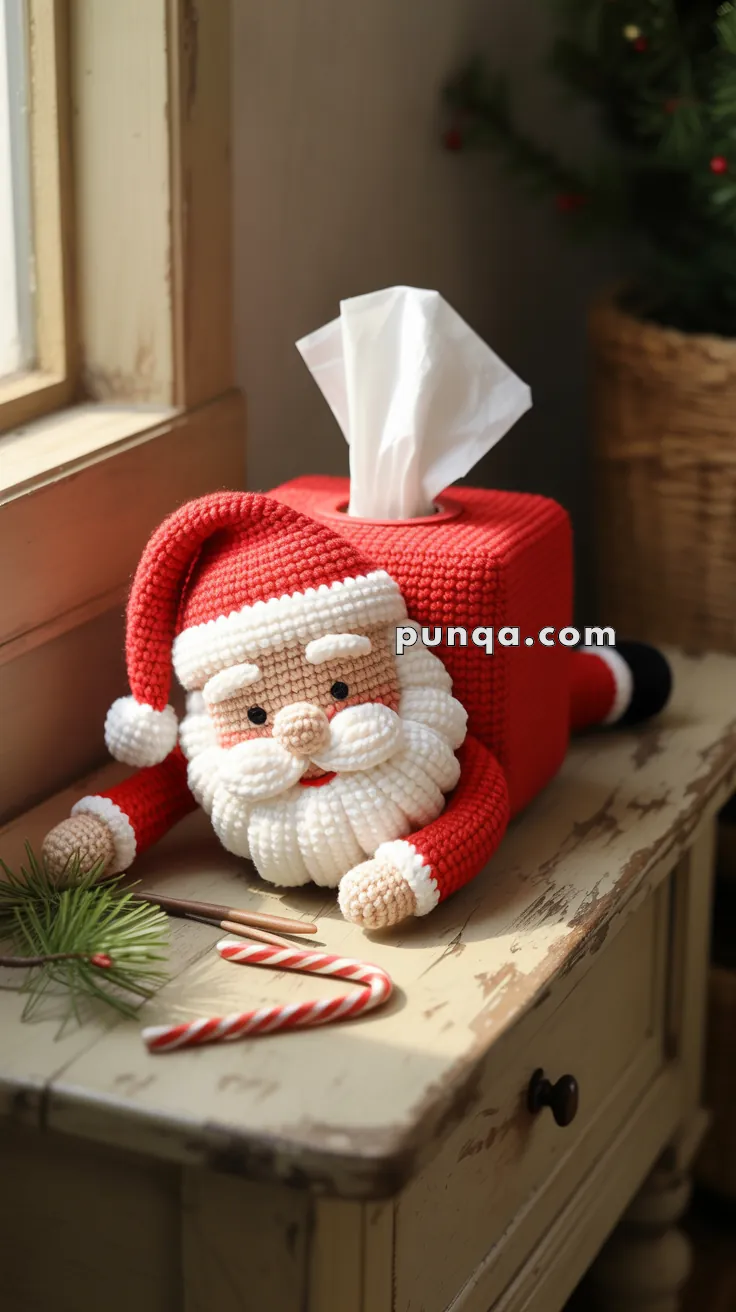
Bring festive cheer to your everyday essentials with the Amigurumi Santa Tissue Box Cover, a crochet project that’s as cozy as it is charming! 🎅🧶 This snuggly Santa leans sweetly against a crocheted cube, with tissues popping out through the top opening like a magical snowy puff. Designed to slip neatly over a standard rectangular tissue box, it transforms a simple household item into a delightful holiday decoration.
With his smiling face and classic Santa details, this cover adds instant warmth and whimsy to any room. Whether displayed in the living room, gifted to a loved one, or used as a playful accent during the holidays, the Amigurumi Santa Tissue Box Cover is a joyful way to crochet celebration, coziness, and a sprinkle of handmade magic—one loop at a time! 🧵✨🎄
🎅 Cozy Santa Tissue Box Cover – Crochet Pattern
Bring festive charm to your home with this adorable Santa tissue-box cover! This cuddly character lies comfortably in front of your tissue box with his fluffy beard, soft round nose, chunky red suit, and a long droopy hat. His arms rest forward as if leaning on the box, while his boots peek out from behind. It’s a heart-melting decoration that instantly transforms any tissue box into cheerful holiday décor.
This project is wonderfully fun to make, highly giftable, and guaranteed to brighten up your home throughout the season.
✨ Skill Level
Confident beginner to intermediate — simple shaping, sewing, and assembling.
📏 Finished Size
Fits standard rectangular tissue boxes:
23–24 cm (L) × 11–12 cm (W) × 9–10 cm (H)
Santa length: approx. 30–32 cm
🧶 Materials
Plush/Chenille Yarn (Himalaya Dolphin Baby, Bernat Blanket, etc.)
- Red: 80–100 g (Santa suit + hat)
- White: 60–80 g (beard + hat brim + trims)
- Beige/Light Skin Tone: 25–30 g (head, nose, hands)
- Black: 25–30 g (boots, belt)
- Light Pink: 5 g (cheeks)
Other Supplies:
- Black safety eyes 10–12 mm
- Crochet hook 4.0–5.0 mm
- Polyester stuffing
- Yarn needle
- Scissors
- Stitch marker
- Pom-pom maker (optional but recommended)
🪡 Abbreviations (US Terms)
MR – Magic Ring
sc – single crochet
inc – increase (2 sc in same st)
dec – invisible decrease
sl st – slip stitch
ch – chain
FLO – front loop only
BLO – back loop only
FO – fasten off
🎁 Tissue Box Cover (Slip-On Cube)
Top Panel (Red)
R1: Ch 22, sc in 2nd ch from hook and across (21).
R2–13: Ch 1, turn, sc across (21).
FO, leave tail.
This creates a 21 × 13 row rectangle, perfect for the top surface.
Oval Tissue Opening (White Trim)
Using white yarn:
Attach white 4 sts right from center.
Round the opening by working:
- 22 sl st around an oval shape
- Keep stitches tight and smooth
This forms the soft oval shape seen in the pictures.
Side Panels (Make 4 – Red)
Ch 32
R1–10: sc 31, ch 1, turn
Make four identical rectangles.
Assembly of Cube
- Sew the four side panels to the edges of the top panel.
- Sew the sides to each other to close the box shape.
- Leave bottom completely open.
- Keep seams inward for smooth outer edges.
This creates a sturdy slip-on cover that hugs the tissue box perfectly.
😊 Santa Head
Head (Beige)
R1: MR 6
R2: inc ×6 (12)
R3: (sc, inc) ×6 (18)
R4: (2 sc, inc) ×6 (24)
R5: (3 sc, inc) ×6 (30)
R6: (4 sc, inc) ×6 (36)
R7–14: sc around (36)
R15: (4 sc, dec) ×6 (30)
R16: (3 sc, dec) ×6 (24)
R17: (2 sc, dec) ×6 (18)
Stuff very firmly.
R18: (1 sc, dec) ×6 (12)
R19: dec ×6 (6)
FO.
Safety Eyes
Insert 10–12 mm eyes between Rounds 7–8, spacing 6–7 stitches apart.
⭐ Nose (Beige – Large & Round)
R1: MR 6
R2: inc ×6 (12)
R3: (sc, inc) ×6 (18)
R4–5: sc around (18)
R6: (sc, dec) ×6 (12)
FO, stuff lightly and sew centered between eyes.
💗 Cheeks (Pink, Make 2 – Lightly Stuffed)
R1: MR 6
R2: inc ×6 (12)
FO and lightly stuff.
Sew slightly under eyes.
🤍 Puffy Beard Pieces (Make 7)
Each beard puff:
R1: MR 6
R2: (inc) ×6 (12)
R3: (sc, inc) ×6 (18)
R4: sc around (18)
FO.
Arrangement:
- 3 along bottom
- 2 on each side of nose
- 1 centered lower (optional)
Sew puffs touching each other so the beard looks rounded and fluffy.
➰ Puffy Mustache (White, Make 2)
R1: MR 6
R2: (inc) ×6 (12)
R3–4: sc around (12)
Pinch one end slightly and sew both pieces under the nose.
🎩 Hat (Long & Droopy)
Ribbed Brim (White)
Ch 40
R1: sc across (39)
R2–6: BLO sc across
Join short ends to form a ring.
Hat Body (Red)
R1: Pick up 39 sts around brim
R2–6: sc around
R7: (5 sc, dec) ×6 (33)
R8–10: sc around
R11: (4 sc, dec) ×6 (27)
R12–14: sc around
R15: (3 sc, dec) ×6 (21)
R16–18: sc around
R19: (2 sc, dec) ×6 (15)
R20–22: sc around
R23: (1 sc, dec) ×6 (10)
R24–26: sc around
R27: dec ×5 (5)
FO.
Add a large white pom-pom.
The hat should be long so it naturally flops just like in the photos.
👋 Arms (Make 2)
Sleeves (Red)
R1: MR 6
R2: (sc, inc) ×3 (9)
R3–10: sc around (9)
Cuffs (White Rib)
Ch 10
R1: BLO sc across (9)
Repeat 4 rows.
Sew into a ring, attach to sleeve end.
Hands (Beige – Round)
R1: MR 6
R2: inc ×6 (12)
R3–4: sc around (12)
R5: (sc, dec) ×4 (8)
Stuff lightly, sew closed, attach to sleeves.
Position arms leaning forward as in the photo.
🥾 Legs (Red)
R1: MR 6
R2: inc ×6 (12)
R3–8: sc around (12)
FO, stuff.
🖤 Boots (Black)
R1: MR 6
R2: inc ×6 (12)
R3: (sc, inc) ×6 (18)
R4–6: sc around (18)
R7: (sc, dec) ×6 (12)
R8–9: sc around (12)
FO.
Sew legs to boots.
Attach legs behind the tissue box, angled outward.
🔧 Belt (Black)
Ch 28–30
sc 2 rows
Wrap around Santa’s belly smoothly and sew flat.
Add a small square yellow buckle (embroider or surface stitch).
🧵 Attaching Santa
- Lay Santa’s body in front of the cube.
- Sew only the front ⅓ of the body (chest area) to the lower front panel.
- Sew arms to the body so hands rest on the floor like in the picture.
- Sew legs behind the cube, pointing backward.
- Sew head to upper chest; tilt slightly forward for cuteness.
- Place hat so it flops naturally to one side.
📦 How to Insert the Tissue Box
This is super easy:
- Turn the Santa over.
- Slide your tissue box up through the open bottom of the crocheted cube.
- Pull the tissues through the oval opening.
- Set Santa down — ready to display!
🧱 How to Keep the Holder Steady
To achieve the crisp, firm cube shape:
- Crochet tight stitches.
- Place plastic canvas panels inside each wall (cut to size).
- Hot glue or stitch lightly inside so they stay in place.
- The top panel will stay perfectly flat.
- Santa will not sag or lean.
🧘 How to Keep Santa Lying Neatly
Two helpful methods:
✔ Method 1 — Add a Little Weight
Insert a few flat stones or glass pebbles in a small pouch and place it inside the center of the cube.
✔ Method 2 — Add a Stiff Back Panel
Cut a rectangle of plastic canvas and place behind Santa’s belly area.
Both help Santa stay in a relaxed, stable pose.
🎀 Finishing Touches
- Shape beard curls gently.
- Adjust hat drape.
- Flatten boots so they rest naturally.
- Smooth stuffing through seams.
- Add blush with pink pastel if desired.
This adorable Santa instantly lights up any room and creates a fun, festive way to share tissues throughout the holidays. It’s a guaranteed smile-maker and a perfect handmade December tradition.


Love your work. Thank you for sharing.