Spread holiday cheer right from the doorstep with the Santa Gnome Welcome Door Hanger, a crochet project that’s as festive as it is fun! 🎅🧶 With his oversized dotted hat, fluffy white beard, and cheerful “WELCOME” sign, this adorable gnome is ready to greet guests with warmth and charm. Perfect for hanging on your front door, wall, or holiday display, he instantly adds a handmade touch to your seasonal décor.
Quick to make and full of personality, this decoration is ideal for crocheters who love combining whimsy with tradition. Whether you’re crafting him as a centerpiece for your holiday home, gifting him to spread joy, or simply enjoying the cozy vibes he brings, the Santa Gnome Welcome Door Hanger is a joyful way to crochet celebration, hospitality, and a sprinkle of handmade magic—one loop at a time! 🧵✨🎄
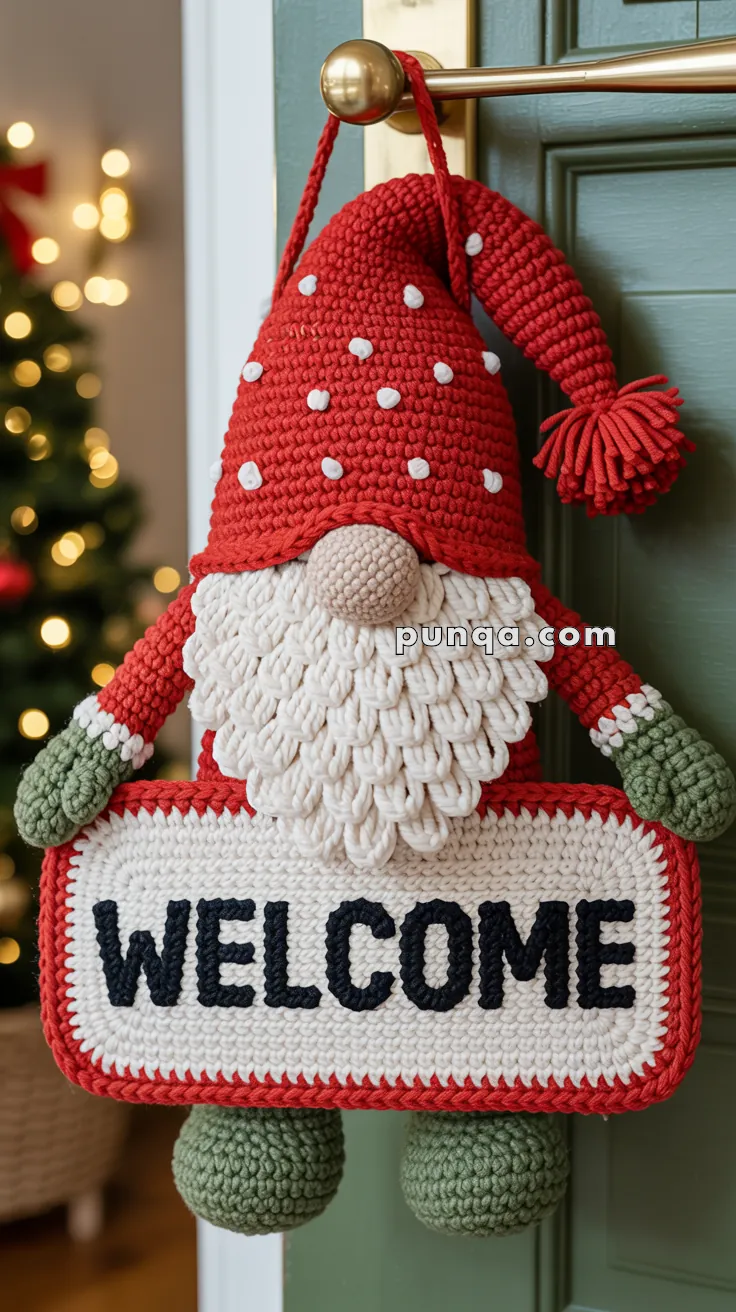
🎅 Crochet Santa Gnome Door Hanger with Welcome Sign
Welcome Christmas guests with this adorable Santa gnome door hanger! With his oversized dotted hat, fluffy white beard, and cheerful “WELCOME” sign, this festive decoration is perfect for your front door, wall, or holiday display.
Skill Level: Intermediate – you should be comfortable crocheting in the round, working flat panels, and doing loop stitch and basic embroidery.
This pattern creates a flat-backed door hanger approximately 32–34 cm tall, featuring surface loop-stitch details for the beard and a sturdy braided hanging loop.
📋 Pattern Information
- Skill Level: Intermediate
- Finished Size: ~32–34 cm tall (including hanging loop)
- Construction: Flat-backed with 3D elements (head, nose, beard)
🧶 Materials Needed
Yarn (DK/Sport Weight)
- Red – hat, body, pom-pom, hanging loop
- White – beard, hat dots, sign base, mitten cuffs
- Beige/Tan – nose
- Sage/Olive Green – mittens and legs
- Black – sign text embroidery
Other Supplies
- 3.0 mm crochet hook
- Tapestry needle
- Stitch markers
- Polyfill stuffing (small amount for head, nose, legs)
- Pins for assembly
📖 Abbreviations
- MR = Magic ring
- ch = chain
- sc = single crochet
- inc = increase (2 sc in one stitch)
- dec = decrease (invisible decrease)
- sl st = slip stitch
- FLO = front loops only
- LS = loop stitch
- FO = fasten off
- R = round
- st(s) = stitch(es)
🎨 Pattern Notes
Construction Method
This Santa is worked in multiple pieces and assembled flat:
- Head & nose – worked in rounds, stuffed firmly
- Body – two flat panels sewn together with minimal stuffing
- Arms – flat pieces attached to body sides
- Legs – lightly stuffed cylinders
- Sign – single flat panel with embroidered text
- Beard – loop stitch worked directly onto finished head
Loop Stitch Technique
To create the fluffy beard: after completing a sc, keep the loop on your hook, wrap yarn around your finger (or a ruler for consistent length), pull through to create a loop, yarn over and pull through both loops to secure. The yarn loop remains on the front of your work.
🧑🎄 Head (Beige/Tan)
Work in continuous rounds. Stuff firmly as you go.
- R1: MR, 6 sc (6)
- R2: inc in each st around (12)
- R3: (sc, inc) × 6 (18)
- R4: (2 sc, inc) × 6 (24)
- R5: (3 sc, inc) × 6 (30)
- R6–R11: sc around (30) — 6 rounds total
- R12: (3 sc, dec) × 6 (24)
Stuff head firmly.
- R13: (2 sc, dec) × 6 (18)
- R14: (sc, dec) × 6 (12)
- R15: dec × 6 (6)
FO, leaving long tail. Close opening with tapestry needle.
👃 Nose (Beige/Tan)
- R1: MR, 6 sc (6)
- R2: inc in each st around (12)
- R3: (sc, inc) × 6 (18)
- R4: sc around (18)
Stuff lightly. FO, leaving long tail for sewing.
Sew nose to center front of head, positioned where face would be (below where beard will attach).
🎩 Santa Hat (Red)
- R1: MR, 6 sc (6)
- R2: (sc, inc) × 3 (9)
- R3: (2 sc, inc) × 3 (12)
- R4: (3 sc, inc) × 3 (15)
- R5: (4 sc, inc) × 3 (18)
- R6: (5 sc, inc) × 3 (21)
- R7: (6 sc, inc) × 3 (24)
- R8: (7 sc, inc) × 3 (27)
- R9–R13: sc around (27) — 5 rounds total
Stuff base of hat very lightly (just enough to give slight shape). Do not overstuff.
- R14: sc around in FLO (27) — this creates a ridge
- R15: sc around (27)
FO, leaving long tail.
White Dots (Make 12–15)
Using white yarn:
- R1: MR, 6 sc
FO, leaving long tail. Do not stuff.
Sew dots randomly across hat surface, spacing them naturally as shown in the photo. Flatten each dot as you sew.
Hat Pom-Pom (Red)
- R1: MR, 6 sc (6)
- R2: inc in each st around (12)
- R3: (sc, inc) × 6 (18)
- R4: sc around (18)
- R5: (sc, dec) × 6 (12)
Stuff firmly.
- R6: dec × 6 (6)
FO and close. Sew pom-pom to tip of hat.
🧔 Beard (White)
The beard is created with loop stitch worked directly onto the assembled head. This is done after the head is attached to the body.
The beard covers only the lower face area (cheeks and chin). The red body remains fully visible between the beard bottom and the sign top.
Beard Base Round
With white yarn, attach to lower edge of head (below nose), working around the face area:
- Foundation: Work 1 round of sc around the lower half of head (approximately 15–18 sc, depending on coverage desired).
Loop Stitch Beard
Continue working on the beard base:
- Rounds 1–4: Work loop stitch in each st around, creating loops approximately 2–3 cm long.
Build up layers of loop stitch, working in a rounded shape that covers from below the nose down to the bottom edge of the head only. The beard should be fuller at the bottom center and taper slightly at the sides.
Tip: Work additional rounds in the center/bottom area to create extra fullness and length (3–4 cm loops in center bottom).
Stop at the head bottom edge — do not extend the beard down onto the red body.
🎅 Body (Red)
Make 2 identical panels. Work in rows, turning at the end of each row.
- Row 1: ch 16, sc in 2nd ch from hook and across (15 sc)
- Row 2–4: ch 1, turn, sc across (15 sc)
- Row 5: ch 1, turn, inc, sc 13, inc (17 sc)
- Row 6: ch 1, turn, sc across (17 sc)
- Row 7: ch 1, turn, inc, sc 15, inc (19 sc)
- Row 8–10: ch 1, turn, sc across (19 sc) — 3 rows
- Row 11: ch 1, turn, inc, sc 17, inc (21 sc)
- Row 12–15: ch 1, turn, sc across (21 sc) — 4 rows
- Row 16: ch 1, turn, dec, sc 17, dec (19 sc)
- Row 17: ch 1, turn, dec, sc 15, dec (17 sc)
- Row 18: ch 1, turn, dec, sc 13, dec (15 sc)
- Row 19: ch 1, turn, dec, sc 11, dec (13 sc)
FO.
Body Assembly
Place two body panels together (wrong sides facing). Using red yarn, whipstitch or sc around edges, leaving top open for head attachment. Add stuffing in the center belly and chest area to create gentle rounding — the body should have soft dimension but remain flat-backed for door hanging.
The body is fully visible in the finished piece, positioned between the beard (which stops at head level) and the sign (which covers the lower body area).
💪 Arms (Red with Green Mittens) – Make 2
Work in rows, turning at the end of each row.
Upper Arm (Red)
- Row 1: ch 8, sc in 2nd ch from hook and across (7 sc)
- Row 2–6: ch 1, turn, sc across (7 sc) — 5 rows total
Mitten (Sage Green)
- Row 7: Switch to green, ch 1, turn, sc across (7 sc)
- Row 8–9: ch 1, turn, sc across (7 sc)
- Row 10: ch 1, turn, dec, sc 3, dec (5 sc)
- Row 11–12: ch 1, turn, sc across (5 sc)
FO, leaving long tail.
Make 2 arms total. Keep flat (do not stuff).
White Mitten Cuffs (Make 2)
With white yarn:
- Row 1: ch 8, sc in 2nd ch from hook and across (7 sc)
- Row 2: ch 1, turn, sc across (7 sc)
FO, leaving long tail.
Sew white cuff across the color change line between red arm and green mitten on each arm.
👖 Legs (Sage Green) – Make 2
Work in continuous rounds.
- R1: MR, 6 sc (6)
- R2: inc in each st around (12)
- R3–R12: sc around (12) — 10 rounds total
Stuff firmly. FO, leaving long tail for sewing.
Make 2 legs.
🪧 Welcome Sign
Sign Base (White with Red Border)
Work in rows, turning at the end of each row.
- Row 1: With white, ch 40, sc in 2nd ch from hook and across (39 sc)
- Row 2–18: ch 1, turn, sc across (39 sc) — 17 rows total
Do not FO.
Border
- Round 1: With red, ch 1, work sc evenly around entire sign:
- sc in each st across top edge
- work 3 sc in corner
- sc evenly down side (approx 18 sc)
- work 3 sc in corner
- sc in each st across bottom edge
- work 3 sc in corner
- sc evenly up other side (approx 18 sc)
- work 3 sc in corner
- sl st to first sc
- Round 2: ch 1, sc in each st around, working 3 sc in each corner st, sl st to first sc
FO and weave in ends.
Text Embroidery
Using black yarn and tapestry needle, embroider “WELCOME” in large block letters across the center of the white sign area.
- Letter sizing: Each letter should be approximately 3–4 cm tall
- Technique: Use backstitch or duplicate stitch to create bold, clear letters
- Spacing: Space letters evenly with small gaps between each
Practice letter placement with removable markers before embroidering permanently.
🔗 Hanging Loop (Red)
- Ch 50–60 (adjust length so loop extends 7–9 cm above hat tip when attached)
- Row 1: sl st in 2nd ch from hook and in each ch across
- Row 2: ch 1, turn, sl st in each st across
- Row 3: ch 1, turn, sl st in each st across
FO, leaving long tails at both ends.
This creates a sturdy braided/corded appearance.
🧩 Assembly Instructions
Follow this order for best results:
Step 1: Attach Head to Body
Position head at top center of body. The beard will slightly overlap the body top. Sew securely all around the neck area.
Step 2: Create Beard
Now that head is attached, work the loop-stitch beard directly onto the head surface as described in the beard section. The beard should cover the lower face only (from nose to bottom of head).
Important: Keep the beard at head level — do not extend it down onto the body. The red body should be fully visible between the beard and the sign.
Step 3: Attach Nose
If not already done, sew nose to center front of head, positioned in the middle of the face area.
Step 4: Attach Hat
Position hat on top of head, tilted slightly back so the nose is fully visible. Sew hat securely to head all around the base edge.
Step 5: Attach Arms
Sew arms to sides of body, positioned wide apart and angled slightly downward. The arms should point down naturally when hung. Keep arms flat against body.
Step 6: Attach Legs
Sew legs to bottom edge of body, spaced apart. Position them pointing straight down.
Step 7: Attach Sign
Position the WELCOME sign across the front of the body at belly/lower chest level. The sign should cover the lower portion of the body but not the upper body — you should see red body visible between the bottom of the beard and the top of the sign.
Sign Attachment Method:
- Position the sign so the top edge sits at mid-body level (not up at the neck)
- Fold the top corners of the sign slightly back
- Sew the top edge/corners to the front of each green mitten, so it appears the gnome is holding the sign
- The sign should hang naturally in front of the lower body, partially covering the belly area
- Red body should be clearly visible above the sign
Step 8: Attach Hanging Loop
Fold the braided loop in half to create a strap. Sew both ends securely to the back of the hat at the base (where hat meets head). Reinforce well so it can support the weight.
🎄 Finishing Touches
- Shape the beard: Gently fluff and arrange the loop-stitch beard to create natural, flowing layers. Trim any loops that are too long or uneven.
- Position the hat dots: Ensure white dots are distributed naturally across the hat surface.
- Adjust the sign: Make sure the sign hangs straight and flat against the body.
- Check the hang: When hanging from the door knob, your Santa should hang straight with the sign and legs vertical.
- Steam blocking (optional): Lightly steam the body and sign areas to flatten and smooth if needed.
💡 Tips for Success
- Loop stitch consistency: Use a ruler or cardboard strip held behind your work to keep all beard loops the same length.
- Flat construction: Remember this is a door hanger — keep the body, arms, and sign flat. Only the head, nose, legs, and beard should have dimension.
- Sign letters: Practice your text embroidery on a test swatch first. Bold, simple block letters work best.
- Sturdy hanging: Reinforce the hanging loop attachment with extra stitches — this needs to support the full weight of your project.
- White dots: For perfectly round dots, flatten them as you sew and secure the edges well.
📸 Display Ideas
- Hang on your front door to welcome holiday guests
- Display on interior doors or walls
- Add to a gallery wall of holiday décor
- Hang from a decorative hook in your entryway
- Gift to friends and family as a handmade holiday treasure
✨ Customization Options
- Change the message: Embroider “JOY,” “NOEL,” “HO HO HO,” or a family name instead of “WELCOME.”
- Add embellishments: Sew small jingle bells to the hat or pom-pom for sound.
- Adjust the size: Use bulky yarn and a larger hook for a bigger door hanger.
- Color variations: Try a blue coat for a different look, or use cream instead of white for vintage vibes.
📝 Design Details
This pattern is designed to match the photo reference, featuring:
- Oversized red hat with white polka dots
- Fluffy white loop-stitch beard (covering lower face only)
- Large beige nose
- Visible red body between beard and sign
- Sage green mittens with white cuffs
- Sage green legs
- White “WELCOME” sign with red border
- Red braided hanging loop
- Flat-backed construction with gentle dimension for door hanging
Skill building: This pattern helps you practice loop-stitch technique, flat panel construction, color changes, and text embroidery.
❤️ About This Pattern
This cheerful Santa gnome door hanger brings warmth and whimsy to your holiday decorating. The oversized hat and flowing beard give him personality, while the welcome sign makes him perfect for greeting guests throughout the Christmas season.
The flat-backed design ensures he hangs beautifully against any door or wall without flopping or twisting. His sturdy construction means he’ll become a treasured part of your holiday traditions for years to come.
Happy Crocheting! 🎄