Step into fall with the Pumpkin Baby Booties, a cozy crochet project that’s as festive as it is adorable! 🎃🧶 These tiny treasures feature a rich orange hue, ribbed texture to mimic pumpkin ridges, and a playful green stem detail that brings the whole look together. Perfect for autumn strolls, Halloween costumes, or seasonal photo shoots, these booties wrap little toes in warmth and whimsy.
Ideal for crocheters who love themed accessories and thoughtful gifts, this pattern offers just the right mix of charm and practicality. You can customize the shades, add leaf appliqués, or pair them with a matching hat for extra cuteness. Whether you’re crafting for a newborn, a baby shower, or just celebrating your love of fall, the Pumpkin Baby Booties are a delightful way to stitch up seasonal joy—one snug little loop at a time! 🍂👶
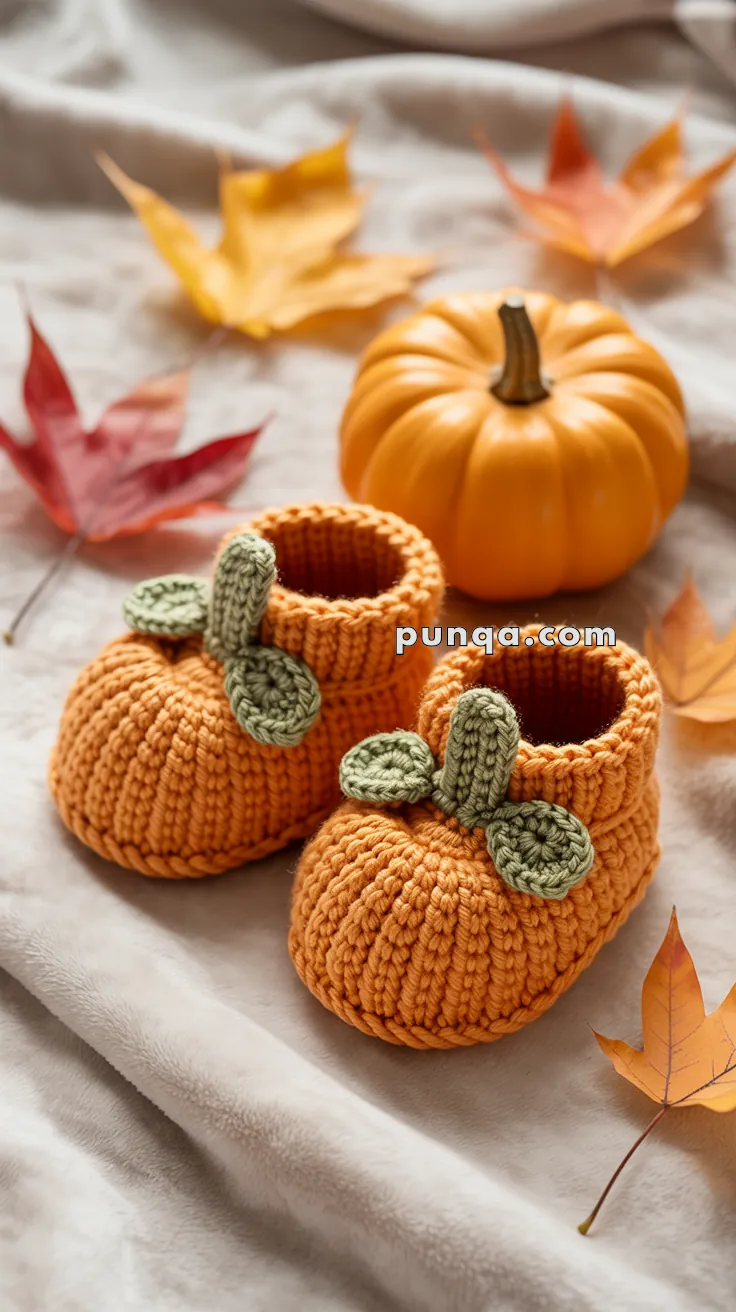
🎃 Chunky Pumpkin Baby Booties Crochet Pattern
Welcome to the coziest fall project ever! These adorable pumpkin booties feature deep, satisfying ridges, a snug ribbed cuff, and the cutest little stem with leaves. Perfect for Halloween photos, Thanksgiving gatherings, or as a heartfelt handmade gift for the tiny pumpkin in your life! 🍂
✨ Skill Level
Intermediate – You’ll be working in the round, creating textured ridges with back loop only stitches, shaping with increases and decreases, and assembling small pieces.
📏 Finished Sizes
- 0–6 months: Sole length 9–10 cm (3.5–4 in)
- 6–12 months: Sole length 11–12 cm (4.25–4.75 in)
- 12–18 months: Sole length 12–13 cm (5 in)
💡 Tip: The chunky yarn creates a plush, stretchy bootie that accommodates growing feet beautifully!
🧶 Materials You’ll Need
Yarn:
- Bulky weight yarn (#5) OR two strands of worsted weight (#4) held together
- Orange: 60–80 yards per pair (depending on size)
- Green: 15–20 yards per pair
Recommended yarns: Lion Brand Wool-Ease Thick & Quick, Bernat Blanket, or any soft bulky yarn
Other Supplies:
- Crochet hook: 5.0 mm (H) for 0–6 months, 5.5 mm (I) for larger sizes
- Stitch marker
- Yarn needle for weaving and sewing
- Scissors
- Small amount of polyfill stuffing (for stem)
- Measuring tape
📖 Abbreviations (US Terms)
- MR – Magic Ring
- ch – chain
- sc – single crochet
- hdc – half double crochet
- dc – double crochet
- inc – increase (2 sts in same stitch)
- dec – invisible decrease (hdc2tog or sc2tog)
- sl st – slip stitch
- BLO – back loop only
- FLO – front loop only
- FO – fasten off
- ( ) – total stitch count
🎯 Gauge
10 hdc BLO × 8 rounds = 4 inches (10 cm) in bulky yarn
Don’t stress too much about gauge for baby booties, but if your fabric is too loose, go down a hook size. If it’s too tight, go up!
📝 Important Notes Before You Start
- Work in continuous spiral throughout (don’t join rounds unless specified)
- Use stitch marker to track beginning of each round, moving it up as you go
- BLO creates the pumpkin ridges – make sure you’re only catching the back loop!
- Count your stitches at the end of each round to stay on track
🍂 Let’s Start Crocheting!
Sole (Make 2 per bootie in Orange)
The sole is worked in a continuous spiral. We’ll start with regular stitches, then switch to BLO for texture.
For 0–6 months:
Foundation: Ch 11
Round 1: Starting in 2nd ch from hook: sc 9, 4 sc in last ch. Working on opposite side of chain: sc 8, 2 sc in last ch. Place marker at beginning. (24)
Round 2 (switch to BLO): BLO: 2 sc, inc, sc 8, inc ×4, sc 8, inc ×3 (32)
Round 3: BLO: sc 3, inc, sc 9, (sc 2, inc) ×4, sc 9, (sc 2, inc) ×2 (38)
Round 4: BLO: sc around (38)
For 6–12 months: After Round 4, add:
- Round 5: BLO: sc 4, inc, sc 11, (sc 3, inc) ×4, sc 11, (sc 3, inc) ×2 (44)
- Round 6: BLO: sc around (44)
For 12–18 months: After 6–12 month rounds, add:
- Round 7: BLO: sc 5, inc, evenly space 8 more increases around (54)
- Round 8: BLO: sc around (54)
💡 The sole should cup slightly upward – this is perfect! It helps create that rounded pumpkin bottom.
Pumpkin Body (Orange, continuing from sole)
Continue working in BLO for all body rounds. This creates those gorgeous deep ridges!
0–6 months (continuing with 38 sts):
Rounds 5–10: BLO: hdc around (38) – Work 6 rounds total
🎃 See those ridges forming? Each round creates another beautiful vertical line!
Round 11 (begin shaping): BLO: hdc 13, dec ×6, hdc 13 (32)
Round 12: BLO: hdc 11, dec ×5, hdc 11 (27)
Round 13: BLO: hdc 9, dec ×4, hdc 10 (23)
Round 14: BLO: hdc 8, dec ×4, hdc 7 (19)
Round 15: BLO: hdc 6, dec ×3, hdc 7 (16)
💡 Stuffing checkpoint: Gently stuff the bootie with your hands to emphasize the pumpkin shape. Don’t overstuff – just enough to make those ridges pop!
For 6–12 months (continuing with 44 sts):
Rounds 7–12: BLO: hdc around (44) – Work 6 rounds
Round 13: BLO: hdc 15, dec ×7, hdc 15 (37)
Round 14: BLO: hdc 13, dec ×5, hdc 14 (32)
Round 15: BLO: hdc 11, dec ×5, hdc 11 (27)
Round 16: BLO: hdc 9, dec ×4, hdc 10 (23)
Round 17: BLO: hdc 8, dec ×4, hdc 7 (19)
Round 18: BLO: hdc 6, dec ×3, hdc 7 (16)
For 12–18 months (continuing with 54 sts):
Rounds 9–14: BLO: hdc around (54) – Work 6 rounds
Round 15: BLO: hdc 19, dec ×8, hdc 19 (46)
Round 16: BLO: hdc 16, dec ×7, hdc 16 (39)
Round 17: BLO: hdc 14, dec ×5, hdc 15 (34)
Round 18: BLO: hdc 12, dec ×5, hdc 12 (29)
Round 19: BLO: hdc 10, dec ×4, hdc 11 (25)
Round 20: BLO: hdc 8, dec ×4, hdc 9 (21)
Round 21: BLO: hdc 7, dec ×3, hdc 8 (18)
Ribbed Cuff (Orange)
All sizes end with 16–18 stitches. Continue from body:
Round 1: BLO: sc around (16–18 depending on size)
Rounds 2–6: BLO: sc around (16–18) – Work 5 more rounds (6 rounds total)
The back-loop-only stitches create horizontal ribbing that’s super stretchy and comfortable for little ankles.
Sl st to next st, FO, leaving a 6-inch tail to weave in.
Stem (Green)
Round 1: Make a magic ring, 8 sc into ring, pull tight. Place marker. (8)
Rounds 2–5: sc around (8) – Work 4 rounds total
Stuff firmly with polyfill so the stem stands up proudly.
Round 6: sc2tog around (4)
FO, pull yarn through remaining stitches to close, leaving a 10-inch tail for sewing.
Leaves (Make 2 per bootie in Green)
These adorable little leaves have a natural teardrop shape.
Foundation: Ch 7
Leaf shaping: Starting in 2nd ch from hook: sl st in first ch, sc in next ch, hdc in next ch, dc in next ch, hdc in next ch, sc in last ch.
Now work down other side of chain: sl st in same ch as beginning sl st.
FO, leaving an 8-inch tail for sewing.
💚 You should have a symmetrical leaf shape! Gently pinch and curve each leaf as you sew it on to create dimension.
🧩 Assembly Time!
This is where your pumpkin booties come to life!
Step 1: Attach the Stem
Position the stem at the center front of the bootie, about ½ inch (1 cm) back from the opening edge. The closed top of the stem should point upward.
Using the long tail and yarn needle, sew the stem securely by stitching through the base in a circle, catching the bootie fabric underneath. Go around 2–3 times for security. The stem should stand perpendicular to the bootie opening.
Step 2: Attach the Leaves
Position the two leaves at the base of the stem on either side, angled outward and slightly forward at roughly 45-degree angles (like a “V” shape pointing toward the toe). The leaves should overlap very slightly at their bases where they meet the stem.
Sew each leaf in place by catching just the center/base of the leaf (about 3–4 stitches worth), leaving the tips and sides free to curl naturally and create dimension.
Step 3: Final Touches
Weave in all remaining ends on the inside of the bootie. Gently shape the booties with your hands, emphasizing the pumpkin ridges by running your finger down each vertical line. Make sure the cuff rolls naturally at the top.
🎨 Styling Variations
Color Options:
- 🤍 White body with orange stem & leaves for ghost pumpkins
- 💚 All green for adorable squash booties
- 🧡 Variegated fall colors for a harvest look
- 🎃 Add a black face with surface crochet or felt for jack-o’-lanterns!
Texture Ideas:
- Use velvet yarn for ultra-plush pumpkins
- Try cotton yarn for year-round wear
- Sparkle yarn for fancy fall photos ✨
💡 Pro Tips for Success
Getting Perfect Ridges: Keep your tension consistent throughout all the BLO rounds. The ridges should be deep and defined – if they’re shallow, you might be accidentally catching both loops. Pull each stitch snug but not tight.
Troubleshooting Wavy Edges: If your sole is ruffling or waving, you may have too many increases. Try skipping 1–2 increases in Round 3. If it’s cupping too much, add 1–2 increases.
Even Shaping: When working decrease rounds, spread your decreases evenly around the bootie rather than clustering them all in one area. This prevents lumpy or uneven shaping.
Sizing Up or Down: The beauty of bulky yarn is it grows quickly! To adjust sizing, simply add or subtract one increase round on the sole and 1–2 rounds in the body.
Keeping Track: Use a row counter or make tick marks on paper for each round – it’s easy to lose count when you’re in the zone!
Gifting These Cuties: Make a matching pair in multiple sizes so baby can wear them through their first fall season. Package them in a clear box with some decorative fall leaves for an adorable presentation! 🎁
Photography Magic: These booties photograph beautifully with real mini pumpkins, fall leaves, and cozy blankets. Golden hour lighting makes the orange yarn absolutely glow! 📸
🧵 Yarn Substitution Guide
If using worsted weight doubled:
- Hold two strands together throughout entire project
- Use a 5.0–5.5 mm hook
- Total yardage needed: 120–160 yards orange, 30–40 yards green
If using super bulky (#6):
- Use a 6.0 mm hook
- Work fewer body rounds (subtract 1–2 rounds)
- Yardage: 50–70 yards orange, 12–18 yards green
Budget-friendly option:
- Acrylic bulky yarn works beautifully and is machine washable
- Look for Red Heart Super Saver Jumbo or Caron One Pound
❓ Frequently Asked Questions
Q: Why are my ridges not as deep as in the photo? A: Make sure you’re using bulky yarn (or doubled worsted) and working consistently in BLO. Tighter tension also helps create more pronounced ridges.
Q: Can I make these for an adult? A: Absolutely! Start with a longer foundation chain (ch 18–20) and add more increase rounds. You’ll need about 150 yards of bulky yarn for adult slippers.
Q: How do I keep the cuff from rolling down? A: The BLO ribbing should provide good grip. If needed, work 1–2 extra rounds on the cuff, or use a slightly smaller hook for just the cuff section.
Q: Can these be machine washed? A: If you use acrylic or superwash wool, yes! Wash on gentle cycle in a mesh bag and lay flat to dry. Avoid machine washing regular wool or cotton blends.
🍁 Final Thoughts
These chunky pumpkin booties are guaranteed to steal hearts everywhere baby goes! The deep ridges, plump shape, and adorable stem with leaves create an irresistible autumnal accessory. They work up quickly thanks to the bulky yarn, making them perfect for last-minute gifts or craft fair inventory.
The best part? Watching those tiny toes wiggle inside their cozy pumpkin homes! Whether you’re making them for your own little one, a friend’s baby shower, or a seasonal photo shoot, these booties bring warmth, whimsy, and serious cuteness to fall wardrobes.
Each pair takes approximately 2–3 hours to complete once you get into a rhythm, making them an ideal weekend project. The repetitive BLO rounds are actually quite meditative, and before you know it, you’ll have an adorable pair ready to gift (or keep – no judgment!).
Happy crocheting, and enjoy your harvest of handmade adorableness! 🎃🧶👶


So fun